Windows devices usually have Dynamic IP addresses by default. Although this is the most commonly used IP setting, some special circumstances might require you to use a static IP address. Such circumstances include using a VPN or wanting external devices like a printer to remember your computer. Some websites or remote access methods also require a static IP to facilitate a secure connection. Such websites whitelist an IP address, making connections easier and faster. Static IP addresses are also essential when using port forwarding since some older routers might misbehave if you use a dynamic IP address.
So, if we were to use dynamic IP addresses in such scenarios, we would encounter problems.
Dynamic IPs often change when the connection is lost or when the allocated IP is no longer needed. Therefore, whenever an IP is needed, your system will provide a new IP address making it hard for other devices and websites to remember your computer.
The Windows 10 operating system allows users to set a static IP address through various methods. Unfortunately, the available instructions are usually not concise or understandable. Therefore, the article will guide you through the process of setting up a working static IP for your Windows 10 device.
Note that all the procedures listed here assume that you are already connected to the network on which you want to use a static IP.

CONTENTS
1. Using the Command Prompt
The command prompt or CMD is one of the ways that allows you to change IP address settings on your Windows device. You can use it to set a Static IP, although the procedure can be hard to follow for many users. If this procedure seems too complicated, you can try the others described below.
- First, click on the taskbar’s search icon (the magnifying icon).
- Type CMD in the search box and right-click on the first option.
- Next, click on the Run as Administrator option.
- View your current network configurations by entering the command ipconfig/all in the CMD window.
- Check for the following address information under the network adapter you are using. That is, either the Ethernet or Wireless LAN adapter.
- Subnet mask
- IPV4 address
- DNS Server address
- Default Gateway
- Then set a new static IP by entering the following command:
netsh interface ip set address name=”Ethernet0″ static 192.168.1.128 255.255.255.0 192.168.1.1
Note: Remember to replace the Ethernet0 in the above command with your current adapter name. That could be either Ethernet0, Ethernet1, or Wi-Fi.
Also, change the first 192.168.1.128 address to match the IPV4 address you found in the previous step. Change the second 192.168.1.1 to match your Windows default gateway address from the previous step above.
Typically, the subnet mask is 255.255.255.0, but if it is different on your device, change it to match.
- Set the DNS server address using the command netsh interface ip set dns name=”Ethernet0″ static 10.1.2.1
Note: Remember to change Ethernet0 from the command above to whatever network adapter you use to access the internet. Also, 10.1.2.1 from the above command should match the DNS server addresses gotten in the fifth step.
- Assign an alternate DNS address using the command netsh interface ip add dns name=”Ethernet0″ 8.8.8.8 index=2
Note: Remember to change Ethernet0 to the adapter you are using. The 8.8.8.8 DNS address is Google’s, which works in most cases. You can change it to your preferred alternative DNS address.
- Using a ping command, you can check if the new settings are working. For instance, while still in the CMD window enter ping www.google.com to ping the google website. Alternatively, you can open a website in your browser and see if it loads.
Ways to Set a Static IP in Windows 10
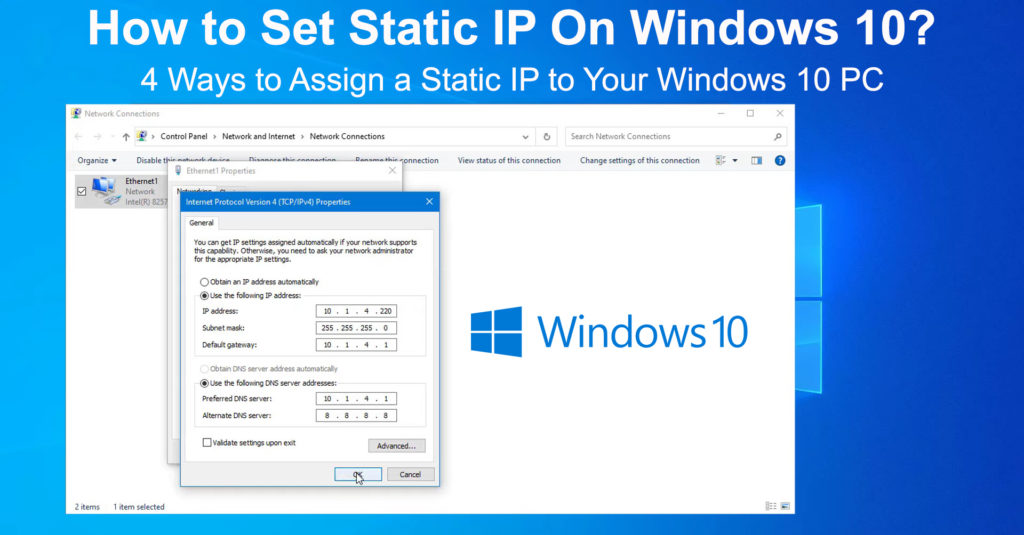
2. Using the Control Panel
If using the command prompt is cumbersome, you can use the control panel to achieve the same results. Simply follow the steps below.
- Click on the search icon and type Control panel, then hit enter.
- Then navigate Network and Internet>Network and Sharing center
- Next, click on the Change Adapter Settings on the left side
- Right-click on the network adapter you are using on the new window that will appear.
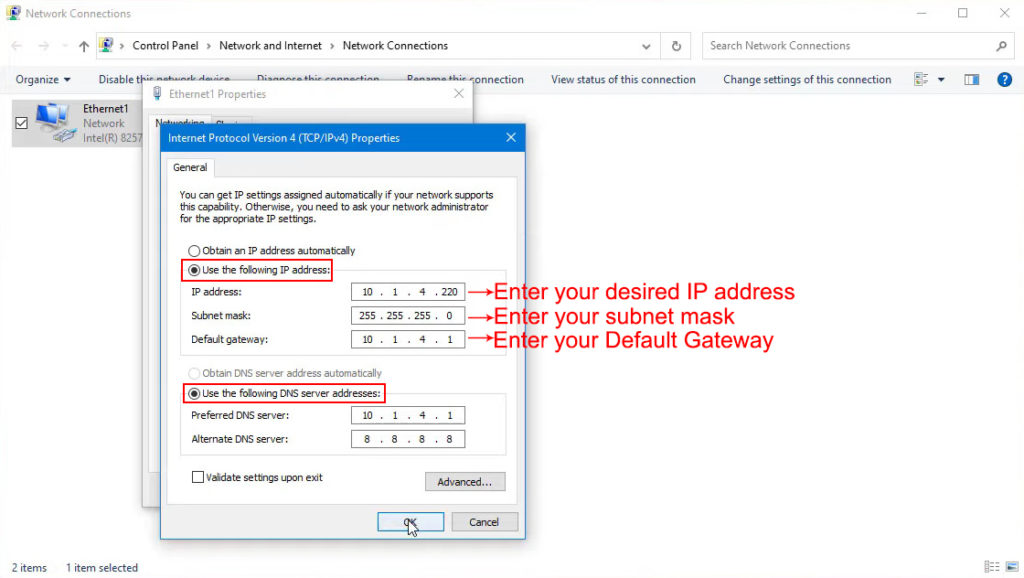
- Select Properties, then click Internet Protocol Version 4 (TCP/IPv4) on the new tab.
- Next, click on Properties on the same tab and select Use the following IP address.
- Enter your preferred static IP address in the IP address box.
- Next, enter a Subnet mask address. A common subnet mask address is 255.255.255.0
- Then enter a Default Gateway address. Here you can use your router’s IP address.
- Finally, enter a DNS server address in the Preferred DNS server address box.
- You can also provide an alternative DNS address; however, this step is optional.
- Click OK and close all the open tabs. Open a web browser to see if the configurations are working.

3. Using the Windows Settings
You can also apply a static IP address through Windows settings by:
- Hit the Start key, then click on the Settings icon.
- Next, navigate Network and Internet>Wi-Fi or Ethernet, depending on which adapter you are using.
- Click on the connected Wi-Fi network name
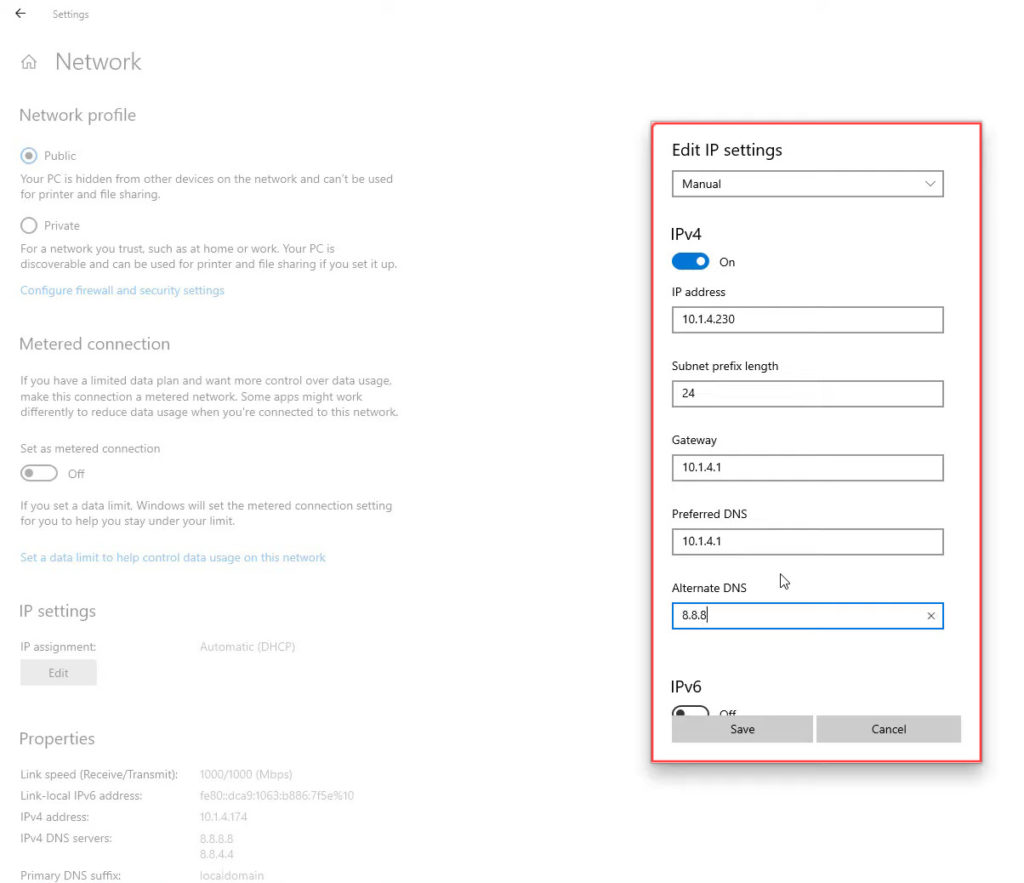
- Scroll to IP Settings and click Edit
- Change the option from Automatic (DHCP) to Manual on the drop-down menu.
- Next, turn on IPV4 by clicking on the toggle switch
- Enter your preferred IP address in the IP address box
- Enter the 24 in the Subnet prefix length box, assuming you will use the 255.255.255.0 subnet mask.
- Enter your router’s IP address in the Gateway box and a DNS address of choice in its respective box.
- You can also provide an alternative DNS address before clicking Save to finalize the settings.

Remember to check if the new configurations work using a web browser to connect to the internet.
4. Using Windows PowerShell
You can also change the IP settings using Windows PowerShell by following these steps;
- Click on the Search icon and Enter PowerShell.
- Right-click on the first result to run PowerShell as an administrator
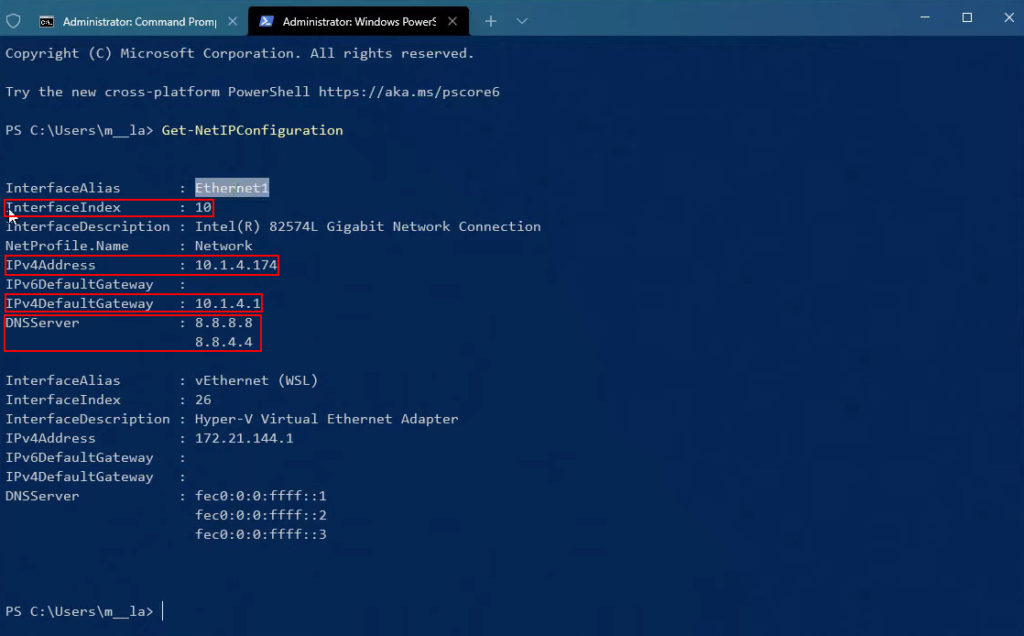
- Use the command Get-NetIPConfiguration and hit enter to access your connection configurations
- Note the following information in a separate place, book, or notepad
- IPv4DefaultGateway
- InterfaceIndex
- DNSServer
- IPv4Address

- Use the command New-NetIPAddress -InterfaceIndex 4 -IPAddress 10.1.2.220 -PrefixLength 24 -DefaultGateway 10.1.2.1 to configure a static IP.
Note: Ensure you use the Interface index number acquired in the previous step. Number four is used in the command above for illustration purposes only.
Also, use an IP address of your choice, i.e., the Static IP you want to apply. You can also change PrefixLength to the one you wish to; however, the default can also work.
The DefaultGateway address should correspond to that of your router.
- Use the command Set-DnsClientServerAddress -InterfaceIndex 4 -ServerAddresses 10.1.2.1 to use your preferred DNS address.
Note: Remember to substitute the InterfaceIndex with the one on your computer and the DNS address with the one you prefer.
- You can also use a comma at the end of the above command, then add an alternative DNS address if you have one and want to use it.
Conclusion
Meddling with IP address settings can hinder your Windows 10 device from connecting to the internet. Therefore, ensure you understand all the settings you are updating to avoid additional connectivity issues.
Recommended reading:
- How to Use a Microsoft Virtual Wi-Fi Miniport Adapter? (What Is It and How to Enable It?)
- How to Connect Printer to MacBook Wirelessly (Detailed Instructions)
- How to Connect Two Computers Using Wi-Fi on Windows 10? (Connecting Computers Wirelessly)
Also, if you followed any of the procedures above, your Windows 10 device will use a static IP address. Remember to revert to a dynamic IP address setting once done with the static IP to avoid future connection issues.
On the same note, ensure that other devices in your home do not use the IP address you chose.

Hey, I’m Jeremy Clifford. I hold a bachelor’s degree in information systems, and I’m a certified network specialist. I worked for several internet providers in LA, San Francisco, Sacramento, and Seattle over the past 21 years.
I worked as a customer service operator, field technician, network engineer, and network specialist. During my career in networking, I’ve come across numerous modems, gateways, routers, and other networking hardware. I’ve installed network equipment, fixed it, designed and administrated networks, etc.
Networking is my passion, and I’m eager to share everything I know with you. On this website, you can read my modem and router reviews, as well as various how-to guides designed to help you solve your network problems. I want to liberate you from the fear that most users feel when they have to deal with modem and router settings.
My favorite free-time activities are gaming, movie-watching, and cooking. I also enjoy fishing, although I’m not good at it. What I’m good at is annoying David when we are fishing together. Apparently, you’re not supposed to talk or laugh while fishing – it scares the fishes.
