
Today we tend to share our Wi-Fi password with all our guests and visitors, without thinking that this represents a severe security risk for our wireless home network. The problem is that our visitors can accidentally download a virus or other malware that can easily infect all the devices within the network. On the other hand, when they have access to our network they can easily login to your router admin dashboard and mess up with you and your network if they want.
One of the best ways to prevent this is to create a Guest Wi-Fi network. In this article we are going to discuss why you should have a Guest Wi-Fi, how to set it up, and also provide some additional tips and tricks about that matter.

CONTENTS
Why Should You Set Up A Guest Wi-Fi Network?
The guest Wi-Fi network will keep your guests and visitors away from your primary wireless network. It will provide internet access for your friends and visitors, but they won’t have access to the primary network. Just as the name implies, it is a network for guests only.
In case your guests download malware to their devices by accident it won’t spread to other devices connected to your primary network. Also, they won’t have the possibility to access the router settings if they want to do that for some reason.
As you can see, this is an excellent solution – your guests can connect to the internet and your home wireless network is safe.
What Do You Need To Get Started?
Although it sounds complicated, it is not that difficult to set up a guest Wi-Fi. Basically, all you need to do is to login to your router settings, find the Guest Wi-Fi options and enable it. Then you need to secure the Guest Wi-Fi and you are good to go.
So, in order to start creating your Guest Wi-Fi network first you have to check whether your router supports this option. You can check that when you access your router settings. Then, you need to have access to the primary network either using the network cable or over Wi-Fi. You also need to know the router’s default IP address, admin username, and password. And finally, you need a device like a computer, tablet, or smartphone to connect to the router and make all the necessary changes.
Logging Into Your Wi-Fi Router
As we have mentioned before the first thing to do is to connect your device to the network and login to the router admin dashboard.
After you connect your device you need to launch the web browser you normally use. After that enter the default router IP in the URL bar and hit the network button if you are using a computer, or tap on Go or the return key if you are using a tablet or a smartphone.
In most cases the default router IP is 192.168.1.1 or 192.168.0.1, but there are also other IP addresses that can be used instead. If you don’t know the default IP, check the label under the router and see if the default IP address is printed there. If it is, try to enter that one in the browser’s URL bar. If the IP is correct you will be asked to enter a username and a password. But if the IP is wrong then you will either see a blank page or an error message saying “This site can’t be reached”. In that case, you need to find the router IP address by yourself. You can follow the guide we have prepared for you.

After you see the router login page you need to enter the admin username and password, or just the password. This depends on the wireless router you are using at the moment. The admin username and password should be printed on the router label as well. If you don’t have this label on your router you can try using some of the common username/password combinations like:
- admin/admin
- admin/password
- user/password
- admin/leave it bank
- user/leave it blank
- root/password
If none of these works, search our website for a router login guide for your router,
After you login to your router successfully, it is time to create our Guest network.
Creating Your Guest Network
In the wireless router admin dashboard, you need to find the Guest network section. In most cases, it is under the Wireless section, but let’s see where you can find it depending on the router brand:
ASUS
If you are using an ASUS wireless router the guest network is clearly labeled in the menu on the left as Guest Network. You will find it almost immediately.
BELKIN
Belkin router users will find this section listed in the Wireless section as Guest Access.

NETGEAR
Netgear users will find this option labeled as Guest Network at the end of the left-hand menu in Network genie.
TENDA
Tenda users will find this option in the menu on the left listed as Guest Network.

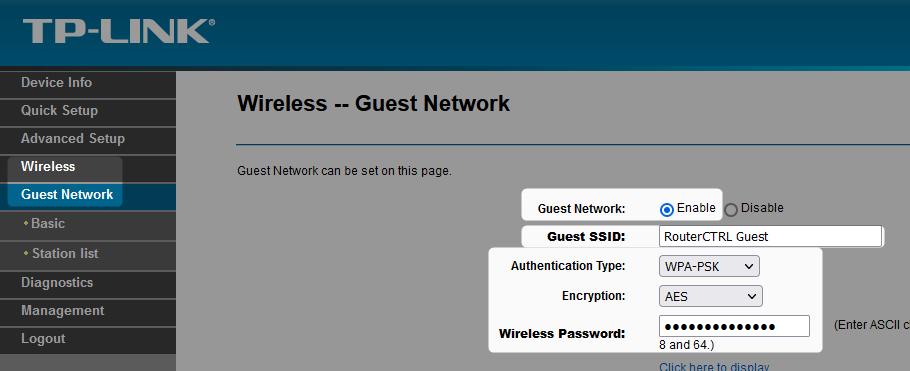
TP-LINK
If you are a TP-Link user this option will also be listed as Guest Network in the left-hand menu.
As you can see this option is clearly labeled as Guest Access or Guest Network, so if you are using a router of another brand, look for these or something similar, like Guest Zone and so on.
After you find this section, you will need to enable the Guest Wi-Fi Network option by clicking the ON/OFF toggle button or checking the radio button next to Enable.
After you do this, a set of additional options will open allowing you to personalize and secure the Guest Wi-Fi network.
Recommended reading:
- How to Connect PS4 to Hotel Wi-Fi? (A Step-by-Step Guide)
- How to Share a Wi-Fi Password From iPhone to iPhone? (Step-by-Step Guide)
- How to Check How Many Devices are Connected to Wi-Fi? (A Detailed Guide)
Securing Your Guest Network
Just as you take care of your home network security, it is recommended to secure your Guest Wi-Fi as well. This will prevent any unauthorized access and abuse.
Once you enable the Guest Wi-Fi the first option you are going to see is to name your guest network. You can clearly state that it is a guest network by adding GUEST at the end of the network name, but you don’t have to do that. In the Network Name (SSID), Guest SSID or WiFi Name field enter the name of your Guest Network.
Now we need to protect our Guest Wi-Fi with a password. Here you can set up an easy-to-remember one. There is no need to come up with something extremely complicated.
As Authentication Type choose WPA/WPA2-PSK or just WPA2 if your router offers that option.
Enter the guest password in the Password, Guest Network Password, or Wireless Password field.
Click the Save or Apply button to save the changes and you are good to go. In a minute you will see the Guest WI-Fi Network name on the list of available networks.
Tips And Tricks
1. Make sure the Guest Wi-Fi password is strong but memorable. You really don’t want to look out for the paper where you have written it.
2. You can generate a QR code on qifi.org that you can print out and let your guests scan the QR code with their smartphones and connect to the network automatically. By doing this, you don’t have to remember the Guest Wi-Fi password and they don’t have to type it.
3. Some routers will let you limit the bandwidth your guests can use, as well as the internet speed. You really shouldn’t let your guests download large files from the internet at maximum speed. Just give them their share for normal internet browsing.

4. Check whether there are some options regarding limiting the usage of your network. You can prevent your users from using your network printer and other devices, or you can just limit the maximum number of users that can be connected at the same time.
Conclusion
If you have followed these steps carefully we are sure you are enjoying your new Guest WiFi network now. As you can see it isn’t that difficult to create and secure it. Just think of it as an additional layer of security for your primary home network. Your guests and visitors will definitely enjoy the time they spend at your place more.

Hey, I’m David. I’ve been working as a wireless network engineer and a network administrator for 15 years. During my studies, I also worked as an ISP field technician – that’s when I met Jeremy.
I hold a bachelor’s degree in network engineering and a master’s degree in computer science and engineering. I’m also a Cisco-certified service provider.
In my professional career, I worked for router/modem manufacturers and internet providers. I like to think that I’m good at explaining network-related issues in simple terms. That’s exactly what I’m doing on this website – I’m making simple and easy-to-follow guides on how to install, set up, and troubleshoot your networking hardware. I also review new network equipment – modems, gateways, switches, routers, extenders, mesh systems, cables, etc.
My goal is to help regular users with their everyday network issues, educate them, and make them less scared of their equipment. In my articles, you can find tips on what to look for when buying new networking hardware, and how to adjust your network settings to get the most out of your wi-fi.
Since my work is closely related to computers, servers, and other network equipment, I like to spend most of my spare time outdoors. When I want to blow off some steam, I like to ride my bike. I also love hiking and swimming. When I need to calm down and clear my mind, my go-to activity is fishing.