Have you got a new modem (or maybe are planning to buy one) and don’t know how to set it up? Don’t worry – you have just found the right article that will guide you through the entire installation process!
Of course, depending on the exact model and modem manufacturer, this operation may differ slightly, but it’s essentially very similar for most modems.
In this article, we will describe, in detail, all the steps for installing a modem and give you a few tips that might come in handy when setting up a new modem.

CONTENTS
Useful to Know Before You Start Setting Up Your Modem
Before you start installing a modem, it is useful to know some things that can make this procedure easier for you.
When buying a modem, be sure to check that the model you want to buy is compatible with your ISP. You should know that not all modems are compatible with all providers. This info is usually available on the provider’s website.
To install the modem, you also need certain cables: a coaxial cable to connect to the cable outlet, a power cable, and an Ethernet cable (if you plan to connect to a router and use Wi-Fi). Coaxial and power cables usually come with a modem, but if you are buying a used one you may need to purchase these cables separately.
A router is also needed because today everyone wants to use the Internet on multiple devices and have Wi-Fi throughout the house/apartment. A Wi-Fi router is necessary to connect devices to Wi-Fi. Of course, some modems have Wi-Fi routers built inside. In that case, you do not need an Ethernet cable or a separate router, so we recommend that you inquire about the specs of the modem model you are buying.
Check the MAC address of your modem – you will need it later. It is located on the sticker on the modem. Next to it, you can find other information about your modem.
What is the Best Place for a Modem?
The best place for your new modem is near the socket where you can plug it in without any interference – without bending the cables or possibly stretching it too much to avoid damage. We recommend that you place it out of the reach of other electrical devices.
Step-by-Step Installation Instructions
Now that we have covered the basics, it’s time to start setting up our new modem. Follow the steps below to install it.
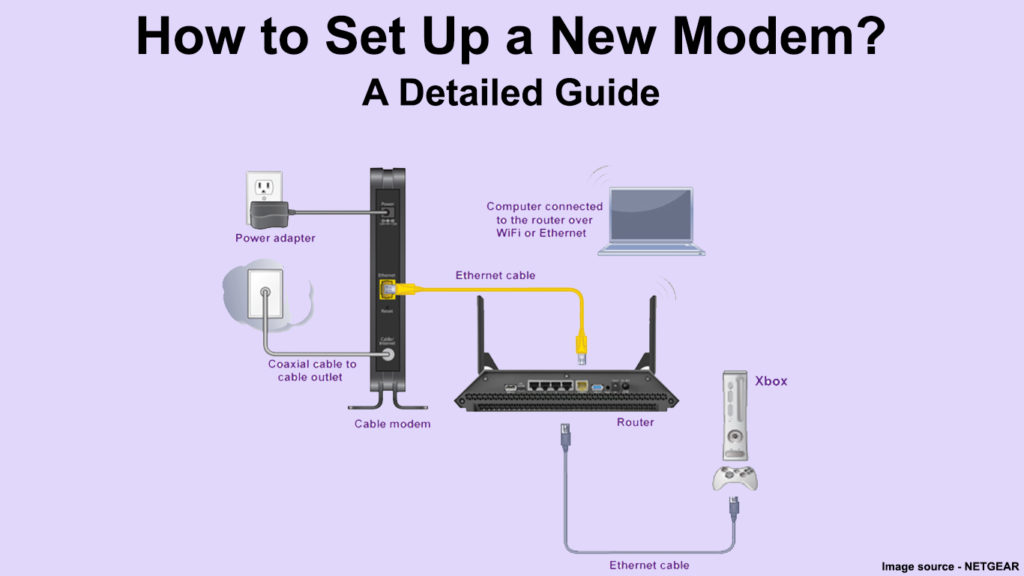
- Your coaxial cable has a needle-like connector on both sides. You need to connect one of these ends to the cable outlet – carefully screw it on. The cable outlet looks like a metal quadrangle with a hole in the middle.
- You need to connect the other end to the coax connector located on the back of your modem.
- Now, you need to plug in the modem. To do this, plug the modem’s power cord into a power source, and then connect the other end of the cable to the modem.
Setting Up a NETGEAR Cable Modem
Make Sure You Have Internet Access
To make sure your internet works, check the lights on your modem.
After connecting the modem and turning it on, if the connection is successful, the lights will turn on and change from yellow, orange, or red to green. (For some modems, such as Arris, they will change color from blue to green). After about 10-15 minutes, the lights should be steady green – they will not blink.
There are 5 LED lights on most modems: Power (this light indicates if your modem has been successfully connected to a power source), Online (it shows if you have successfully connected to the Internet), Upload/Download, and Activity (this light indicates whether there is current between the cable output and the modem itself).
Troubleshooting Tips – Dealing with Installation Issues
If, even after 15 minutes, the ONLINE light is still flashing, or even worse, does not turn on at all, try the following:
Make sure you have connected the coaxial cables tightly enough. This is a common cause.
In rare cases, there may be a problem with the electrical outlet. If the power light is off, plug the modem into another electrical outlet.
If the problem persists even after you have checked the coaxial cable and changed the socket, perform a factory reset. You will do this by pressing and holding the reset button for 10-20 seconds and then releasing it. The button is most often tucked into the back of the modem, so it wouldn’t be a bad idea to find an object that has a sharp tip so you can simply press it.
How to Activate Your New Modem?
You will need to activate your modem (this is required by your Internet Service Provider). The activation is usually done very simply. Just open your internet browser, and you should be automatically redirected to your ISP’s activation page.
Now that you are on the activation page, you need to enter the MAC ID of your modem. (located at the bottom or back of the modem).
If you have any problems activating the modem, you always have the option to contact the provider by phone.
Make sure you’re online by trying to open some web pages. You could also test your internet speed. If the page loads successfully, the modem connection process is complete, and you can use the Internet.
How to Set Up and Activate the Spectrum Modem and Router
Using a Wi-Fi Connection
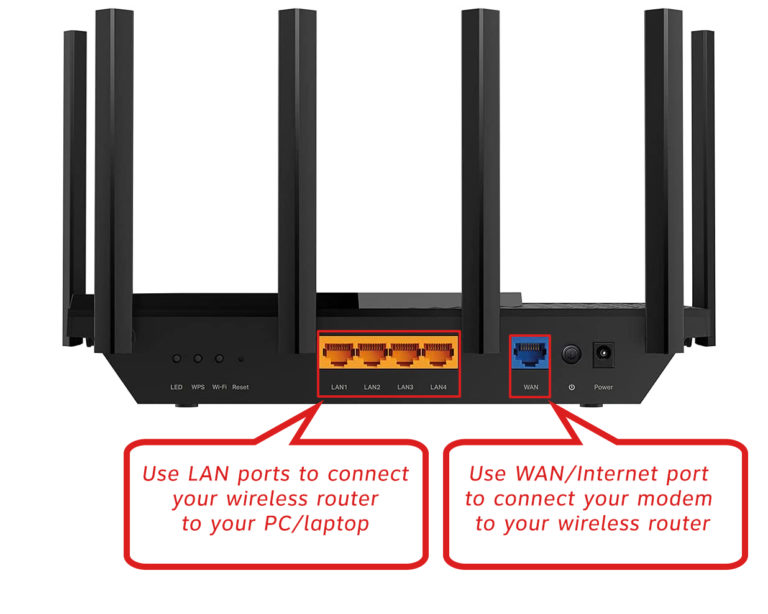
After successfully connecting and setting up your new modem, you need to connect the router (of course, if your modem is not a router at the same time, as discussed above). The router allows you to wirelessly connect multiple devices to the Internet.
Connecting modems and routers is very simple and is done with an Ethernet cable.
After connecting the modem and router using an Ethernet cable, you should be able to connect your devices to Wi-Fi.

Conclusion
As you can see, connecting a new modem is not too complicated, and the whole process should not take longer than 20 minutes. We hope our guide helped you install your new modem.
Lastly, we advise you to test your internet speed after setting up the modem – the speed on the test should be the same as the speed you paid for.

Hey, I’m Jeremy Clifford. I hold a bachelor’s degree in information systems, and I’m a certified network specialist. I worked for several internet providers in LA, San Francisco, Sacramento, and Seattle over the past 21 years.
I worked as a customer service operator, field technician, network engineer, and network specialist. During my career in networking, I’ve come across numerous modems, gateways, routers, and other networking hardware. I’ve installed network equipment, fixed it, designed and administrated networks, etc.
Networking is my passion, and I’m eager to share everything I know with you. On this website, you can read my modem and router reviews, as well as various how-to guides designed to help you solve your network problems. I want to liberate you from the fear that most users feel when they have to deal with modem and router settings.
My favorite free-time activities are gaming, movie-watching, and cooking. I also enjoy fishing, although I’m not good at it. What I’m good at is annoying David when we are fishing together. Apparently, you’re not supposed to talk or laugh while fishing – it scares the fishes.
