
When talking about setting Wi-Fi as a primary network, we can discuss two different scenarios.
The first one is when you have several available wireless networks, and you want to make one of them your primary/preferred network, and make your Windows 10 laptop or desktop computer connect to that network and not others. If you don’t set the primary network, your computer will connect to any of the available networks or will connect to the network with the strongest signal. So, we want to prevent this from happening.
The second situation is when you connect the Ethernet (network) cable to the laptop or computer. By default, the Ethernet connection will always come first and will have priority over the wireless one. In case you want to change that and make Wi-Fi the preferred network, even when the Ethernet is connected, there are a few things you can do.

CONTENTS
How to Prioritize One Wi-Fi Network Over Other Wi-Fi Networks?
Let’s say you have access to several different wireless networks, and your Windows 10 computer fails to connect to the right one or the one you prefer. If this happens to you, and you want to force your Windows 10 machine to connect to the desired Wi-Fi, there are a few different ways to do it.
Set A Primary Wi-Fi Network by Disabling Automatic Connections
Windows has this auto-connect or auto-join feature that allows your computer to connect to a network when it gets in range. Of course, it is enough to connect to this network just once and check the Connect automatically checkbox.

To give priority to just one network we have to disable automatic connections for all the “unwanted” networks.
To disable the automatic connection, you need to disconnect from the Wi-Fi first. And then connect again. But before you hit the Connect button, make sure that Connect automatically is unchecked.
Leave it checked just for the network you want your computer to connect to.
Recommended reading:
- How to Find Out Who Is Using My Wi-Fi? (5 Ways to Check Who Is on Your Wi-Fi)
- How to Connect a Non-Wi-Fi Device to Wi-Fi? (Ways to Turn Your Non-Wi-Fi Device into a Wi-Fi Device)
- How to Connect to Wi-Fi Instead of Ethernet on Windows 10? (How to Give Priority to Wi-Fi Connection?)
Click on the Wi-Fi icon in the taskbar, then click on the preferred network. If you are already connected click on Properties and the Settings window will open. Make sure that Connect automatically when in range is enabled.
Then, go back to the Wi-Fi icon, and click on the unwanted Wi-Fi network. Make sure that Connect automatically is unchecked. Repeat this for any other network.
Set a Primary Wi-Fi Network Using the Command Prompt
The Wi-Fi priority can be changed from the Command Prompt as well. Just make sure to launch the Command Prompt as an administrator. And we recommend using Notepad on your computer to take notes of the network profile and network interface. You will need these for the final command.
- Click on the Start button and, in the search bar, type “cmd”.
- When the Command Prompt icon appears, click on Run as administrator.
- The Command Prompt window should open. Type this command and hit the Enter key on the keyboard:
netsh wlan show profiles
This command will list all the networks you have been connected to before.

- Write down the network you want to make the primary one.
- Now use the following command and hit the Enter key.
netsh wlan show interfaces
This command identifies the name of the Wi-Fi adapter.
- Write down the name of the Wi-Fi adapter.
- Now prepare this command to change the priority of the Wi-Fi connection. If you are afraid that you might make a mistake, we recommend typing it in Notepad and then copying/pasting it into the Command Prompt.
netsh wlan set profileorder name=”YourNetworkProfile” interface=”YourInterface” priority=1
Make sure to replace YourNetworkProfile and YourInterface with the correct names.
Hit the Enter button.
After this, your computer should connect to the wireless network you have set to be the primary one.
How to Prioritize Wi-Fi Over Ethernet?
Generally speaking, Windows 10 will always give priority to the Ethernet connection over Wi-Fi. However, if you want to change this for some reason, for example, if you are getting better speeds over your 5GHz connection than over the network cable, you have to make a few changes in the settings.
Let’s begin:
- Click on the Start button and then select the Settings icon (Gear icon)
- Now click on Network & Internet
- Status should be selected automatically, but if it isn’t click on Status on the left.
- Click on Change adapter options
- Right-click on Ethernet and select Properties.
- Now click on Internet Protocol Version 4 (TCP/IPv4) and select Properties.
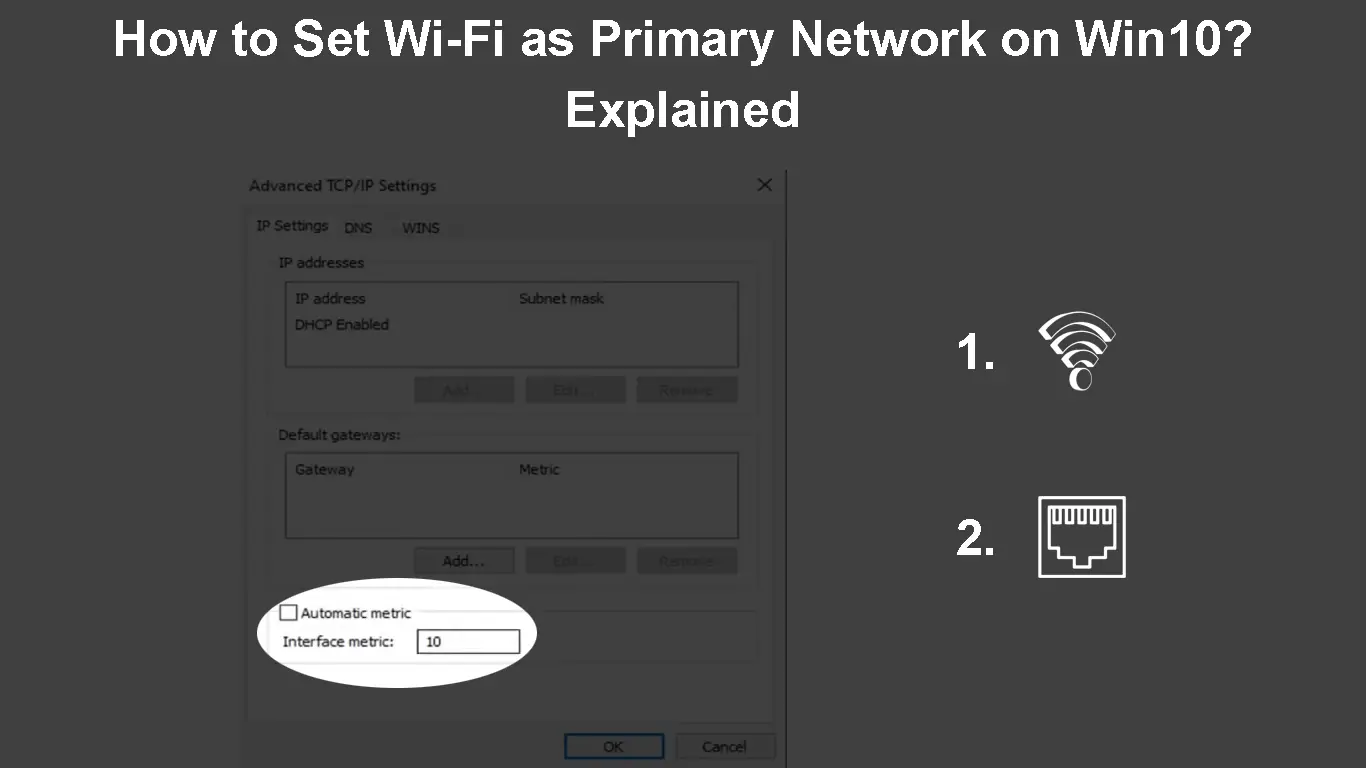
- Make sure the General tab is selected and click on Advanced in the bottom-right of the window.
- Uncheck the Automatic metric checkbox and in the Interface metric field type a value higher than the one you want to set for your Wi-Fi.

IMPORTANT NOTE: A lower number means higher priority and vice versa.
- Click on OK
- Repeat this process for the Wi-Fi from step 5 and don’t forget to set up a lower number than the one you have set for Ethernet.
Changing Network Priority in Windows 10
Verify Whether Everything Works Properly
After you make the necessary changes, it is time to check whether your Windows 10 computer prioritizes the Wi-Fi network over the Ethernet connection or the other Wi-Fi networks.
So, either check the network icon and see if the Wi-Fi icon is active even when the Ethernet cable is connected, or click the Wi-Fi icon and see whether your computer is connected to the desired Wi-Fi.
Final Words
As you can see, it’s not that complicated to set Wi-Fi as a primary network on Win10. Whether you want to prioritize your Wi-Fi over the Ethernet connection or over other Wi-Fi networks, the steps described in this article will help you set up your preferred Wi-Fi network in just a few minutes.

Hey, I’m Jeremy Clifford. I hold a bachelor’s degree in information systems, and I’m a certified network specialist. I worked for several internet providers in LA, San Francisco, Sacramento, and Seattle over the past 21 years.
I worked as a customer service operator, field technician, network engineer, and network specialist. During my career in networking, I’ve come across numerous modems, gateways, routers, and other networking hardware. I’ve installed network equipment, fixed it, designed and administrated networks, etc.
Networking is my passion, and I’m eager to share everything I know with you. On this website, you can read my modem and router reviews, as well as various how-to guides designed to help you solve your network problems. I want to liberate you from the fear that most users feel when they have to deal with modem and router settings.
My favorite free-time activities are gaming, movie-watching, and cooking. I also enjoy fishing, although I’m not good at it. What I’m good at is annoying David when we are fishing together. Apparently, you’re not supposed to talk or laugh while fishing – it scares the fishes.