
Connecting devices wirelessly to the internet makes things easier as you have more room to move about. All you need is a wireless signal, a password, and a device that can connect to the internet wirelessly, and you can access the vast services of the internet.
People often share an internet connection from one device to another, which is an easy task if you know how to create Wi-Fi hotspots that other devices can join. However, some can face challenges, especially when sharing an internet signal from a Mac to an iPhone. That is because it is a little complicated compared to sharing the internet between a Windows and Android device.
Keep reading as we look at how you can share your Mac’s internet connection with an iPhone. We also check whether it is possible to share Mac’s internet connection through Wi-Fi while connected to another Wi-Fi network.

CONTENTS
Mac devices have an internet-sharing feature that allows you to create a Wi-Fi hotspot from the Mac. Once you create the hotspot, other devices with the password can join the network without a fuss.
However, Mac devices can only create the hotspot if connected to the internet via an Ethernet cable. This is because the Wi-Fi adapter can either broadcast a wireless signal or be connected to a wireless signal, but it cannot do both simultaneously.
There is a workaround where you have to purchase an additional wireless adapter and connect it to your Mac so that the Mac can broadcast a Wi-Fi signal while it is still connected to a Wi-Fi network.
Using an Additional Adapter
You must first download the necessary setup software from the adapter manufacturer’s website to use the adapter. The software includes drivers and program files necessary to use the adapter on your Mac.
After downloading and installing the software, restart your Mac, then plug in the adapter. Then run the adapter program you installed earlier to connect the adapter to your home Wi-Fi.
Connecting a Wi-Fi USB Adapter to a Mac – Step-by-Step Setup Guide
Next, open the Apple menu > System Preferences on the Mac, scroll to Sharing, and select the option.
Navigate to Internet sharing on the left side of the screen. Remember to click the checkbox before the internet sharing option to activate the feature.

For macOS Ventura 13, you will click on the Apple Menu > System Settings > General > Sharing, then click the information icon next to Internet sharing.
Next, click the pop-up menu next to the “Share your connection from” option and select 802.11 NIC (or your USB Wi-Fi adapter’s name).

After, select Wi-Fi from the options next to “To computer using.” Finally, click Wi-Fi “Wi-Fi options,” and a new window will appear where you can update the Wi-Fi name, channel, password, and security protocol. Click Done > OK, then Start to finalize the settings.

At this point, your Mac should be broadcasting a Wi-Fi signal while being connected to a Wi-Fi network via a USB Adapter. Note that the procedures for working with adapters vary depending on the adapter manufacturer, so check the respective websites for setting up the adapters. Tp-link and Linksys are manufacturers that provide setup instructions on their websites.
Using a Cable
Another option is to share the Mac’s Wi-Fi with your iPhone using the iPhone’s USB Lightning cable. You can do this by;
- First, connect the iPhone and Mac using the lightning-to-USB cable.
- Then on the Mac, click the Apple logo and navigate to System Preferences > Sharing > Internet Sharing.
- Next select Wi-Fi from the ‘Share your connection from’ drop-down menu.
- Select iPhone USB from the ‘To computer using’ options.
- Check the Internet Sharing checkbox, then click Start on the menu that will pop up.
- Then on the iPhone, turn off Wi-Fi and cellular data. You can now access the internet and try it by launching Safari and visiting any website.
Note that this setup method might require you to wait a few minutes before the phone can access the internet, so be patient. Connect the devices and give them at least five minutes before setting up the connection afresh in case it did not work the first time.
Also, MacOS Catalina users should activate the internet connection setting under Content caching so that the Mac can share its internet connection with other iOS devices through the lightning cable.
Navigate the Apple icon > System Preferences > Sharing > Content Caching and select the checkbox to activate Content caching. Then select the Share Internet Connection checkbox once Content caching is active.
Using Bluetooth
You can tether your Mac’s Wi-Fi connection to your iPhone via Bluetooth. The method has a disadvantage where your internet will be slower than normal. However, if you do not intend to use the connection for heavy browsing, it should serve you well.
The steps below describe how to share your Mac’s Wi-Fi with an iPhone through Bluetooth.
- Ensure Bluetooth is on for both devices and they are connected. You can turn on Bluetooth on iOS by navigating Settings > Bluetooth and tapping the activation switch. For Mac, click the Bluetooth icon on the status bar, select Turn Bluetooth On, or navigate to System Preferences > Bluetooth.
- Pair the devices by going to your iPhone, navigating Settings > Bluetooth, and selecting your Mac’s name from the devices in the ‘Other devices’ list. Go to your Mac and click Connect on the prompt that will appear. You might have to enter a six-digit code to complete the setup. The code will display on the Mac’s or iPhone’s screen.
- Then on the Mac, navigate System Preferences > Sharing > Internet Sharing.
- Select Wi-Fi from the ‘Share your connection from’ drop-down menu.
- Select Bluetooth PAN from the ‘To computer using’ options.
- Check the ‘Internet Sharing’ option on the left of the screen so that the feature is active, then click Start on the pop-up notification. Finally, click OK > Done. You can now use the internet on your iPhone.
How to Share Wi-Fi from Mac to iPhone (Wi-Fi/Ethernet to Bluetooth)
Creating a Wi-Fi Hotspot from Mac
You can also connect the Mac to your router via an Ethernet cable and create a Wi-Fi hotspot from the Mac. That way, you will share Mac’s internet connection as a wireless signal for the iPhone.
The steps below describe how to create a hotspot from your Mac;
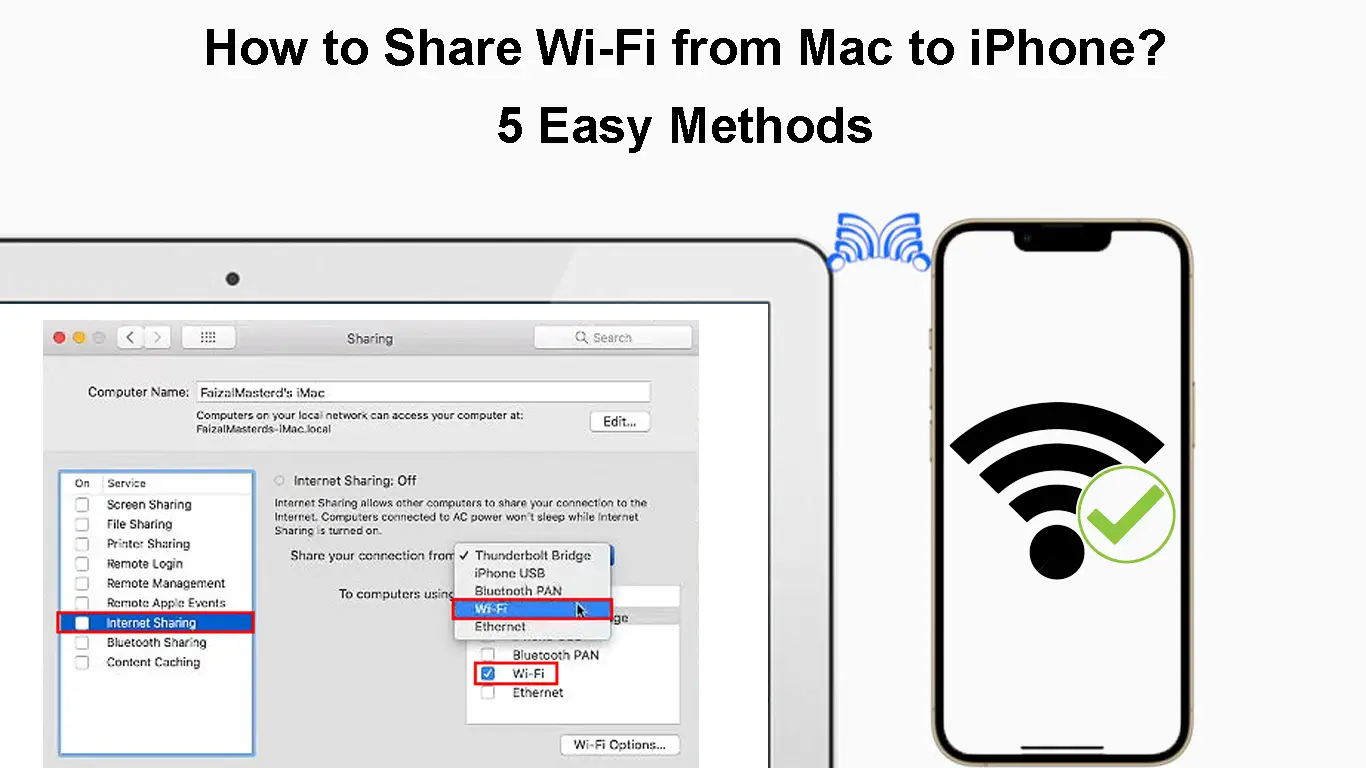
- Click the Apple menu, then navigate to System Preferences > Sharing.
- Click Internet Sharing on the left of the screen and ensure the checkbox has a tick to show Internet sharing is active.
- Launch the drop-down menu in the ‘Share your connection from’ option and select ‘Ethernet.’
- Then select Wi-Fi from the options next to “To computer using”
- Select the ‘Wi-Fi options’ option to set the network’s security protocol, Wi-Fi SSID, channel, and password. Select Done > OK once done to finalize the setup.
- Lastly, click the check box before Internet Sharing and select Start on the notification that will appear.
How to Share Wi-Fi from Mac to iPhone (Ethernet to Wi-Fi)
You should leave the channel in the default option if you do not understand the setting. Also, it is preferable to use the WPA2 (or WPA3) security protocol since it is compatible with most devices.
Once you create the Wi-Fi network, go to your iPhone, navigate Settings > Wi-Fi, select the Wi-Fi SSID you set earlier, and enter its password.
Instead of sharing your Mac’s Wi-Fi with the iPhone, you can share the Wi-Fi password. That way, the iPhone connects to the same wireless network your Mac is using.
Both devices must meet some conditions first before achieving this. They are:
- The iPhone should have the latest iOS version, which should be iOS 11 or later. The Mac should also be using macOS High Sierra or later versions.
- Turn off the Wi-Fi hotspot on both if either has an active hotspot. Also, ensure that Bluetooth and Wi-Fi are active on both devices.
- Both devices should be within each other’s Bluetooth and Wi-Fi range.
- Ensure both devices are signed into their iCloud accounts. Also, save the iPhone’s iCloud email on Mac’s contacts and Mac’s iCloud email on the iPhone.
Sharing Wi-Fi Password from Mac to iPhone/iPad
Once both devices meet these caveats, proceed to share the Wi-Fi password by following the steps below:
- Connect the Mac to the Wi-Fi whose password you want to share and double-check that the Mac’s Bluetooth is on. Both devices should be close to each other.
- Then navigate Settings > Wi-Fi on the iPhone.
- Check that the button next to Wi-Fi highlights green to show Wi-Fi is on. If it is off, tapping the button will activate the iPhone’s Wi-Fi.
- Next, select the Wi-Fi network you want to join. It should be the same one the Mac is connected to.
- A Wi-Fi password dialogue box will appear on the Mac; click on it. Then click the Options drop-down menu and click Share.
- At this point, the Mac and iPhone should be on the same Wi-Fi network.
Retrieving the Wi-Fi Password from Mac
If sharing the password seems cumbersome, you can retrieve the password from your Mac. That will enable you to use the password to connect your iPhone to a Wi-Fi network whose password you do not know but the Mac has in its system.
You can use either Mac’s terminal or the Keychain Access app; for this article, we will use the terminal app.
The procedure is as follows;
- Click the Spotlight search icon from the menu bar or use the function keys to search for the Keychain app and launch it. Or navigate Finder > Applications > Utilities > Terminal.
- Enter the command security find-generic-password -ga WIFI NAME | grep “password:” in the terminal window. Where ‘Wi-Fi name’ is the Wi-Fi SSID of the network whose password you are trying to retrieve.
- Press the return key, and the Mac will prompt you to enter your username and password for verification. Once you do, the password will be on the last line in the terminal window.
How to Find a Wi-Fi Password in macOS (2 Methods)
Conclusion
You can now share a Wi-Fi network from a Mac to an iPhone through various setups. If you decide to do it, we suggest exploring heightened online security and privacy for your iPhone as you unlock the potential of sharing a Wi-Fi network from a Mac to an iPhone, complemented by the additional layer of protection offered by a free VPN for iPhone. By incorporating a VPN, you ensure a secure internet connection on your iPhone, empowering you to browse with confidence and safeguard your privacy.
Notably, getting an adapter can be unnecessary since you can easily connect the iPhone to the same Wi-Fi your Mac uses. Therefore, consider connecting your Mac to the internet via an Ethernet cable so it is easier to set up a hotspot that your iPhone can easily connect to.
Alternatively, share the Wi-Fi password from your Mac to your iPhone. That way, the iPhone connects to the same Wi-Fi your Mac is connected to. And if that seems to be cumbersome, you can retrieve the Wi-Fi password from the Mac and use it to connect the iPhone to the internet wirelessly.

Hey, I’m Jeremy Clifford. I hold a bachelor’s degree in information systems, and I’m a certified network specialist. I worked for several internet providers in LA, San Francisco, Sacramento, and Seattle over the past 21 years.
I worked as a customer service operator, field technician, network engineer, and network specialist. During my career in networking, I’ve come across numerous modems, gateways, routers, and other networking hardware. I’ve installed network equipment, fixed it, designed and administrated networks, etc.
Networking is my passion, and I’m eager to share everything I know with you. On this website, you can read my modem and router reviews, as well as various how-to guides designed to help you solve your network problems. I want to liberate you from the fear that most users feel when they have to deal with modem and router settings.
My favorite free-time activities are gaming, movie-watching, and cooking. I also enjoy fishing, although I’m not good at it. What I’m good at is annoying David when we are fishing together. Apparently, you’re not supposed to talk or laugh while fishing – it scares the fishes.