
Mac’s next-level speed and smoothness make it one of the most sought-after laptop brands all around the world. If you’ve just bought a Mac, the first thing you’d want to know is how to show all the Wi-Fi networks available. Well, you’ve come to the right place. In this article, we will show you a couple of methods to show Wi-Fi networks on your Mac. Let’s jump straight into it.

CONTENTS
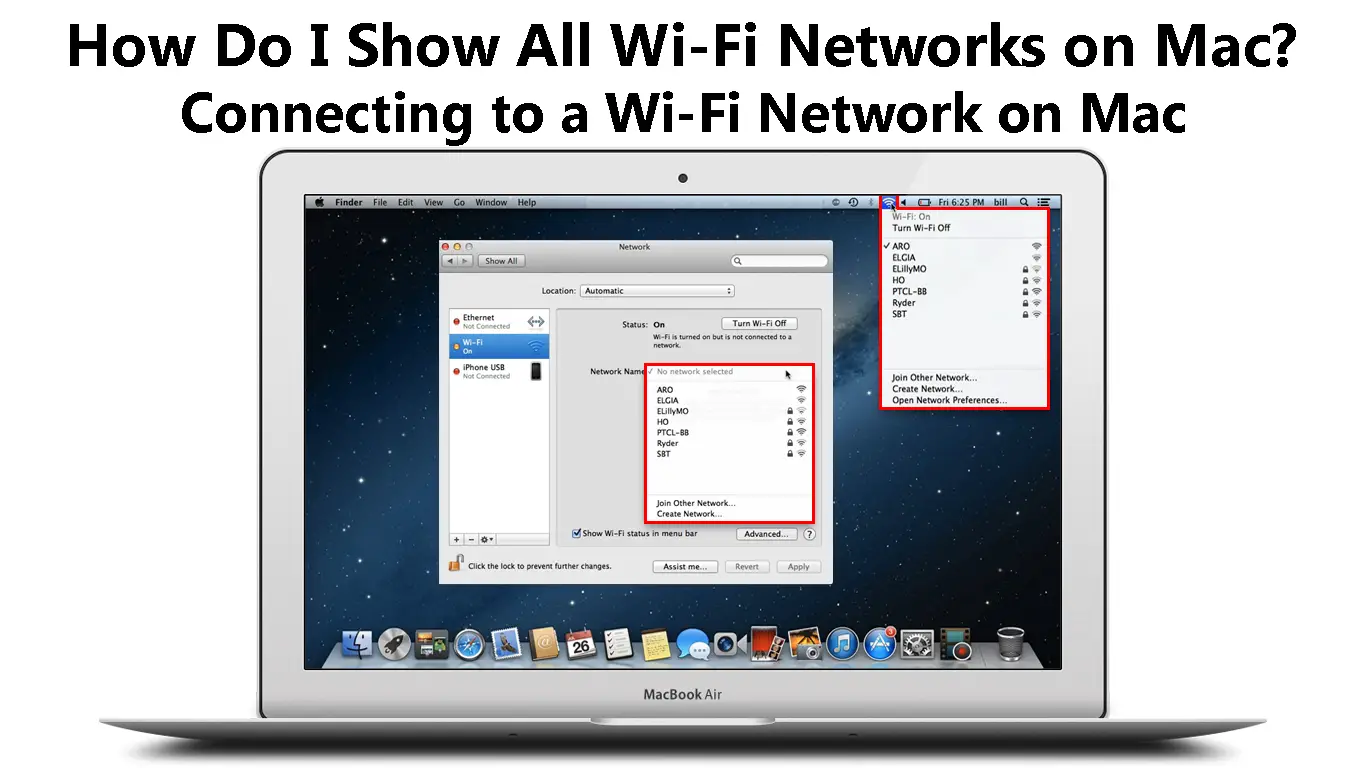
How to Show All Wi-Fi Networks on Mac
If you want to see all available Wi-Fi networks and connect to one, you need to go to the page that will show a list of all available Wi-Fi networks near your Mac. Here are two methods to do it.
Recommended reading:
- Can I Connect My Old Phone to Wi-Fi? (What Can I Do with an Old Phone Connected to Wi-Fi?)
- How to Connect a Toshiba Tablet to Wi-Fi (Step-by-Step Guide)
- How to Restrict Internet Access on Home Wi-Fi Network? (Ways to Block Devices from Your Wi-Fi)
Accessing the Wi-Fi Network List Via the Wi-Fi Icon
It’s a straightforward method – you don’t have to go to settings or the menu, just find the Wi-Fi icon on the screen and follow these simple steps:
- Click the Wi-Fi icon on your Mac’s top panel, and a drop-down menu will pop up.
- Select Turn Wi-Fi On to set enable the Wi-Fi features.
- Your Mac will automatically search for all available Wi-Fi networks around your Mac and list them out.

- Choose your desired Wi-Fi network from the list if you want to connect.
- If it’s an open network, you can immediately connect to the network and start doing your online activities on your Mac. However, most Wi-Fi networks have a security password to make them safe from unwanted intruders and malicious hackers.
- Enter the password when prompted, and press <Enter>.
It’s a longer method to find the available Wi-Fi list, but you will have more settings options. Stick to the following instructions:
- Open the Apple Menu.
- Select the System Preferences option.
- Go to the Internet & Wireless section and select Network.
- A new page will come up. Move the cursor to the Wi-Fi tab on the left.
- If the Status is Off, click on the toggle to turn the Wi-Fi on.
- Below the Status, you can see the network name. Click it to pop up a drop-down menu containing a list of available Wi-Fi networks.

- Choose your desired Wi-Fi network.
- If it prompts for a password, you need to enter it and proceed.
- Furthermore, you can tick the box that says “Automatically join this network” so you will connect the next time automatically.
- You can also click on Advanced to change the order of your preferred networks.
- Also, on the Advanced page, you can tick the box that says “Remember networks this computer has joined” to lock in all the networks you have joined earlier for easy setup in the future.
How to Fix Wi-Fi Networks Issues on Mac
All laptops occasionally experience some kind of issues, and Mac computers are no different. Follow these guides if you have problems connecting to Wi-Fi on your Mac.
Use the Forget Wi-Fi Network Technique
- Go to the Apple Menu by clicking the Apple logo at the top-left.
- Choose System Preferences.
- Select the Network option.
- From the menu on the left, select the Wi-Fi option.
- Next, click on the Advanced button on the bottom-right of the Mac screen.
- Bring the cursor to your Wi-Fi network name from the list of available networks and click the (-) sign.

- Next, click OK and Apply.
- Now, restart your Mac and try to join the network again via the Wi-Fi logo at the top panel.
Forgetting a Wi-Fi Network on a Mac
Change Your DNS Server
- Head to the Apple logo at the top-left corner again to bring up the Apple Menu.
- Select Network Preferences.
- Next, click on the Network icon.
- Go to the Wi-Fi tab from the menu on the left.
- Click the Advance button in the lower-right corner of your Mac screen.
- Select the DNS tab at the top panel.
- Click the (+) sign and type in Google DNS address in the DNS server box (8.8.8.8).
- Next, click the (+) sign again and type in another Google DNS address (8.8.4.4).
- Then, click OK and Apply buttons.
Changing a DNS Server on a Mac
Change the Location to “Automatic”
- Click the Apple logo and select Network Preferences on the Apple Menu.
- Next, select Network.
- Then, select Wi-Fi.
- Under Location, select Automatic.

- Next, click the Advanced button.
- Choose the TCP/IP at the top panel.
- Next, click on Renew DHCP Lease.

- Then, click OK and Apply.
Frequently Asked Questions
Question: Why are Wi-Fi networks not appearing on my Mac?
Answer: You might not have set up the Wi-Fi service on your Mac. Here are the methods to set it up:
- Go to the Apple Menu.
- Choose System Preferences.
- Select the Network option.
- Select the Add Button at the bottom.
- Click the Popup menu.
- Select Wi-Fi.
- That should add your Wi-Fi to your Mac.

Question: What is a hidden Wi-Fi network’s SSID?
Answer: A hidden Wi-Fi network’s SSID is a security measure to safeguard the network from unwanted intruders. They cannot enter the network because the SSID will not appear on a device’s Wi-Fi network list. Therefore, only those who know the SSID can join the network, making it a safer network compared to known SSIDs.
Question: How can I find my Wi-Fi network’s SSID?
Answer: Find and click on the Wi-Fi icon at the top menu bar. Then, you can see a list of available Wi-Fi networks in the vicinity. Your network’s SSID will be the one with the check mark next to it.
Question: What does it mean if my Mac says “activate Mac?”
Answer: It will appear when you have set up Find My Mac on your device. This action activates the macOS Activation Lock, which is a security feature to prevent strangers from accessing your Mac. So, when a stranger tries to access your Mac, it will come up with the message “activate Mac” to lock your device.
Conclusion
Showing all available Wi-Fi networks on Mac is super easy. A Mac is synonymous with a laptop’s fast, smooth, and practical online activities. An operation like showing all Wi-Fi networks is an example of an easy process with only a few clicks or taps. You just need to click the Wi-Fi icon, and there you have a list of networks available.
If, for some reason, the Wi-Fi icon is not working, we have also shown another method via the Apple menu. While there are more steps involved, you will also have more setting options and features using this alternative method.

Hey, I’m Jeremy Clifford. I hold a bachelor’s degree in information systems, and I’m a certified network specialist. I worked for several internet providers in LA, San Francisco, Sacramento, and Seattle over the past 21 years.
I worked as a customer service operator, field technician, network engineer, and network specialist. During my career in networking, I’ve come across numerous modems, gateways, routers, and other networking hardware. I’ve installed network equipment, fixed it, designed and administrated networks, etc.
Networking is my passion, and I’m eager to share everything I know with you. On this website, you can read my modem and router reviews, as well as various how-to guides designed to help you solve your network problems. I want to liberate you from the fear that most users feel when they have to deal with modem and router settings.
My favorite free-time activities are gaming, movie-watching, and cooking. I also enjoy fishing, although I’m not good at it. What I’m good at is annoying David when we are fishing together. Apparently, you’re not supposed to talk or laugh while fishing – it scares the fishes.