
Have you just seen this message in your modem’s error log and have no idea what to do? Don’t worry – we’re here to help. “Started Unicast Maintenance Ranging – No Response Received” is a common problem among cable internet users. Identifying the source of this issue can be frustrating and requires a thorough and methodical approach.
In this article, we will explain the meaning of this message, list all potential causes, as well as solutions to this problem. Let’s get started.

CONTENTS
What is Unicast Maintenance Ranging?
Your DOCSIS 3.0/3.1 cable modem is in constant communication with your internet provider. Whatever you do, the communication with the ISP never stops. Every 30sec, one channel inside your modem sends a request to something called Cable Modem Termination System (or CMTS), and the CMTS responds. When everything is fine, the modem sends requests and receives responses every 30sec, and your internet is working flawlessly at full speed.
If for some reason, your modem doesn’t get a response from the CMTS, a T3 timeout message (like “Started Unicast Maintenance Ranging – No Response Received”) will appear in your modem’s/gateway’s error log. You won’t see any message on your PC, laptop, tablet, or phone, but if you log into your modem/gateway and go to the error log (or event log), you will see one or multiple messages.
An occasional T3 timeout message doesn’t necessarily mean that you won’t be able to connect to the internet, but it does indicate that your service performance is not at its best. So, you will definitely notice a drop in your internet speed, and you may experience some issues when doing certain online activities (especially gaming).
Frequent T3 timeout messages will, eventually, result in loss of internet connection.
Why Do I Get This Message?
This message is the result of the lack of communication between your modem/gateway and your ISP (CMTS). Your modem/sends a request and doesn’t receive a response. The message gets corrupted or lost. The problem could either be on your end or your ISP’s end. Or somewhere in between.
The problem is most commonly hardware-related. If the problem is on your end, it’s caused by damaged cables, loose or inadequate connectors, poor-quality splitters, moisture inside coax lines, corroded wires, attenuators, etc. Rarely, the problem could also be caused by some bugs in your modem’s/gateway’s firmware.
The source of the problem by your ISP (CMTS). For example, if the number of requests sent to the CMTS from all the modems/gateways in a certain area is higher than what CMTS can handle, the CMTS may miss the request message sent from your modem and it won’t send the response. As a result, you will get a T3 timeout message. This happens rarely, usually during peak hours. Even if it happens, it’s unlikely that you will see frequent T3 timeout messages. Once the peak is over, your internet connection should be good as new.
Finally, the cause of your issue could also be in the infrastructure connecting your home to the ISP. So, cables again. If the problem is outside your home, you can’t solve it on your own – you have to contact your ISP and ask them to send a technician. But, let’s not get ahead of ourselves. Let’s see what you can do to diagnose the problem, find the cause, and solve it in case it’s on your end.
Is There a Way to Fix this Issue – A Step-by-Step Troubleshooting Guide
Yes, there is a way to fix this issue, but first, you have to diagnose the problem and find the culprit. So, let’s diagnose it.
Check Event Log
Log into your modem/gateway, and look for the event log. Your modem records all the error messages received over time, so you can check how often you receive this type of message. If it happens a few times a day, and if it only happens during peak hours (7-11PM), there’s a good chance that the problem is on your ISP’s end.
If it happens frequently and not just during peak hours, the problem is either on your end (equipment and cables in your home) or in the infrastructure that connects your home to the ISP.
Let’s move on to the next step.

Check the Power Levels and SNR Values
Now that you have established that your message is not just a result of high internet traffic in your area and that you actually have a problem, let’s analyze the data that your modem can offer. On the Connection Status page, you will see a list of downstream (up to 32) and upstream channels (up to 8) with a bunch of data for each channel.
We want you to take a closer look at downstream/upstream power levels and SNR values. By analyzing these values, you can identify the channel (or channels) that causes the problem. The values for this channel will be significantly higher or lower than the values for other channels and not within the range of recommended values. So, let’s learn what the recommended power and SNR values are.
Depending on the source, you will find different recommended values. We will state a few sources we find reliable, mostly router manufacturers like ARRIS, NETGEAR, and Motorola.
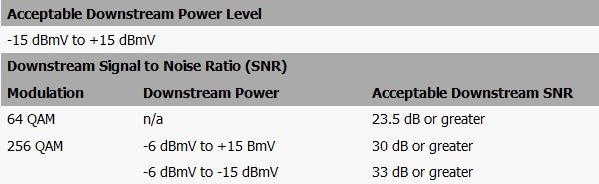
Recommended downstream power levels, according to ARRIS and Motorola, range between -15 and +15dBmV. NETGEAR, on the other hand, states that the downstream power levels should be between -7dBVmV and +7dBmV. In some sources, you will also find that the recommended values are -5 to +5dBmV or -10 to +10dBmV. Also, the variations in power levels between channels should not be too high (up to +/- 3dBmV).
Recommended Downstream Power Levels (Source – ARRIS)
Recommended SNR values vary depending on the power levels and type of modulation (QAM64 or QAM256). If the modulation is QAM64, the recommended SNR is 23.5dB or higher. If the modulation is QAM256, the recommended SNR values are 30dB or higher (for power levels between -6 and +15dBmV) and 33dB or higher (for power levels between -15dBmV and -6dBmV). The variations in SNR values between the channels should also be within the +/- 3dB.

Let’s now move on to the upstream bonded channels. If you look at the image above, you will also see the power levels for locked upstream channels (active upstream channels). The upstream power levels are higher than the downstream power levels. The recommended upstream power values vary depending on the Channel Type (TDMA or ATDMA) and the number of locked channels. It also varies with the symbol rate (1280Ksym/sec, 2560Ksym/sec, or 5120Ksym/sec). The number of locked channels is different for different users and depends on your subscription (higher upload speeds = more locked channels).
NETGEAR gives a general recommendation that the upstream power levels should be between 38dBmV and 48dBmV.
ARRIS, on the other hand, gives more detailed recommendations for different numbers of locked upstream channels, for different channel types, and different symbol rates. The recommended values range between 45dBmV and 61dBmV.

Recommended Upstream Power Levels (source – ARRIS)
If you have multiple locked upload channels, the acceptable difference in upstream power levels between channels is +/- 3dBmV.
Analyze your power levels (downstream and upstream) and SNR values. Look for the channel with too high or too low power level, for the channel with too low SNR, or for the channel with too high deviation (higher than +/- 3dBmV).
Now that you know the basics, let’s take a look at one example. In the image below, you can see the power levels of a modem that gets the message from our title. If you analyze the values, you will notice that the upstream power level for channel two is 42.8dBmV. It’s lower than the min recommended value (45dBmV), and it’s also much lower than power levels for channels 1 and 3 (49.5dBmV and 47.0dBmV).
If you consider NETGEAR recommendations for upstream power levels (38-48dBmV), the value for channel 2 is within the limits, but it’s still more than 3dBmV lower than the other two values. Downstream power levels and SNR values are within the limits. So, our second upstream channel is the source of the problem.

Sometimes, even if the power levels are just slightly over the limits or even within the limits but very high (close to the upper limit), you may experience the same issues with intermittent disconnections, and you may get that annoying message. Look at the image below.

All the upstream power levels are very high. Most of them are within the limits recommended by ARRIS (but out of limits recommended by NETGEAR 38-48dBmV). Channel 4 power level exceeds the upper limit recommended by ARRIS. This will, almost certainly, result in a T3 timeout message, like the one from our title.
Now that you know how the problem manifests and what causes it, let’s see what you can do to fix it.
Fixing the Problem
As explained earlier, if the source of the problem is in your home, you may be able to fix it. Since the root of this problem is a bad connection, you need to check every piece of equipment that brings the internet signal to your modem.
The first and easiest thing to do is to restart the modem and router. A simple restart will eliminate some bugs and give your internet connection a fresh start. If the restart doesn’t help, you can try resetting your modem/gateway and your router. The reset could eliminate more persistent bugs and all the custom-made settings. Some of those settings may not be compatible with your internet connection – erasing them might solve the problem.
If neither restart nor reset help, you have to check the rest of your cable internet infrastructure. You can start with the entry point – the place where coax internet cable enters your home. From there, you need to examine all the cables, PoE filter, splitters, MoCA adapters, F connectors, etc.
Checking the Cables
Perform a visual inspection of the entire coax cable wiring from the entry point to the modem. Look for any dents, nicks, sharp bends, parts of a cable that were pinched underneath doors. Coax cable is not extremely fragile, but it can still be damaged. If you notice any damage, you need to replace it.
Checking the Splitters, F-connectors, and PoE Filters
Splitters, PoE filters, and F-connectors are particularly sensitive parts of your coax cable wiring. Naturally, you will have to look for loose connections and tighten them up. But that’s not the only thing you need to pay attention to.
Ideally, you will buy new high-quality splitters, connectors, and filters, and try replacing your current connectors, especially if your current connectors are old and/or inappropriate. You need bi-directional cable-rated splitters for 5-1002MHz. DO NOT USE cheap splitters rated for 5-900MHz.
At the entry point, you should have a single two-way splitter. If there’s a three-way or four-way splitter, you should definitely consider replacing it with a two-way splitter. One OUT port should feed your modem (direct connection), while the other port should feed the rest of your home.
If there’s a MoCA adapter between the entry point and your modem, try disconnecting it and connecting the cable directly to the modem. Any splitter that can be eliminated should be eliminated. You need the shortest possible run between the entry point and your modem/gateway.
If you don’t want to buy new splitters and connectors, you should at least take them apart and clean them. Check for corrosion inside the splitter and, while you’re there, check the center wire for corrosion. If you notice any corrosion on the wire, remove a tiny part of the cable, and then install your F-connector.
How to Install Coax F-connectors
If even after checking all the cables and all the connections, you still can’t find the culprit, and you really don’t want to call your ISP, there’s one more thing you could try.
One Last Thing to Try Before Calling a Specialist
As explained earlier, the “Started Unicast Maintenance – No Response Received” message occurs because of the failed communication between your modem and your ISPs – the request sent by your modem simply gets corrupt or lost in the process. Because of that, your modem increases the power levels of the upstream channels trying to send a stronger signal to the ISP, exceeding the upstream power limit.
Imagine your modem yelling at your ISP, but your ISP can’t hear it. Your modem yells even louder hoping that your ISP will hear it, and, at some point, it yells so hard that it loses its voice. That’s what happens with your modem. The signal strength exceeds the limit, and the result is that T3 timeout message.
So, you need a stronger signal, but you also need your modem’s upstream power levels to stay within the limits. You can achieve that by adding a signal booster (amp) with an active return between the entry point and your modem. This amp will boost the outgoing signal coming from your modem, lessening the strain on the modem. Something like Motorola’s BDA-K4/RA drop amp with active return might help you with your problem.

Have in mind that this doesn’t really solve the problem – it only bypasses it. The problem is still there. If you really want the problem eliminated and if you’re certain the problem is not inside your home, you should most definitely call your ISP and ask them to send a technician. If even a trained technician can’t identify the problem, you can either try using that signal booster we’ve talked about or, if possible, switch to another internet provider.
Solving High Upstream Power Level issues by Installing Cable Drop Amp with Active Return
Conclusion
The goal of this article was to help you understand the problem you’re facing and list all the fixes you could try on your own, without calling your ISP. Hopefully, one of the fixes worked. As always, we encourage you to share your experience and thoughts on the subject in the comment section below.

Hey, I’m Jeremy Clifford. I hold a bachelor’s degree in information systems, and I’m a certified network specialist. I worked for several internet providers in LA, San Francisco, Sacramento, and Seattle over the past 21 years.
I worked as a customer service operator, field technician, network engineer, and network specialist. During my career in networking, I’ve come across numerous modems, gateways, routers, and other networking hardware. I’ve installed network equipment, fixed it, designed and administrated networks, etc.
Networking is my passion, and I’m eager to share everything I know with you. On this website, you can read my modem and router reviews, as well as various how-to guides designed to help you solve your network problems. I want to liberate you from the fear that most users feel when they have to deal with modem and router settings.
My favorite free-time activities are gaming, movie-watching, and cooking. I also enjoy fishing, although I’m not good at it. What I’m good at is annoying David when we are fishing together. Apparently, you’re not supposed to talk or laugh while fishing – it scares the fishes.