Brief outline
This article covers the steps required for TP-Link router login using the default TP-link IP, username and password. It also provides some basic changes you need to make in order to secure your home network.
The examples are given for old router models as well as modern ones.
TP-Link Router Login Steps
STEP 1: Connect to your network
Before you login to your router you have to connect to your network first. You can do this using a wired or wireless connection. It all depends on the device you are using to login to your TP-Link router admin page.
STEP 2: Launch your browser
The router settings page can be accessed using any browser already installed on your device. Therefore launch your browser and in the address bar type one of the default TP-Link IP addresses – 192.168.0.1 or 192.168.1.1 and press Enter.
Modern TP-Link router models can be accessed using http://tplinkwifi.net
The default IP depends on the router model, so you can either check the sticker on the bottom of the router or find the default router IP on your own by following the steps given in this article – Find the Default Router IP: A Step-by-Step Guide.
STEP 3: Enter the default router username and password
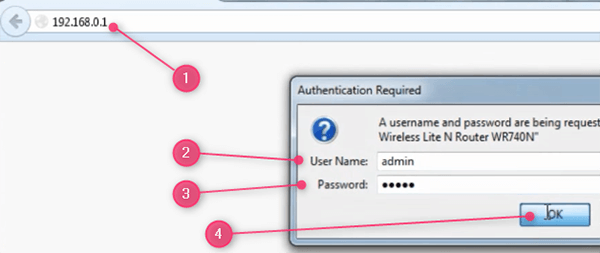
If the router IP address is correct you will have to enter the default username and password.
The default TP-Link router login details are:
- Username “admin”
- Password “admin”
*make sure to type these in lower case letters. In case you have changed the login details earlier, use them instead.
Click OK.
Basic TP-Link Router Configuration
When you purchase a TP-Link router it is already configured in the factory. It has a default IP to access the login page, a default username and password and a default network name and Wireless Password/PIN.
Leaving everything at the default settings represents a security risk for your network. Therefore, it’s recommended to take your time and configure your TP-Link router. At least change the default router password and protect the wireless network with a unique and strong password.
Change the default TP-Link router password
First of all we have to change the default TP-Link router login username and password. By doing this we will make sure only we can access the router settings. It is also recommended to write down the new password for further use.
We will show you how to do this using the old and modern GUI.
Old router GUI:
Login to your TP-Link router first. Follow the steps given above.
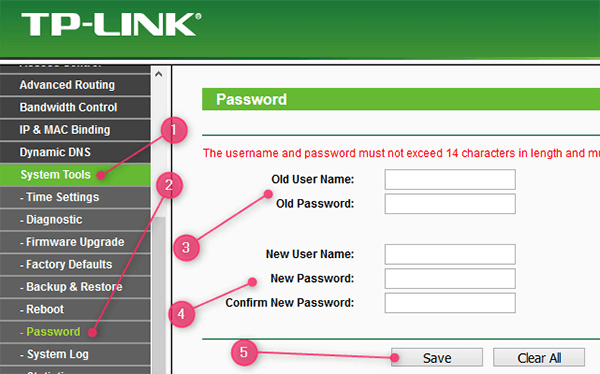
- Click on System Tools in the menu on the left.
- Then Password.
- Type the old (default) username and password in the appropriate fields.
- Enter the new username and password in the appropriate fields, and make sure to type the new password again in the Confirm New Password.
- Click Save.
Modern router GUI:
Login to your TP-Link router first. Follow the steps given above.
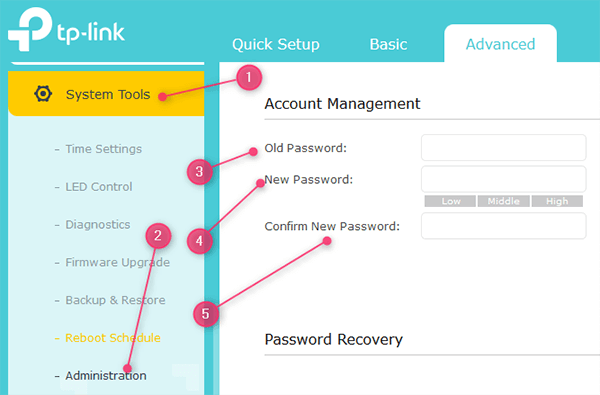
- Click on System Tools in the menu on the left.
- Then Administration.
- Type the old (default) password in the Old Password field.
- Type the new password in the New Password field.
- Type the new password again in the Confirm New Password field.
- Click Save.
Change the default TP-Link router SSID and wireless password
The default TP-Link Network name (SSID) is usually TP-LINK_XXXXXX or TP-LINK_XXXXXX_5G. The XXXXXX part is a combination of numbers and letters. You can easily rename these later in the router settings.
The default TP-Link Wireless Password, as well as the SSID, is usually printed on a label at the bottom of your router.
These can be easily changed during the initial quick setup or later by logging into the TP-Link router settings.
Go through the following steps:
For older TP-Link router models
The older GUI can be found in TP-Link 300M Wireless N Router. So Let’ take a look how you can change the TP-Link wireless password and SSID.
Changing the SSID
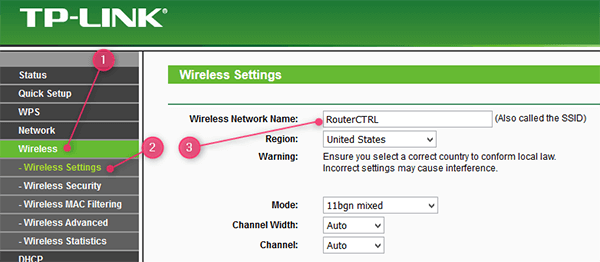
- In the menu on the left click Wireless.
- Then click on Wireless settings.
- In the Wireless Network Name type your desired network name.
Changing the Wireless Password
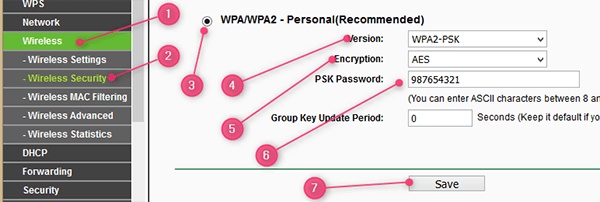
- In the menu on the left click Wireless.
- Then click on Wireless security.
- Scroll down and check WPA/WPA2 – Personal(Recommended)
- In the Version drop down list select WPA2-PSK
- Set Encryption to AES.
- In the PSK Password field type a unique and strong password.
- Click Save.
For Modern TP-Link router models.
Newer TP-Link router models have a modern GUI. In the example given below we are going to use the Archer 7 GUI.
Changing the BASIC wireless settings.
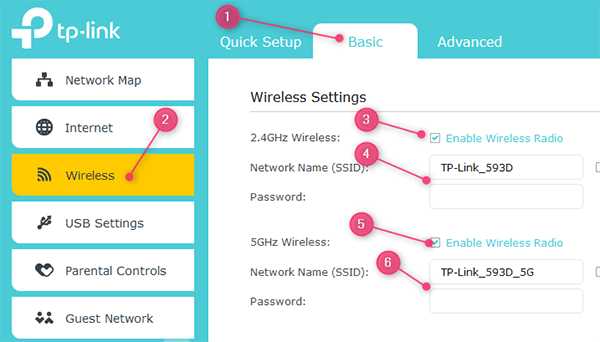
- Click on BASIC.
- Then click on Wireless.
- and 5. Check the Enable Wireless Radio on both 2.4GHz and 5GHz Wireless.
- and 6. Type a new network name (SSID) and make sure to know whether you will be connecting to the 2.4 or 5GHz.
Also type strong wireless passwords for both.
Changing the ADVANCED wireless settings.
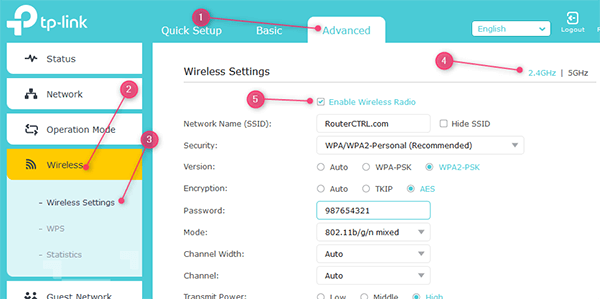
In case you want to play with the advanced settings follow these steps.
- Click on ADVANCED.
- Then click on Wireless
- Then on Wireless Settings.
- Choose whether you want to make the changes on the 2.4 or 5GHz band.
- Check the Enable Wireless Radio and then make the following changes:
- Network Name (SSID): Type your desired network name. Make sure it’s something familiar to you.
- Hide SSID: No need to check this. Although it is considered as an additional layer of security to your network it’s not worth the trouble.
- Security: Select WPA/WPA2-Personal (Recommended)
- Version: Select WPA2-PSK
- Encryption: You can choose AES here.
- Password: Type your wireless password and make sure its strong enough. Combine numbers and special characters with small and capital letters for best results. Also make sure to write it down J
- Mode: 802.11 b/g/n mixed
- Channel width and Channel can be set to Auto.
Recommended reading:
- TP-Link Router Orange Light: An In-Depth Guide
- TP-Link Router Lights Meaning: Everything You Need to Know
Final Words
The TP-Link router login steps are something every user has to be familiar with. As you can see it’s not that difficult to make the necessary changes and secure your network. And the best thing is there is so much more to change and modify according to your need.

Hey, I’m David. I’ve been working as a wireless network engineer and a network administrator for 15 years. During my studies, I also worked as an ISP field technician – that’s when I met Jeremy.
I hold a bachelor’s degree in network engineering and a master’s degree in computer science and engineering. I’m also a Cisco-certified service provider.
In my professional career, I worked for router/modem manufacturers and internet providers. I like to think that I’m good at explaining network-related issues in simple terms. That’s exactly what I’m doing on this website – I’m making simple and easy-to-follow guides on how to install, set up, and troubleshoot your networking hardware. I also review new network equipment – modems, gateways, switches, routers, extenders, mesh systems, cables, etc.
My goal is to help regular users with their everyday network issues, educate them, and make them less scared of their equipment. In my articles, you can find tips on what to look for when buying new networking hardware, and how to adjust your network settings to get the most out of your wi-fi.
Since my work is closely related to computers, servers, and other network equipment, I like to spend most of my spare time outdoors. When I want to blow off some steam, I like to ride my bike. I also love hiking and swimming. When I need to calm down and clear my mind, my go-to activity is fishing.
