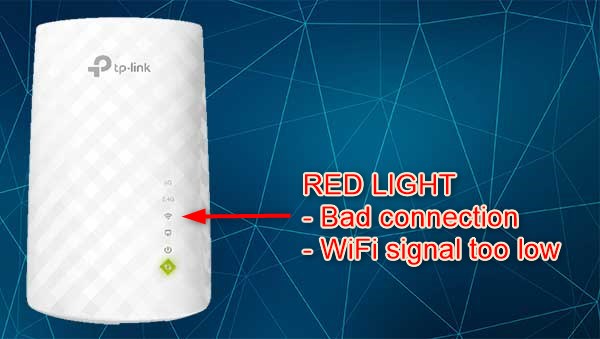
If you want to expand your wireless network, reduce interference and make the WiFi signal stronger, the TP-Link WiFi extender is the right choice. However, there are situations when it can signal that there is something wrong and that it requires your immediate attention. In this case, we are going to cover the TP-Link WiFi extender red light, what might be the causes for it, and how to fix it.
So let’s start!
CONTENTS
- TP-Link WiFi Extender Red Light: Meaning
- How To Fix The TP-Link WiFi Extender Red Light?
- Final Words
- FAQ
- Why Does My TP-Link WiFi Extender Show a Red Light?
- How Can I Reset My TP-Link WiFi Extender?
- How Do I Update the Firmware on My TP-Link WiFi Extender?
- Can Moving My TP-Link WiFi Extender Improve Signal Strength?
- What Should I Do If My TP-Link WiFi Extender Still Shows a Red Light After Troubleshooting?
- How to Connect TP-Link WiFi Extender to Router?
- Why is My TP-Link WiFi Extender Not Working After Setup?
- Can I Use Multiple TP-Link WiFi Extenders in My Home?
- How to Change the WiFi Password on TP-Link Extender?
- What to Do If TP-Link WiFi Extender is Slowing Down Internet Speed?
TP-Link WiFi Extender Red Light: Meaning
The red light on your TP-Link WiFi extender usually indicates that the WiFi signal is too weak. To be more precise, if the signal strength is at 30% or less you will see the red light.

And now let’s see what you can do to get rid of it and see the green light again.
How To Fix The TP-Link WiFi Extender Red Light?
Unplug It And Plug It Back In
The first thing to try is pretty simple and very effective. All you need to do is to unplug the extender from the electrical outlet. Leave it disconnected for 10-20 seconds and then plug it back into the wall outlet. Now just give it some time to boot up completely and connect. You should see the green lights pretty soon.
However, if the red light is still on after you do this, try the following.
Move It Closer
We have mentioned that the red light indicates that the WiFi signal is too weak. This might have happened if you have moved or replaced the router recently. Also, maybe a new device is causing interference and affecting the WiFi signal strength, so you will have to investigate this as well.
However, in order to make the signal better, we need to move the extender closer. Plug the extender closer to the router and wait for it to reconnect. As a result, we can expect to have a stronger signal between the router and the extender, and of course, the red light should turn green now.
Update The Firmware
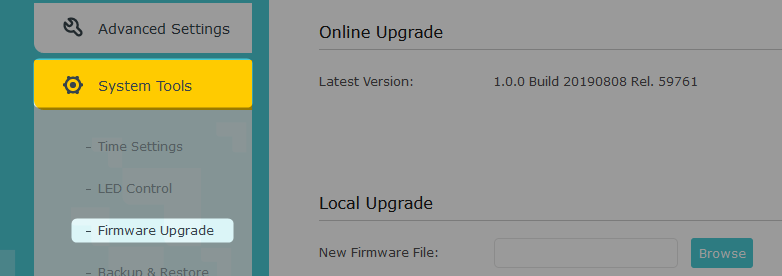
Corrupt or obsolete firmware can also be the reason for this behavior. Although it is highly recommended to keep the firmware up-to-date we often forget to check this. In order to do this, you need to login into the extender’s admin dashboard and then find the Firmware update section. This is usually located in the System Tools menu. There you can choose to perform a Local or Online firmware upgrade.

Reset The TP-Link WiFi Extender
Resetting the extender to factory defaults is another solution to the problem you might want to try. However, before you start you have to know that you will have to set it up again. This is necessary because the factory-reset process will revert the extender’s settings to the state when it was brand new. All the settings you have changed will be erased.
Some extenders come with a reset button while others have this button hidden inside of a pinhole.
If your TP-Link WiFi Extender has a Reset button, make sure the extender is powered on. Press the Reset button and keep it pressed for a couple of seconds. The extender will reboot and this is when you should release the reset button.
If the Reset button is hidden, you will need to use a pointed object like a paper clip or a pen to press the button. When you press it, hold it for around 10 seconds. The extender will reboot. Give it some time to boot up and stabilize.
These two ways to reset the TP-Link WiFi extender to factory defaults should help you fix the TP-Link WiFi extender red light issue. To make sure you have reset it to factory defaults try to login to its admin panel with the default login details.
All you have to do now is to connect and set up the TP-Link extender again.
Contact TP-Link Support
If you have tried everything and the red light is still on, it is recommended to contact Support. Make sure to thoroughly explain what the problem is. They can give some tips on how to fix the problem. In case your device is defective and it’s still under warranty, you might expect to get a replacement.
Final Words
We hope that you have fixed the TP-Link extender red light successfully by now. When you know the reason for this problem, it isn’t that difficult to fix it. You just need to start with the simplest and easiest solutions first and then move to the advanced ones gradually. Hopefully, you won’t need to reset the extender to factory settings or get in touch with support. But if you have to, feel free to do it. After all, it is pretty important to have a strong and stable internet connection in every corner of our home.
FAQ

Hey, I’m David. I’ve been working as a wireless network engineer and a network administrator for 15 years. During my studies, I also worked as an ISP field technician – that’s when I met Jeremy.
I hold a bachelor’s degree in network engineering and a master’s degree in computer science and engineering. I’m also a Cisco-certified service provider.
In my professional career, I worked for router/modem manufacturers and internet providers. I like to think that I’m good at explaining network-related issues in simple terms. That’s exactly what I’m doing on this website – I’m making simple and easy-to-follow guides on how to install, set up, and troubleshoot your networking hardware. I also review new network equipment – modems, gateways, switches, routers, extenders, mesh systems, cables, etc.
My goal is to help regular users with their everyday network issues, educate them, and make them less scared of their equipment. In my articles, you can find tips on what to look for when buying new networking hardware, and how to adjust your network settings to get the most out of your wi-fi.
Since my work is closely related to computers, servers, and other network equipment, I like to spend most of my spare time outdoors. When I want to blow off some steam, I like to ride my bike. I also love hiking and swimming. When I need to calm down and clear my mind, my go-to activity is fishing.

