There are situations when your laptop won’t see any wireless network available. It is practically impossible not to see a wireless network when you live in a city, but your laptop still says that there are no networks available.
Well, if that’s what’s going on with you you may have disabled Wi-Fi by accident. If your laptop has a physical switch on the side that enables and disables Wi-Fi then you need to check this button. Otherwise, you should be able to do it on the keyboard.
In the next few paragraphs, we will explain how to turn on Wi-Fi from your keyboard. So, let’s get started!
CONTENTS
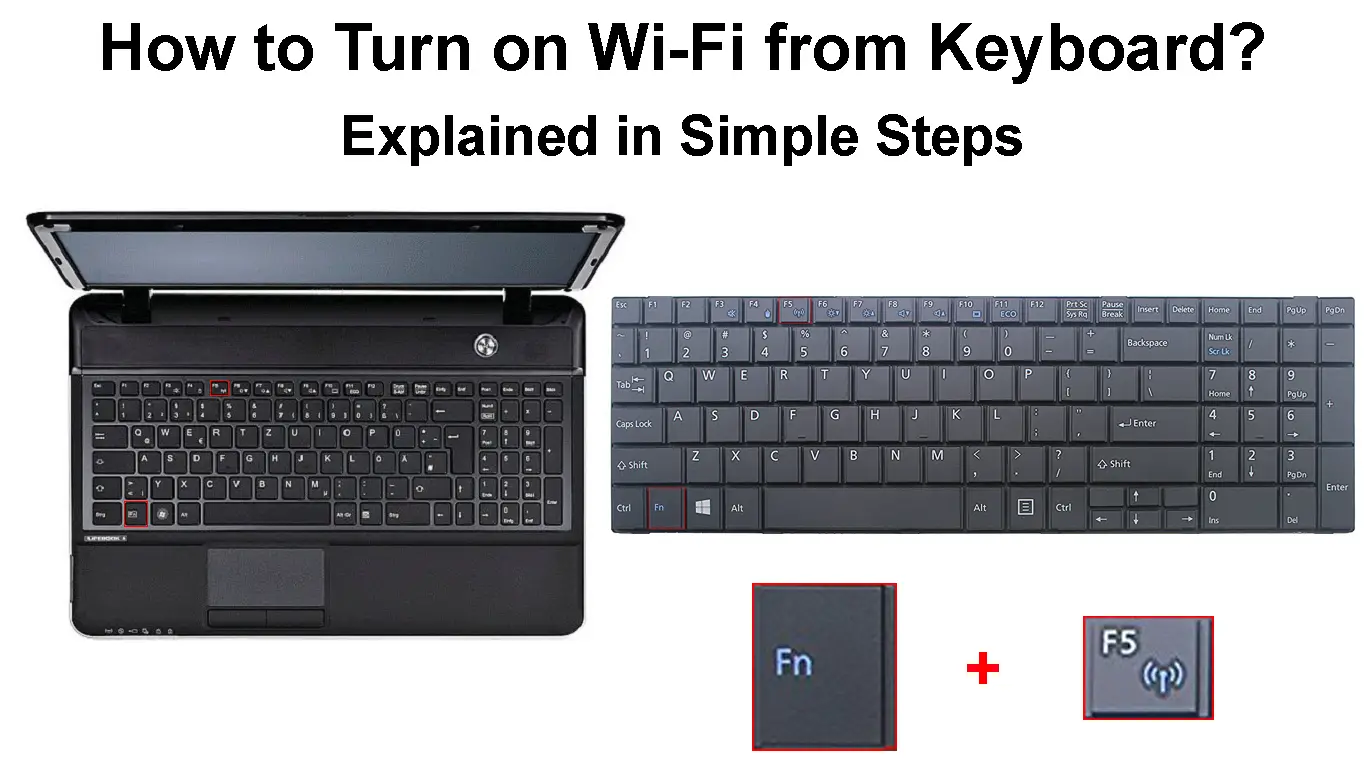
How to Enable Wi-Fi on Your Laptop Using the “Fn” Key?
The Wi-Fi can be turned on and off using different key combinations, and this mainly depends on the laptop’s brand and model.
The button on the keyboard that can be used to turn Wi-Fi on and off is also different and can be represented by different images.
One of the buttons is the “Fn” key at the bottom-left part of the keyboard. The other button is usually one of the function keys from the top row and F1, F2, F3, and so on. Taking a quick look at the image on the button should reveal which one needs to be pressed along with the “Fn” button to enable or disable Wi-Fi.
In most cases it will be the F2 button, but as we said this depends on the laptop brand and model. Just look for something similar to a wireless icon. Normally you should see this on the F1, F2, F3, or F12 function keys.


We have to say that using these key combinations is quite handy but what happens when your “Fn” key doesn’t work?
How to Enable Wi-Fi on Your Laptop If The “Fn” Key Is Not Working?
There are situations when the “Fn” function key won’t work. In that case, enabling and disabling Wi-Fi from the keyboard will be impossible. Luckily, there are a few other ways that can be used to enable and disable Wi-Fi on your laptop.
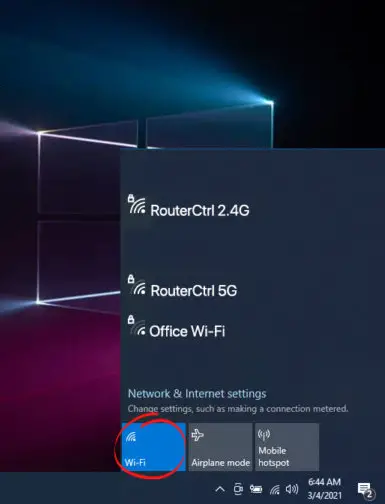
Use the Wi-Fi Icon In Windows 10 Or 11
Windows 11 – Left-click on the Wi-Fi icon in the bottom-right of the desktop. Then click on the Wi-Fi icon again. If it has been disabled, this will enable Wi-Fi, and the laptop should connect automatically to your network. If it doesn’t, click on the little arrow next to the Wi-Fi icon and choose the network you want to connect to.
![]()
Windows 10 – If you are using Windows 10, click on the Wi-Fi icon in the bottom-right of the desktop, but this time click on the Wi-Fi icon. When activated, you should see a list of available networks. Connect the laptop to your network.
Enable Wi-Fi From the Settings in Windows 10 Or 11
Windows 11 – Click on the Start button and then click on the Settings icon if it is pinned. If it isn’t, type “settings” in the search field. Click on the Settings icon when it appears.
Take a look at the menu on the left and click on Network & internet.
In the Wi-Fi section, you should see a toggle ON/OFF button at the right. It is probably off so you should click on it to enable Wi-Fi and set it to the ON position.
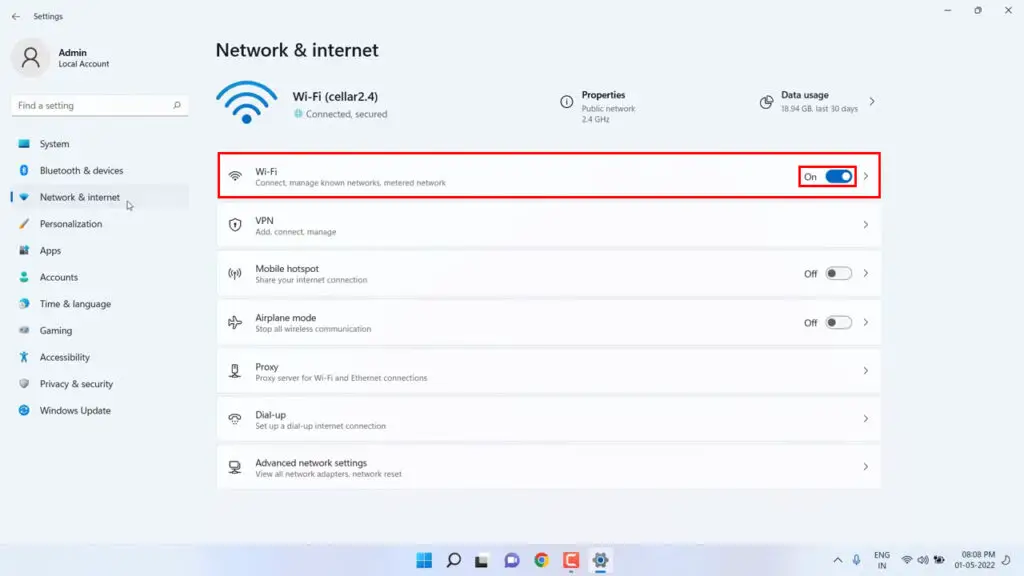
If there is a known wireless network your laptop should connect automatically to it.
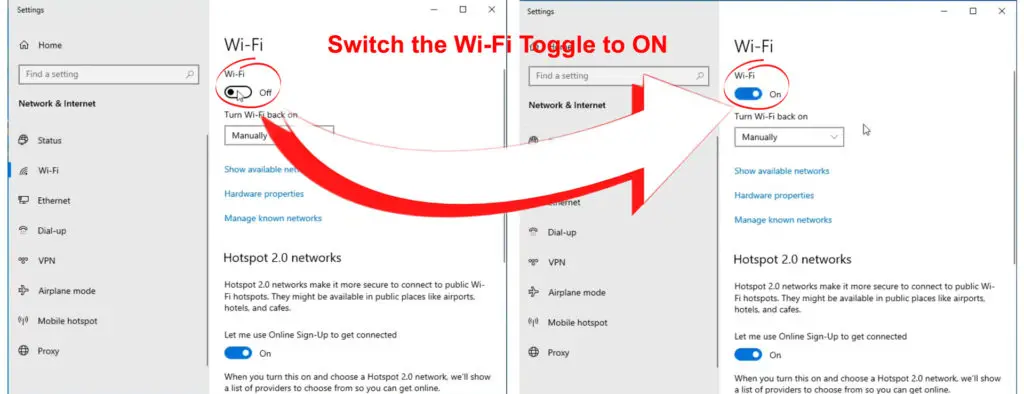
Windows 10 – Click on the Start button in the bottom left of the desktop and then click on the little gear icon just above. It will open Settings. Now click on Network & Internet and in the new windows look for Wi-Fi in the menu on the left.
Recommended reading:
- How to Fix A Tablet That Won’t Connect to Wi-Fi? (Troubleshooting Guide)
- How to Sign In to Wi-Fi Network On iPhone? (Step-by-Step Guide)
- How to Make Your Own Wi-Fi Network on Your Phone? (Explained)
Since Wi-Fi is disabled you should see a toggle ON/OFF button. Click on it to enable Wi-Fi on Windows 10.
Use the Physical Wi-Fi Switch If Your Laptop Has One
Some laptops come with a physical Wi-Fi switch that can be used to enable and disable Wi-Fi. It is usually positioned on the side of the laptop so check whether your laptop has it.

If it does, check this button and turn on Wi-Fi. Here is one example to see what the Wi-Fi switch looks like when Wi-Fi is enabled and disabled.
Create A Shortcut on Your Desktop to Turn Wi-Fi ON and OFF
Creating shortcuts to enable and disable Wi-Fi on your laptop is another solution if your Fn key is not working.
- Right-click on the desktop and select New > Shortcut
- To create a shortcut that disables Wi-Fi type “netsh wlan disconnect” without quotes. Click Next and give it a name like “Wi-Fi OFF” and click Finish.
To create a shortcut that enables Wi-Fi type “netsh wlan connect name=your SSID”. Note that you have to enter the name of your wireless network instead of “your SSID”. Click Next and give it a name like “Wi-Fi ON” and click the Finish button.
- Now you have two icons on your desktop that allow you to disable and enable Wi-Fi by double-clicking the one you want.
How to Create Wi-Fi ON/OFF Shortcuts on Your Desktop (Windows PCs)
NOTE: If you want to add a Shortcut Key for this shortcut, right-click on the shortcut you have just created. Go to Properties and then in the Shortcut Key type the key combination you would like to use to activate the shortcut command. For example, if you press the “Q” key on the keyboard “Ctrl + Alt + Q” will be added automatically. This will be the key combination you should press on the keyboard to run the shortcut command.
Final Words
Hopefully, now you know how to turn on Wi-Fi from the keyboard. We have tried to make this as simple as possible but it greatly depends on your laptop and whether or not it has that function key.
We have also tried our best to give you some additional options in case your keyboard is not functioning properly. These are pretty helpful if you need to turn the Wi-Fi on and off quickly.

Hey, I’m Jeremy Clifford. I hold a bachelor’s degree in information systems, and I’m a certified network specialist. I worked for several internet providers in LA, San Francisco, Sacramento, and Seattle over the past 21 years.
I worked as a customer service operator, field technician, network engineer, and network specialist. During my career in networking, I’ve come across numerous modems, gateways, routers, and other networking hardware. I’ve installed network equipment, fixed it, designed and administrated networks, etc.
Networking is my passion, and I’m eager to share everything I know with you. On this website, you can read my modem and router reviews, as well as various how-to guides designed to help you solve your network problems. I want to liberate you from the fear that most users feel when they have to deal with modem and router settings.
My favorite free-time activities are gaming, movie-watching, and cooking. I also enjoy fishing, although I’m not good at it. What I’m good at is annoying David when we are fishing together. Apparently, you’re not supposed to talk or laugh while fishing – it scares the fishes.

