If you are using a Vianet router for your home or office wireless network it is important to know how to manage and secure that network from unwanted access. You can do that from the Vainet router admin dashboard and in order to access it you have to know the Vianet router login steps.
In this article we are going to show you how to access your Vianet router settings and how to change the default network name and wireless password.
So, let’s begin!

CONTENTS
What You Need:
In order to access your Vianet router settings you have to use a device like laptop or desktop computer, a tablet or a smartphone. Also, this device has to be connected to your network over WiFi or using a direct wired connection.
And finally, it is important to have the Vianet admin login details. You can try accessing your router using the default login details given here or check whether there is a sticker on the router with the printed default login details.
What Are The Default Vianet Router Details?
These are the default Vianet router login details:
Default router IP address: 192.168.1.1
Vianet admin username: useradmin
Vianet admin password: useradmin
NOTE: You can also try this username: superadmin and the following password: q!w@e#
If you have changed these or these ones don’t work, check the router label.
How To Login To Vianet Router?
Follow the next few steps carefully and you should see the Vianet router admin dashboard in a minute.
STEP 1 – Is The Device Connected?
The device you are planning to use to access the router settings has to be connected to the Vianet router network. If the device allows you to connect it directly to the router using an Ethernet cable we recommend using that type of connection. Otherwise, if WiFi is the only option, feel free to use that connection as well.
When using a wireless connection you can expect to be disconnected from the network or logged out when you change the wireless or the router admin password.
STEP 2 – Launch The Web Browser
Open the web browser on your device. It will allow you to access the router’s web-based interface and manage the router settings in a user-friendly environment. You can use any web browser you already have installed on the device.
STEP 3 – Type The Vianet Router IP Into The URL Bar
The default Vianet router IP is 192.168.1.1. You need to enter the IP into the browser’s URL bar. Then press Enter or Go on the keyboard.

This should make the router login page appear. If the router login page doesn’t appear you have to check the following:
– Is the device still connected to the network? Check the cables if you have connected the device using a network cable or check the network icon on the device.
– Have you entered the correct IP address? Check the IP using this guide.
– Have you entered the IP correctly? Mistyping the IP address is a common reason why the router login page doesn’t appear. Retype the IP carefully and try again.
STEP 4 – Enter The Vianet Admin Login Details
When the router login page appears and you get asked to enter the admin username and password, type “useradmin” (without quotes) in both fields and press the Login button.
If these login details are correct, you will be taken to the Vianet router admin dashboard.
However, if the admin username and password we have provided don’t work, type them again or check the router label and see whether they match. But if you know that these have been changed you should use the custom ones to access the Vianet router settings.
STEP 5 – Now You Can Manage Your Vianet Router Settings
Right now, you have admin access and you have full control over the router settings. While you can easily modify various router settings there are two that greatly improve the network security and have to be changed as soon as possible. These are the default admin password and the default network name and wireless password.
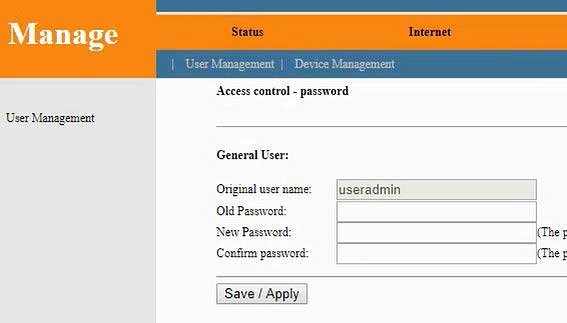
Change The Vianet Admin Password
Changing the admin password ensures that only you can access the router admin dashboard. The default admin password is easy to guess and anyone can find it with a simple Google search.

1. Login to your Vianet router as described.
2. Click on Manage in the menu at the top.
3. The User Management page will open allowing you to change the admin password. Just follow the instructions and complete the necessary fields with the old and new admin password.
4. Click on the Save/Apply button to save the new admin password.
Change The Vianet Wireless Network Name And Password
Everyone wants to make the wireless network name more personal or to say something more about the business. At the same time the network has to be secured and this is why you need to change the default WiFi password. Plus, it is recommended to change it every few months.
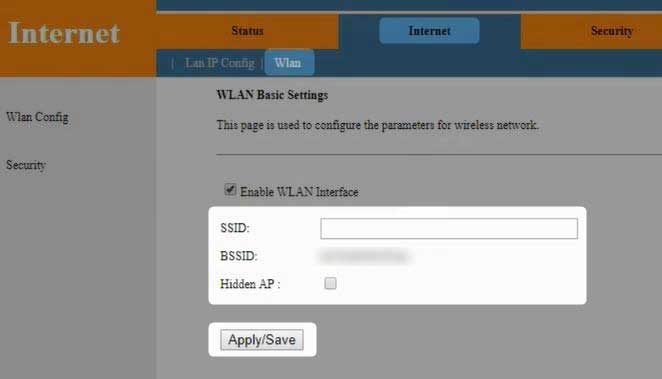
Here is where you can find the wireless settings and make the necessary changes.
1. Login to the Vianet router.
2. Click on Internet in the top menu.
3. Then click on WLAN in the sub-menu.
4. The WLAN Basic Settings page will open and in the SSID field type the desired network name.

5. Click on Apply/Save and the new wireless network will be saved. Now you can connect to it using the old wireless password and login again to your Vianet router.
6. Now again go to Internet, then select WLAN and in the left-hand menu click on Security.
7. As Encryption select WPA2 from the drop-down list.
8. Make sure AES is checked.
9. In the Key field enter the desired wireless password.
10. Confirm the changes by clicking the Apply/Save button.
Now you need to connect again to your network using the new wireless password and don’t forget to reconnect your other wireless devices.
Recommended reading:
- Router Refuses to Connect to Management Page (How to Fix It?)
- How to Configure a Router to Use WPA3?
- What Are the Most Common Router Problems? List of Common Router Issues (with Fixes)
Final Words
Accessing the Vianet router settings is very easy when you are well prepared. With a device connected to the network and the correct admin login details, the entire process takes less than a minute.
After that, you have all the options to manage and secure your network. While changing some basic settings is extremely easy and you really can’t make a mistake, we recommend avoiding making changes in the advanced settings unless you know what you are doing.
If you have to do it because you are following a tutorial, we recommend taking notes on the changes you are making or even better, create a backup of the router settings just in case. By doing this you can revert the router settings to the previous state if something doesn’t work as planned.

Hey, I’m David. I’ve been working as a wireless network engineer and a network administrator for 15 years. During my studies, I also worked as an ISP field technician – that’s when I met Jeremy.
I hold a bachelor’s degree in network engineering and a master’s degree in computer science and engineering. I’m also a Cisco-certified service provider.
In my professional career, I worked for router/modem manufacturers and internet providers. I like to think that I’m good at explaining network-related issues in simple terms. That’s exactly what I’m doing on this website – I’m making simple and easy-to-follow guides on how to install, set up, and troubleshoot your networking hardware. I also review new network equipment – modems, gateways, switches, routers, extenders, mesh systems, cables, etc.
My goal is to help regular users with their everyday network issues, educate them, and make them less scared of their equipment. In my articles, you can find tips on what to look for when buying new networking hardware, and how to adjust your network settings to get the most out of your wi-fi.
Since my work is closely related to computers, servers, and other network equipment, I like to spend most of my spare time outdoors. When I want to blow off some steam, I like to ride my bike. I also love hiking and swimming. When I need to calm down and clear my mind, my go-to activity is fishing.
