
Having issues with your Wi-Fi extender? Whether you can connect to your extender’s Wi-Fi but can’t get internet through the extender, or can’t even connect to the extender’s Wi-Fi network because your device doesn’t register the network, we’re here to help. In this post, we will go through the most common causes and offer you potential fixes. Follow our troubleshooting guide to restore your internet connection.

CONTENTS
- First Things First – Check Your Internet Connection
- Check Your Internet Equipment
- The Extender is Too Far Away from the Router
- The Extender is Not Set Up Properly
- Outdated Firmware
- Set Up DHCP Settings on Your Extender
- Wi-Fi Broadcast or SSID Broadcast Is Not Enabled
- Check for Wi-Fi Interference
- Your DNS Settings Might Be Causing the Issue
- Do You Have MAC Filtering Enabled on Your Router?
- What About Your Devices (Phones, Laptops, etc.)?
- Almost Out of Ideas
- Conclusion
First Things First – Check Your Internet Connection
If you don’t have an internet connection at the moment, your extender won’t connect you to the internet. So, if your internet is down because of an outage or for some other reason, there’s nothing you can do about the extender because there’s nothing wrong with it.
Solution: Try connecting your devices directly to the router or modem. Ideally, you should use a wired connection. If you still can’t access the internet, check for outages by calling your ISP or visiting your ISP’s support page. If your ISP confirms that there’s an outage in your neighborhood, there’s nothing you can do but wait.
If your ISP’s representative tells you that there’s no reported outage in your area, contact your neighbors and see if they’re experiencing the same problem. If they are, you need to contact your ISP again and ask to send a technician to your neighborhood. If the neighbors don’t have any problems with their internet connection, the problem is in your home. It could be a problem with some piece of equipment (splitters, modem, router), it could be the cables inside your home, or it could be the line bringing the internet to your home. If it’s the last one, you will need a technician, but if it’s the equipment-related issue or the cables, then you can try solving the problem on your own.
Check Your Internet Equipment
Let’s start by removing the router from the equation. Connect your PC directly to the modem using an Ethernet cable, and see if you have an internet connection. If you can access the internet when connected directly to the modem, the problem is in the router. Follow this guide to troubleshoot your router.
If you still can’t access the internet, then the problem is not in the router. It could be your modem, your splitter (or splitters), damaged cables, MoCA adapters, or some other piece of equipment between the point of entry (the place where the internet cable enters your home) and your modem.
You could try borrowing a functional modem from your neighbors (assuming they have the same ISP) and replacing your modem with the borrowed one. If this helps, the problem is in the modem, and you can either try to fix the modem by trying some common fixes like rebooting, resetting your modem to factory settings, and updating its firmware. If none of those things help, it’s probably smart to contact your ISP and ask them to send a technician or a new modem.
If your neighbor’s modem doesn’t help and you still don’t have an internet connection, the problem is not in the modem.
Now comes the hard part. You need to check your cables and see if they are damaged. When I say cables, I mean the entire run from the point of entry to your modem. Every inch. If you’re using fiber internet, you should be aware that fiber-optic cables are very fragile and prone to damage. One bending is enough to break them and rob you of your internet connection. If you notice any kind of damage on your cables, replace them. If the cables are fine, you need to check the rest of the equipment.
If your setup includes splitters, check the connections on them. If the connections are loose, tighten them up. If the connections are fine, then the problem could be in the splitters. If possible, remove the splitters, and try running a direct line to your modem. If you manage to restore your internet connection, you need to replace your splitter. Do the same thing with MoCA adapters and filters in case your setup includes any.
If none of the suggested solutions help, the problem is not inside your home. In that case, ask your ISP to send a technician and troubleshoot the line outside your home.
Assuming that your internet connection is fine, but you still can’t get internet through your extender, here are some common causes and easy fixes.
The Extender is Too Far Away from the Router
This is one of the rookie mistakes. The extender is supposed to be placed halfway between the router (or gateway) and your dead zone. If it’s in the middle of the dead zone, it won’t receive the Wi-Fi signal from your router and it won’t be able to extend it because there’ll be nothing to extend. So, in this case, the extender will broadcast its Wi-Fi signal, and you will be able to connect to your extender via Wi-Fi, but there will be no internet because the extender will not receive the signal from the router.
Solution: Most extenders have LED indicators showing you whether the extender is too far from the router or not. Check the manual and find out what those different LED colors mean. If the extender is too far and can’t receive a stable Wi-Fi signal from the router, you need to move it closer to the router. Check if this solves the problem. If not, try some of the other fixes listed below.
The Extender is Not Set Up Properly
Most of today’s extenders can be set up in at least two ways – you can use the WPS button or your browser and the extender’s web interface. More advanced extenders can also be set up via the included app. The manufacturers made the setup process straightforward, so making a mistake is pretty hard. But it’s still not 100% impossible. And it doesn’t even have to be your mistake – it could be some kind of glitch in your extender’s firmware that ruins the setup.
To set up your extender using the WPS button, you need a router with a WPS button and an extender with a WPS button. You will have to place the extender near your router, plug it in, power it on, and wait for it to enter the setup mode. Then, you will have to press the WPS button on the extender. After that, press the WPS button on the router. After a few seconds, the extender will connect to the router. If your router and your extender support 2.4 GHz Wi-Fi and 5 GHz Wi-Fi, you will have to repeat the procedure for the 5 GHz Wi-Fi. Once your extender connects to the router via 2.4 GHz Wi-Fi, you will press the WPS button on each device once again to enable the 5 GHz Wi-Fi extension.
How to Properly Set Up a NETGEAR Extender (WPS Button)
If you want to use your extender’s web interface, the first few steps are the same. The router and extender should be close to each other, you need to plug in your extender, power it on, and wait until it’s up and running. Don’t press the WPS button. Connect your PC to the extender (either via Wi-Fi or via Ethernet cable), open your browser, and enter your extender’s default IP address. You will need to log in to set up your extender. If you’re installing the extender for the first time, use the default username and password (usually found in the manual or on a sticker on the extender).
Now, you need to go through the initial setup. The extender will scan for Wi-Fi networks (2.4 GHz Wi-Fi network first), you will select your Wi-Fi, and enter your Wi-Fi password. Then, you will enter the desired Wi-Fi name (SSID) and Wi-Fi password for your extender’s network. Once you save these settings, the extender will also search for available 5 GHz networks (if it supports dual-band Wi-Fi), and you will go through the same steps and save the settings.
When you finish setting up the extender, your extender will reboot. You can log out and close your browser once the reboot is complete. After that, you can unplug the extender and move it to your desired location.
How to Properly Set Up a NETGEAR Extender (Installation Assistant)
As mentioned, more advanced extenders come with one additional setup option. They come with some kind of companion app that allows you to set up your extender without going to the extender’s web interface or using the WPS button. Instead, you can open the app, wait for it to recognize your extender, select the extender, and go through the step-by-step setup process.
How to Properly Set Up a TP-Link Extender (3 Options)
As you can see, it’s almost impossible to make a mistake while setting up your extender. However, if you experience some kind of glitch, and you can’t access the internet through your extender, you could try a few things.
How to Properly Set Up a Linksys Extender
Solutions: First, reboot your extender. When your extender is up and running, check if the LEDs are green and try connecting to your extender. If you still don’t have an internet connection, try resetting your extender to factory default settings. This will erase all the settings made in the past, and you will have to set it up from scratch. Just follow the instructions above to set up your extender.
Outdated Firmware
On rare occasions, outdated firmware on your extender could cause internet loss or occasional disconnection. It’s not a common occurrence, but it’s theoretically possible.
Solution: Update your extender’s firmware. To do that, you will usually have to use the extender’s web interface or the companion app that comes with the extender. If your extender can’t connect to the internet, your only option is to download the update to your PC, connect the PC to your extender using an Ethernet cable, open the web-based interface of your router (in your browser), find the firmware update section, and upload that file you downloaded.
How to Update a NETGEAR Extender
Set Up DHCP Settings on Your Extender
Normally, you don’t have to deal with your extender’s DHCP settings. In fact, your extender’s DHCP server is disabled by default. Your extender will, under normal conditions, receive an IP address through your router’s DHCP server. Every device connected to your extender will also receive an IP address from your router’s DHCP server. However, miscommunication between the router and your extender is possible and could result in loss of internet connection when trying to connect to Wi-Fi through your extender.
Solution: Depending on the complexity of your extender, you may only be able to set a static IP address for your extender. For most NETGEAR extenders, that’s the only thing you can do. TP-Link extenders, on the other hand, have a built-in DHCP server, so you can do both – enable the DHCP server on the extender and set a static IP address for the extender.
For NETGEAR extenders, when you log in to their settings, there’s a section called IP Address or IP Address Setup. There, you can choose to use a static IP address for the extender instead of using the one received from your router. However, you still have to know the router’s IP address, subnet mask, and you need to select the address from the same subnet as your router’s default IP. You will also have to enter the primary DNS server address – it can be your router’s default IP or some public DNS server address (like Google’s).
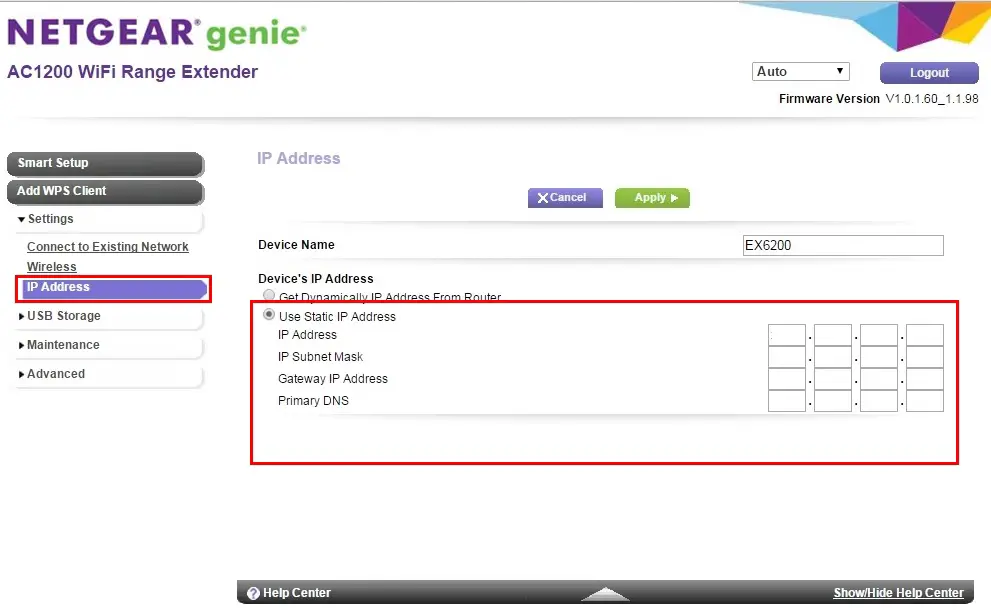
Setting a Static IP Address on a NETGEAR Extender (Source – NETGEAR)
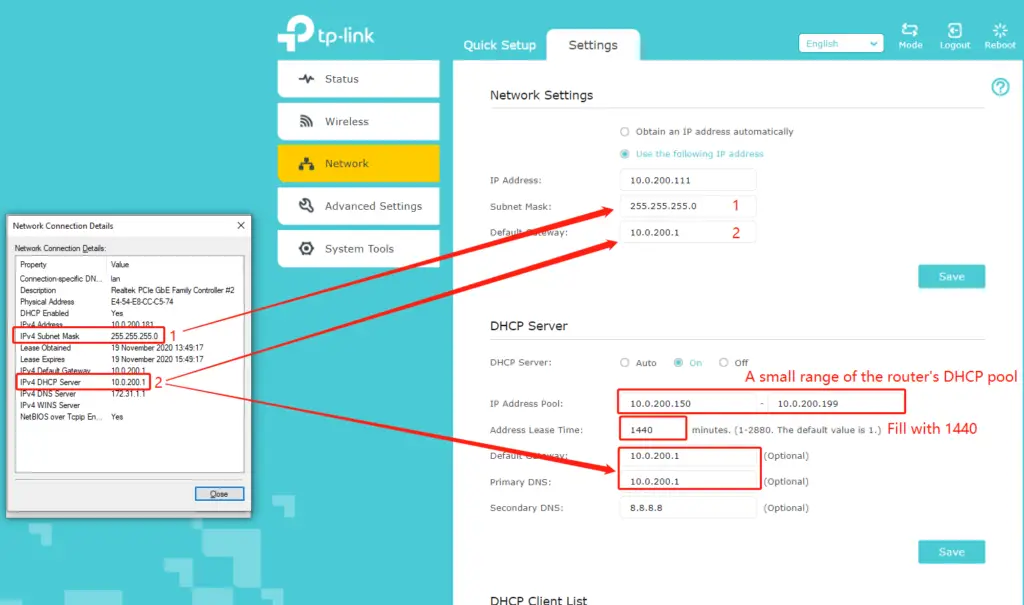
If you are using a TP-Link extender, you will not only be able to set a static IP but also enable the DHCP server on your extender. That way, you will allow your extender to assign IP addresses to devices that connect to the internet through your extender. To do this, you will need to know your router’s default IP address, your network’s subnet mask, and your router’s DHCP pool size. You will give a small portion of addresses from your router’s DHCP pool to your extender’s DHCP pool.
On the TP-Link’s website, there’s no info on whether you should shrink your router’s DHCP pool to prevent it from assigning the addresses given to your extender’s DHCP pool, but we think it’s safer if you do that. For example, if your router’s DHCP pool spans from 192.168.0.2 to 192.168.0.250, and you want to give a small portion of your router’s DHCP pool to your extenders DHCP pool (let’s say from 192.168.0.200 – 192.168.0.250), you may want to shrink your router’s pool to 192.168.0.2-192.168.0.199. The internet should work even if you don’t shrink your router’s DHCP pool.
How to Assign a Static IP to Your TP-Link Wi-Fi Extender and Enable DHCP Server (source – TP-Link Support)
Wi-Fi Broadcast or SSID Broadcast Is Not Enabled
If you don’t see your extender’s Wi-Fi network(s), there’s a chance that your extender’s Wi-Fi network is disabled or that the SSID broadcast for your extender’s Wi-Fi is disabled.
Solution: To solve this issue, you need to log in to your extender’s settings and go to the Wireless tab. On some extenders, there will be an option to hide SSID. This option should be disabled. On other extenders, you will see an option SSID Broadcast or Enable SSID Broadcast. In this case, the option should be enabled.

Check for Wi-Fi Interference
Wi-Fi interference is a serious problem, especially for 2.4 GHz Wi-Fi. However, the interference more often manifests through slow speeds or occasional Wi-Fi disconnection. Still, when using Wi-Fi, you should at least try to disable Bluetooth on your Bluetooth-enabled devices, keep the microwave away from the router, and don’t put your router close to other electronic devices.
Eliminating Wi-Fi Interference
Your DNS Settings Might Be Causing the Issue
There’s a small chance that your extender’s default DNS settings are not set appropriately. And even if they are set appropriately, you could try changing the DNS server in your extender’s settings and use some other public DNS server. The most popular third-party DNS servers are Google’s (8.8.8.8 and 8.8.4.4), Cloudflare’s (1.1.1.1 and 1.0.0.1), Cisco’s (208.67. 220.220 and 208.67. 222.222). etc.
Note: When setting up a DNS server, you will also have to assign a static IP address to your extender. Make sure to assign an IP from the same subnet as your router’s default IP. Also, avoid assigning an address that is already in use. That will cause an IP conflict.
Do You Have MAC Filtering Enabled on Your Router?
MAC filtering, if enabled, could be the reason why you can’t get internet through your extender. MAC filter can be set in two different ways – you either have to whitelist devices that you want to give access to, or you have to blacklist the devices you don’t want on your Wi-Fi.
Solution: Depending on the type of MAC filtering, you will either have to whitelist your extender, or remove it from the blacklist. Log in to your router, and go to the MAC Filtering section. On some routers, this option is named Access Control, and it’s usually found under Security settings. You will see a list of whitelisted/blacklisted devices, and you will have to make changes appropriately.

What About Your Devices (Phones, Laptops, etc.)?
If you can’t access the internet on one or two devices, but can access the internet through your extender on other devices, then the problem could be in those devices, not the extender.
In that, case you will have to troubleshoot your devices. Depending on the device, you can do various things to fix the issue – reset network settings, run network troubleshooters, uninstall/reinstall/update network drivers, clean DNS cache, give static IP addresses to your devices, change DNS servers, etc. Below, you can find video tutorials with some useful troubleshooting tips.
Windows PC Can’t Access the Internet through Wi-Fi – Troubleshooting Tips
Android Phone Can’t Access the Internet through Wi-Fi – Troubleshooting Tips
https://www.youtube.com/watch?v=32zMN6nJw_0
iPhone Can’t Access the Internet through Wi-Fi – Troubleshooting Tips
Almost Out of Ideas
If none of the previous tips work, the only thing left to try is resetting your network equipment. You don’t have to reset everything at once. You can start with your extender since that is less invasive than resetting the router/gateway. See if that solves the problem. Depending on the extender brand and model, the procedure may be slightly different, but there’s usually a button or a recessed pinhole on the bottom or side that you have to press for a few seconds.
How to Factory Reset a NETGEAR Extender
How to Factory Reset a TP-Link Extender
If resetting your extender doesn’t help, you could try resetting your router. Before resetting the router, try connecting your devices to the router’s Wi-Fi. If you can access the internet through the router, then the problem is probably not in the router. But you can still try to reset it, and see if it works.
Conclusion
Hopefully, one of our tips helped you fix your extender issue and finally access the internet through your extender. If you are still facing the same problems after resetting all of your network equipment, it’s time to contact the manufacturer’s customer support and ask for additional troubleshooting tips. If even they can’t help you, you should probably start thinking about buying a new extender.

Hey, I’m Jeremy Clifford. I hold a bachelor’s degree in information systems, and I’m a certified network specialist. I worked for several internet providers in LA, San Francisco, Sacramento, and Seattle over the past 21 years.
I worked as a customer service operator, field technician, network engineer, and network specialist. During my career in networking, I’ve come across numerous modems, gateways, routers, and other networking hardware. I’ve installed network equipment, fixed it, designed and administrated networks, etc.
Networking is my passion, and I’m eager to share everything I know with you. On this website, you can read my modem and router reviews, as well as various how-to guides designed to help you solve your network problems. I want to liberate you from the fear that most users feel when they have to deal with modem and router settings.
My favorite free-time activities are gaming, movie-watching, and cooking. I also enjoy fishing, although I’m not good at it. What I’m good at is annoying David when we are fishing together. Apparently, you’re not supposed to talk or laugh while fishing – it scares the fishes.