Many people use Android devices in their daily activities. They can send emails, call friends, schedule appointments, make payments and get regular updates on happenings worldwide. To fully experience the capabilities of an Android device, one needs an internet connection, and one way of getting one is through Wi-Fi.
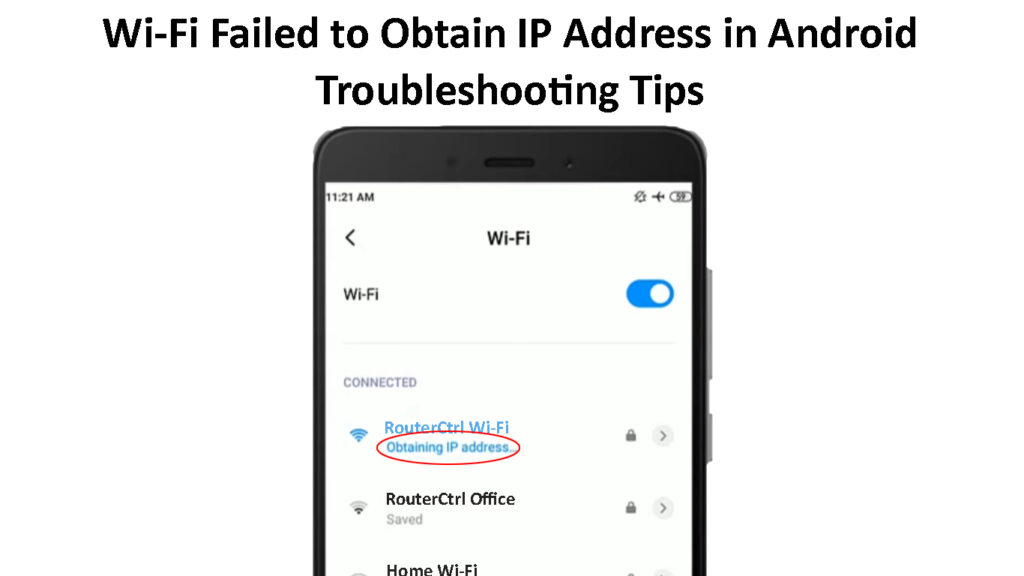
Unfortunately, sometimes these devices can have challenges joining a Wi-Fi network and instead notify you that it has failed to obtain an IP address.
Such scenarios are infuriating and can adversely affect your day, especially if they keep reoccurring. Hence this article provides solutions regarding what you can do to remedy the situation.

CONTENTS
- What Causes the Wi-Fi Failed to Obtain IP Address Error?
- Forget and Reconnect to the Wi-Fi Network
- Toggle Airplane Mode ON and then OFF
- Restart Your Router and Mobile Phone
- Move Closer to the Router
- Check the Router’s MAC Filtering Settings
- Use a Static IP on Your Android Device
- Change Your Android Device Name
- Use a Different Encryption Mode on the Router
- Clear Google Play Services Cached Data
- Uninstall any Wi-Fi-Controlling Apps
- Factory Reset the Router and Android Device
- Conclusion
What Causes the Wi-Fi Failed to Obtain IP Address Error?
Whenever your Android presents such an error message, there has been a communication/configuration mishap between the Android device and your router or access point.
The configuration errors can be a result of the following:
- Software incompatibility between the router and Android device
- The router’s Wi-Fi signal could be too weak or too far from the Android device
- There could be a cache memory conflict between the router and the Android device
These are only some of the possible causes. It isn’t easy to pinpoint one, so you have to try a couple of troubleshooting measures and hope one works.
Below are some tips on what you can do to restore normal Wi-Fi connectivity on your Android device.
Forget and Reconnect to the Wi-Fi Network
If the issue keeps occurring each time you connect to a Wi-Fi network that you have previously connected to, try forgetting the network and reconnecting to it.
When you forget a Wi-Fi network from your Android device, you erase all configuration information relating to the network. That gives the router and Android device a chance to establish a new connection and sort out any configuration issues that could have been the problem.
Also, when you forget and reconnect to a Wi-Fi network on Android, you force the device to request a new IP address from the router. This is essential as issues could arise because the Android device was having problems renewing its Wi-Fi lease, thus the error message.
You can forget a Wi-Fi network on Android through the steps below:
- Go to Settings > Network and Internet > Wi-Fi
- Find the network you want to connect to and long-press the Wi-Fi name.
- The following three options will appear; Connect, Modify, and Forget. Tap Forget.
- Next, tap on the same Wi-Fi network, which will prompt you to enter the password. Key in the correct password and tap Connect.
- Wait and see if the problem persists; if it does, try the other suggestions below.
Forget a Wi-Fi Network on an Android Phone
Toggle Airplane Mode ON and then OFF
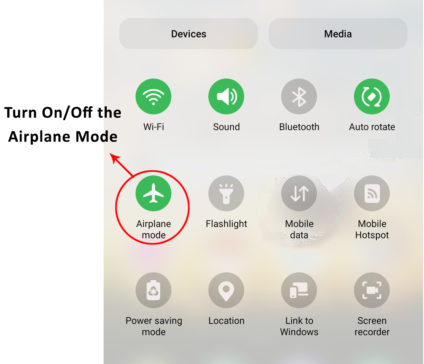
Another way to refresh the Android’s Wi-Fi connection is by switching the Airplane mode on and off. Doing that will stop any wireless connections and signals from your phone.

Using the Airplane mode can resolve any system bugs that might be the problem; therefore, you should try it.
You can activate Airplane mode by navigating Settings > Network and Internet > Airplane mode. Then tap the slider button to move it to the right to activate the setting. Wait for at least five minutes and tap the button to disable Airplane mode.
Now try reconnecting to the troublesome Wi-Fi network and check if it works properly.
Restart Your Router and Mobile Phone
Restarting the router will ensure it starts issuing IP addresses afresh and hopefully sorts any configuration issues that could affect it. For instance, a system malfunction might cause the router’s DHCP server to stop renewing IP leases or issuing IP addresses to devices that want to join the network.
A system restart also allows both devices to reconfigure themselves and hopefully remove any software bugs affecting IP address acquisition. Remember, the issue could be that the Android device is not correctly initiating the DHCP conversation that helps it obtain an IP address. Or the router could fail to respond to the Android’s IP requests; thus, it is important to restart both devices.
Routers have different ways of restarting, but you can cut the power supply to the router, wait a few minutes then power it back up.
Long press the power button on the Android device to reveal the power menu and tap restart/reboot.
Move Closer to the Router
The router and Android device could be having communication issues because the gadgets are far apart. When the phone is at the edge of the Wi-Fi signal range, such problems are bound to happen.
Therefore, consider moving closer to the router and then try reconnecting to the Wi-Fi network.
Check the Router’s MAC Filtering Settings
Routers have access control settings regulating which devices can join the network and which are barred from accessing the internet.
One such setting is MAC address filtering that, if set to use an Allow list and your Android is not among those on the list, you will have connection issues. Also, if the router uses a deny list and your Android is registered, it will not access the internet through that router.
You can access a router’s settings through its default IP address, usually printed on a label on the router. Simply type the IP address into a web browser, then enter the admin password and username to get to the settings.
Then search for MAC filtering settings and disable the feature. Alternatively, remove your Android from the deny list or add it to the allow list to ensure the router does not block it from accessing Wi-Fi.
Also, check whether the router is applying any additional access control settings, such as bandwidth limiting to your device. You will have to consult your router’s user manual or the manufacturer’s website for instructions on deactivating the various access controls it might have.
MAC Filtering on a TP-Link Router – How to Allow/Block Devices
Use a Static IP on Your Android Device
Routers give client devices dynamic IP addresses each time they join the network. The router’s DHCP server can malfunction and have issues assigning an IP address to your Android device.
You can overcome this by setting the Android device to a predetermined IP address instead of relying on the router to give it one.
To achieve this, go to your Android’s Wi-Fi settings and forget the troublesome Wi-Fi network. Then, select the same Wi-Fi network from your Android and tap on ‘Advanced Options’ before connecting to the network.
Go to IP settings under Advanced options and tap DHCP to reveal the DHCP and Static options. Select Static.
Next, change the last group of digits in the IP address field. You can select any number between 1 to 225. For example, if the IP was 192.168.1.128, change it to 192.168.1.153.
Now enter the Wi-Fi password in the appropriate field and tap Connect.
Alternatively, log into the router’s configuration settings and reserve an IP address for your Android device. Using a Static IP and reserving an IP address achieve the same result of ensuring the Android device has a predetermined IP address. That would alleviate the router’s stress of issuing an IP address to the Android and hopefully regain Wi-Fi connectivity.
How to Assign a Static IP Address to an Android Phone
Change Your Android Device Name
Although this might seem like a far reach, users who have faced the same problem claim it works for them. It could be because the router treats your Android device as a new device on the network once you change its name.
Therefore, there is no harm in changing your device’s name, considering it might resolve your Wi-Fi issues.
You can rename your device by going to Settings > About Phone > Device Name and changing the name, then tapping OK.
Next, forget the Wi-Fi network and reconnect to the same network, and hopefully, this solution works for you too.
How to Change Device Name on an Android Phone
Use a Different Encryption Mode on the Router
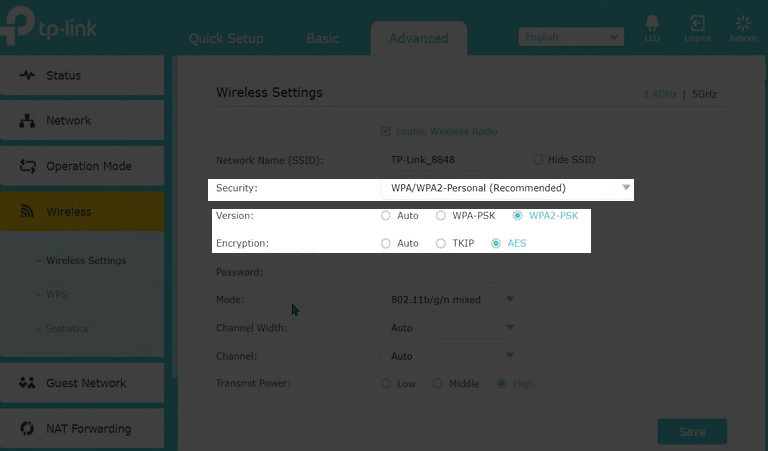
Routers have different encryption modes that they use to safeguard the Wi-Fi connection. Each encryption mode is unique; some are newer and more advanced than others.
Therefore, there is a chance the router uses a recent encryption method; thus, your device does not support it. Or the Android device is simply incompatible with your router’s encryption method.
Also, shifting from one encryption mode to another and then back can sort the router’s connectivity issues.
You can change your router’s security modes through the user interface page and then navigate to wireless security settings. Here you are likely to find an Encryption mode option.

Try the different encryption modes available on the router and restart it each time you shift to a new encryption mode.
Clear Google Play Services Cached Data
Google Play Services is an integral component of your Android device. Most system updates run in the background and corrupted Google Play cache data may be causing the Wi-Fi issues.
However, it is unclear how doing this solves the ‘failed to obtain IP address error, but it does not hurt to try.
You can clear your Android’s Google Play cache by going to Settings > Apps > See all apps. Then look for and tap Google Play Services and select the Storage and Cache option the finally, Clear cache.
Now try reconnecting to the Wi-Fi network and if it still misbehaves, clear the cache again, then forget the Wi-Fi network and restart your device. Then try reconnecting to the Wi-Fi network.
Uninstall any Wi-Fi-Controlling Apps
Apps like antivirus and VPN apps that interact with your Android’s Wi-Fi connectivity can also cause the problem. These apps usually monitor the data coming in and going out from your Android device or router.
As they monitor the internet traffic, they can also result in connectivity issues and block your Android from obtaining an IP address from the router.
Therefore, it is important you disable these apps, especially if this problem started after installing any of the mentioned apps.
You can uninstall an app on Android by long-pressing the app from the app launcher and then tapping the information icon. Finally, select Uninstall and confirm your choice to remove the app.
Factory Reset the Router and Android Device
Your last resort is to reset the router and your phone. Because if you try all the suggestions above and the issue persists, it means the matter has dug its roots deeper into your systems than you thought.
Also, a factory reset will erase all settings and apps that did not come with the Android device. This will guarantee that any app that could have been the problem is no longer on your device.
You can factory reset your Android by navigating Settings > System > Reset Options > Erase all data/Factory reset. Confirm you want to erase all data, enter your device password and wait for it to complete the reset.
How to Factory Reset an Android Phone
However, you can choose to only erase connection settings first by going to Settings > System > Reset Options > Reset Wi-Fi, mobile, and Bluetooth. Then confirm your choice, enter the device password, and you are done.
How to Reset Network Settings on an Android Phone
Conclusion
The instructions on updating various Android settings might vary from the steps that will work on your device. Although Android phones use the same OS, manufacturers tweak some aspects and change where to find some settings. Therefore, consult the manufacturers for your device’s precise instructions if you are worried about making the problem worse. Always equip your devices with the latest firmware to avoid unnecessary problems like these.

Hey, I’m Jeremy Clifford. I hold a bachelor’s degree in information systems, and I’m a certified network specialist. I worked for several internet providers in LA, San Francisco, Sacramento, and Seattle over the past 21 years.
I worked as a customer service operator, field technician, network engineer, and network specialist. During my career in networking, I’ve come across numerous modems, gateways, routers, and other networking hardware. I’ve installed network equipment, fixed it, designed and administrated networks, etc.
Networking is my passion, and I’m eager to share everything I know with you. On this website, you can read my modem and router reviews, as well as various how-to guides designed to help you solve your network problems. I want to liberate you from the fear that most users feel when they have to deal with modem and router settings.
My favorite free-time activities are gaming, movie-watching, and cooking. I also enjoy fishing, although I’m not good at it. What I’m good at is annoying David when we are fishing together. Apparently, you’re not supposed to talk or laugh while fishing – it scares the fishes.
