Windows updates are usually meant to make your device more efficient by fixing common problems and implementing new features. Unfortunately, in the bid to better your system, these updates also break features that were working perfectly before. One such feature that often malfunctions after updates is the Wi-Fi.
The downside is you cannot ignore the updates since they also patch critical security vulnerabilities that put the information on your PC in danger. However, this article lists measures you can take to fix your windows Wi-Fi, enabling you to update your system without any worries.
Below are steps to get your Windows device online if it loses Wi-Fi connectivity after an update.
CONTENTS
- Forget then Reconnect to the Wi-Fi Network
- Update Power Saving Settings for the Wi-Fi Adapter
- Run the Network Troubleshooter
- Disable then Enable the Network Adapter
- Update the Network Driver
- Restart the Wi-Fi Direct Virtual Adapter
- Uninstall the Wireless Network Driver
- Disable IPV6
- Reset Your Device’s TCP/IP Stack and Flush the DNS
- Conduct a Network Reset
- Rollback the Network Driver Update
- Uninstall the System Updates
- Conclusion
Restart Your Device
Before you embark on complicated fixes, consider some basic fixes that will get your Wi-Fi working normally. It is always advisable to restart your device after an update so that all system processes begin afresh and the updates are implemented.
To restart your Windows 10 device.
- Press the Windows button or click on the Start option on your taskbar.
- Click the power option, then select Restart.
Give your device a few moments to restart. Once it powers on, reconnect it to Wi-Fi and check if it works properly.
Consider trying different wireless networks if the problem is with the router and not your device. You can also try different browsers just to ensure the problem is with the Windows system and not the Wi-Fi network.
Forget then Reconnect to the Wi-Fi Network
You can also try reconnecting to your Wi-Fi network so that the Windows device can recreate the Wi-Fi profile. A Wi-Fi profile consists of the Wi-Fi password, the network’s security settings, and other information necessary for establishing a connection between your router and device.
Sometimes this information might get corrupted during the update, and forgetting then reconnecting to the network can help solve the problem.
You can forget and then reconnect to the Wi-Fi network by following the steps below;
- Press the Windows button, then navigate to Settings > Network & Internet > Wi-Fi.
- Ensure Wi-Fi is on by clicking the toggle switch under Wi-Fi so it says ON.
- Click on Manage known Wi-Fi networks, click on the Wi-Fi network you intend to connect to, then select Forget.
How to Forget a Wi-Fi Network in Windows 10/11
- Next, reconnect to the Wi-Fi network by pressing the back navigation option at the top left of your screen.
- Then select the Show available networks option to display all the available wireless networks around you.
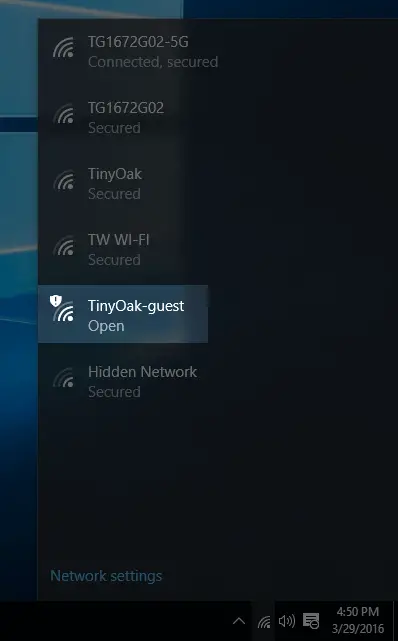
- Select the Wi-Fi you wish to connect to, click Connect, enter the password and select Next.
- Select Yes if you want your device to be discoverable by other devices on the network.
How to Connect to Wi-Fi in Windows 10
If you cannot update the Wi-Fi settings on your device, chances are the Windows system has problems detecting the network adapter. In that case, you can try the troubleshooting tips listed in this article related to the network adapter.
Update Power Saving Settings for the Wi-Fi Adapter
You can also disable your device’s settings that allow it to turn off the wireless adapter to save power. Some users who have had problems with the wireless adapter have stated that this works for them.
To do this, follow the steps below;
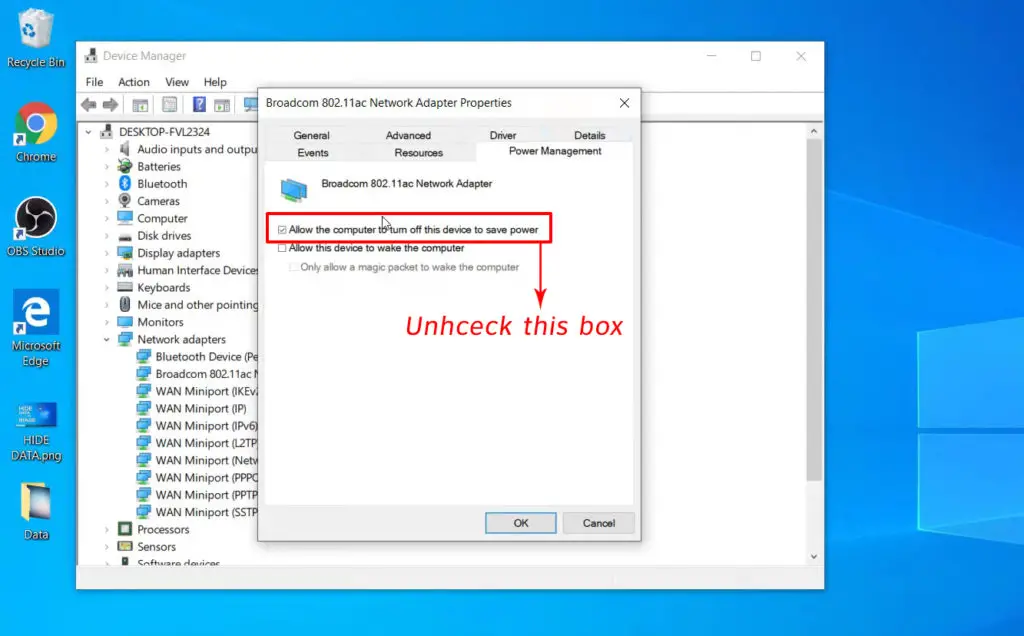
- Press the Windows + X buttons, then select the Device manager.
- Expand the Network adapters menu by clicking the > arrow.
- Right-click on your device’s wireless adapter and select Properties.
- Next, select the Power Management tab in the new window.
- Uncheck the ‘Allow the computer to turn off this device to save power option and click OK.
Restart your device and see if your wireless connectivity issues are solved.
Run the Network Troubleshooter
Windows devices have a network troubleshooter that can help solve minor connectivity issues. All you have to do is run the troubleshooter; hopefully, it will get your Wi-Fi working as it should.
You can try the troubleshooter by following the steps below:
- Press the Start button, then go to Settings.
- Next, navigate to Update and Security, then Troubleshoot >Additional troubleshooter.
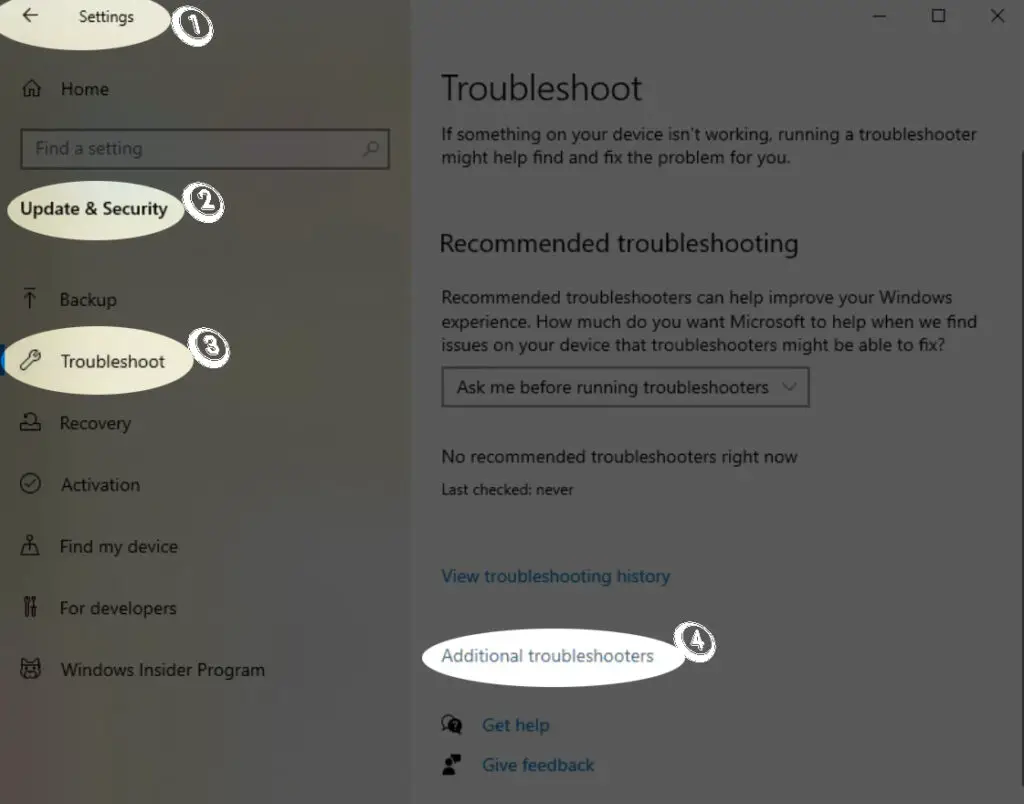
- Select the Internet Connection option, then run the troubleshooter.
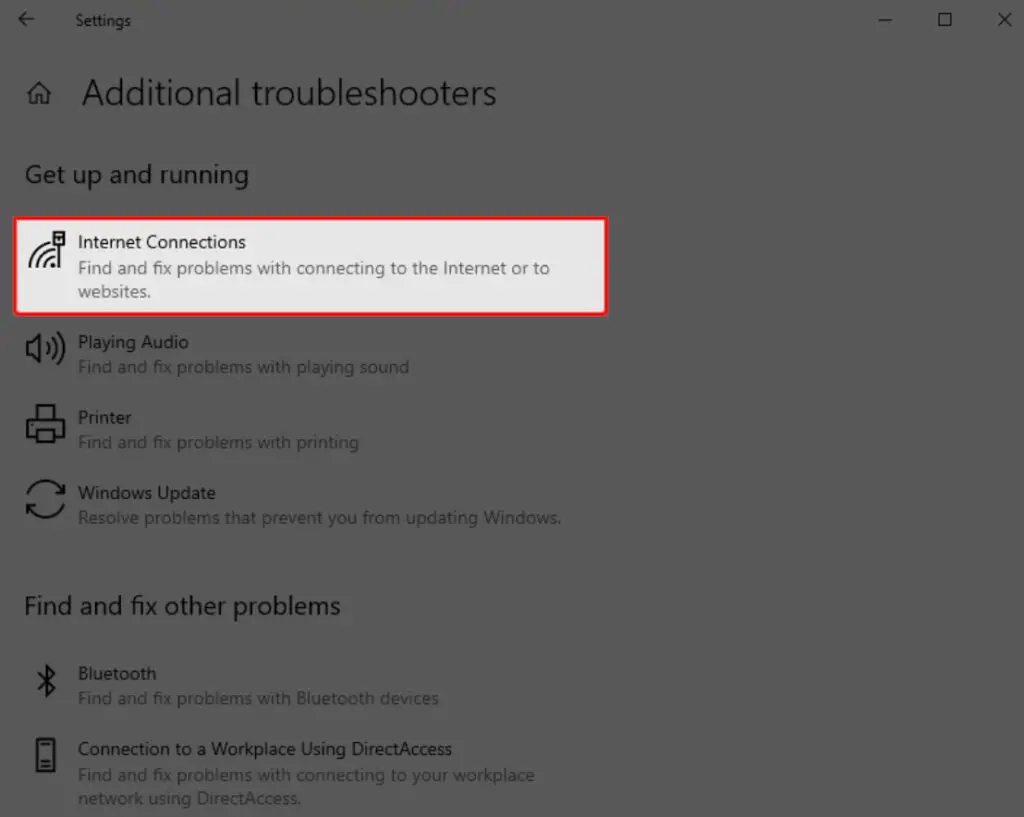
- Wait as the troubleshooter tries to detect any problem on your system.
Disable then Enable the Network Adapter
Another option is to disable the wireless network adapter and then reenable it. This will restart the network adapter and hopefully solve your connectivity issues.
You can restart the network adapter by navigating:
- Press the Windows button, then go to Settings.
- Next, go to Network & Internet > Change adapter options under Advanced network settings.
- Locate the Wi-Fi adapter on the new window and right-click on it.
- Next, click Disable and wait for the adapter to get disabled.
- Right-click on the adapter again and select Enable.

- Try reconnecting to Wi-Fi and check if it works as it should
Update the Network Driver
If the device can connect to Wi-Fi, but the connection seems slow or problematic, check if a driver update still needs to be installed. You can do this through the steps below:
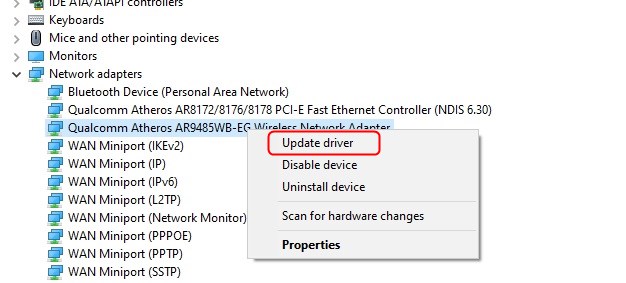
- Press the Windows + X keys, then select Device manager.
- Expand the Network adapters option to show your device’s wireless adapter.
- Right-click on the adapter and select Update driver.
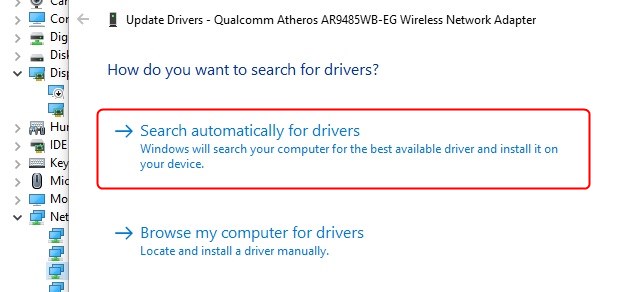
- You can search for updates automatically or manually on the new Window. Select ‘Search automatically for drivers’ and wait as the device searches for updates.
- If it does not find any, select ‘Search for updated drivers on Windows update.’
- Then select Optional updates > Driver updates and click the checkbox if any wireless driver updates are available.
- Finally, click download and install and wait for the system to finish installing the update.
How to Update Wi-Fi Adapter Drivers in Windows 10
If you have no Wi-Fi or Internet connectivity, consider downloading a Wi-Fi driver on a separate device and loading it on a flash drive. Then connect the flash drive to your computer and follow the steps above then select ‘Browse my computer for drivers’ instead of ‘Search automatically for updates‘.
Then click the Browse option, locate your flash drive from your system storage, select the saved driver, and click OK. Click Next to initiate installing the driver.
After you update the driver, restart your device before reconnecting to Wi-Fi.
Restart the Wi-Fi Direct Virtual Adapter
When you update Windows, it often loses its ability to create a Wi-Fi hotspot, which can even impact the device’s ability to connect to Wi-Fi.
Fortunately, you can restart the hotspot adapter by navigating to:
- Press the Windows + X button and select Device manager.
- On the device manager, click View > Show hidden devices.
- Go to Network adapters and click on the > to show the drop-down menu.
- Right-click on the Microsoft Wi-Fi Direct Virtual Adapter, then select Disable device.
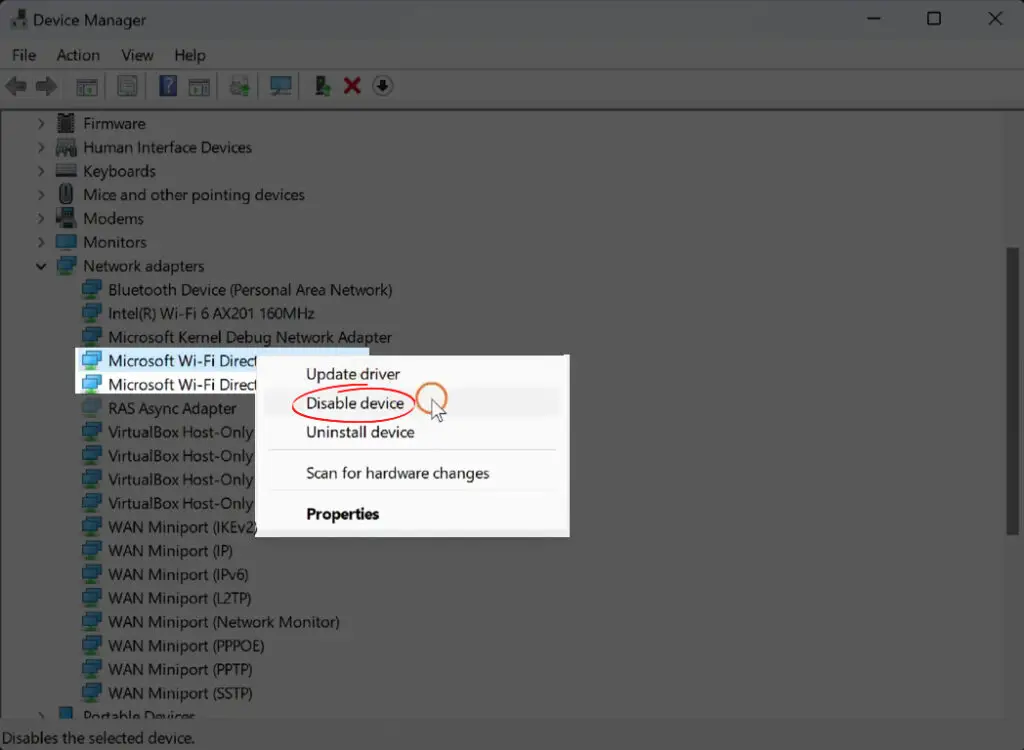
- Click Yes on the pop-up, and the adapter is disabled.
Check if your device works properly on Wi-Fi and if it does, leave the hotspot adapter disabled. And if you need to create a hotspot network, follow these same procedures and select Enable device to enable the adapter.
Uninstall the Wireless Network Driver
You could uninstall and then reinstall the device’s network adapter if it got corrupted during the update. Follow the steps below to do this;
- Press the Windows + X keys and select the Device manager.
- Click the arrow before Network adapters to expand the menu.
- Right-click on your device’s wireless adapter, then click on Uninstall device.
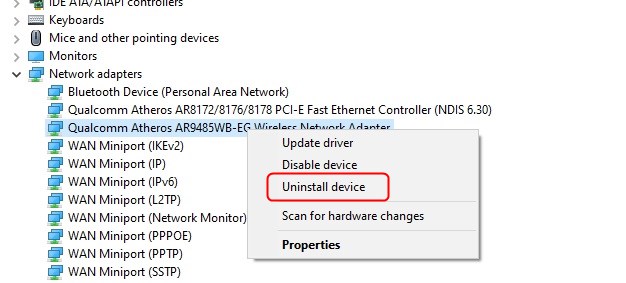
- Check the Delete the driver software for this device, then Uninstall.
- Select the Scan for hardware changes icon at the top of the device manager to reinstall the network driver.
- Restart your device and check whether it works on Wi-Fi as it should.
Disable IPV6
Sometimes the updates can also enable IPV6 settings on your Windows device. Normally, these settings should not affect the device’s functionality. However, disabling it has proven to enable the Wi-Fi to work normally after an update; therefore, you should try it.
To do this:
- Right-click on the connection icon on the taskbar.
- Select ‘Open Network and Sharing Center’.
- Select Change adapter options.
- Right-click on your wireless adapter, then select Properties.
- Scroll to the Internet Protocol Version 6 (TCP/IPv6) and ensure the checkbox before it is unchecked.
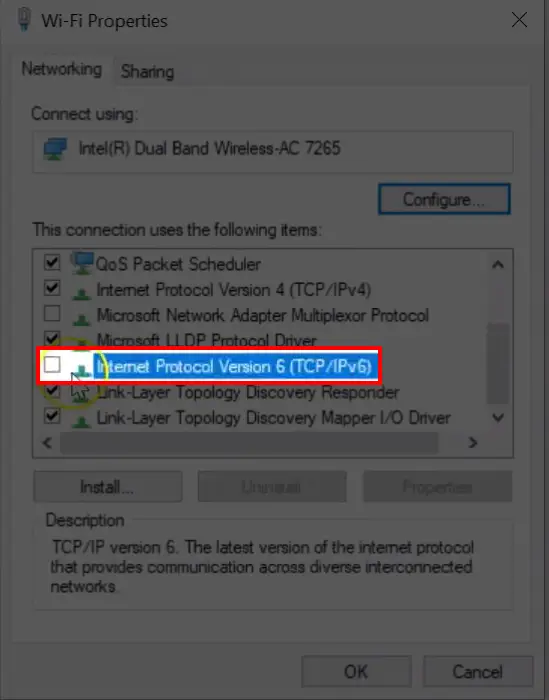
- Click OK and restart your device.
Reset Your Device’s TCP/IP Stack and Flush the DNS
You can use the command prompt to reset the mentioned connection settings and regain wireless connectivity. The necessary procedure is as follows:
- Click Search on the taskbar and enter Command prompt.
- Right-click on the result and select Run as administrator.
- Next, enter the following commands consecutively and press Enter after each command to run it.
- ipconfig /release
- ipconfig /flushdns
- ipconfig /renew
Restart your device and check if it works properly.
Conduct a Network Reset
Windows provides users with a network reset feature that is useful in such instances. Therefore, try resetting your network settings, and hopefully, Wi-Fi will be better once you reconnect to your home network.
The steps below will guide you on how to do this.
- Open Settings and go to Network & Internet, and select Status.
- Select Network reset.
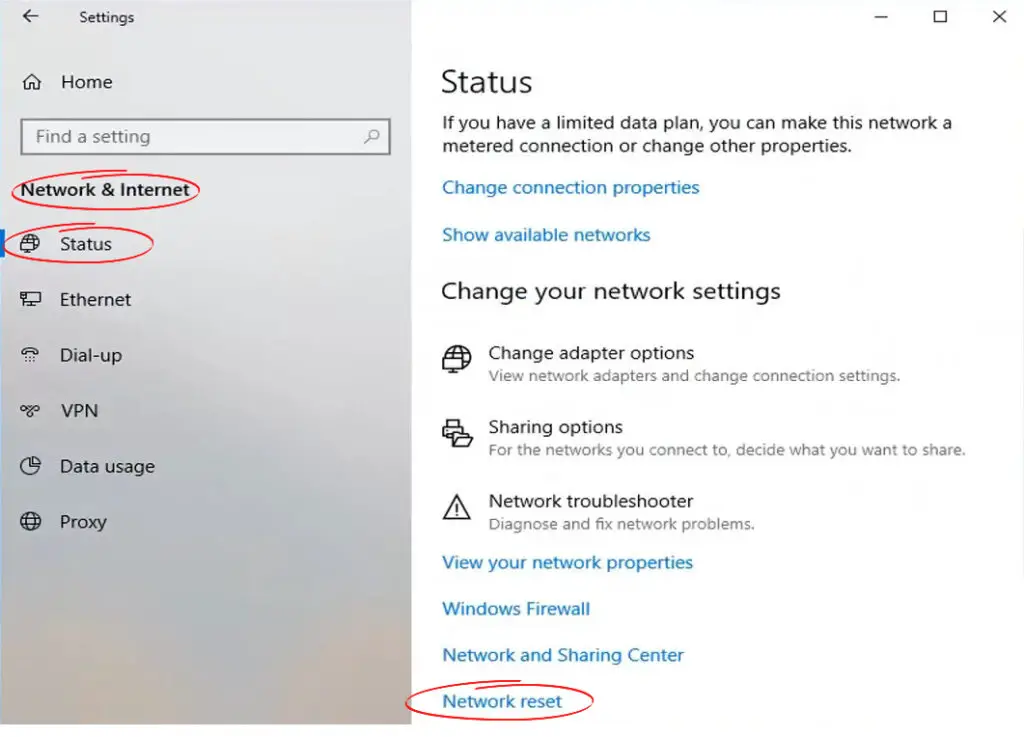
- Click on Reset now
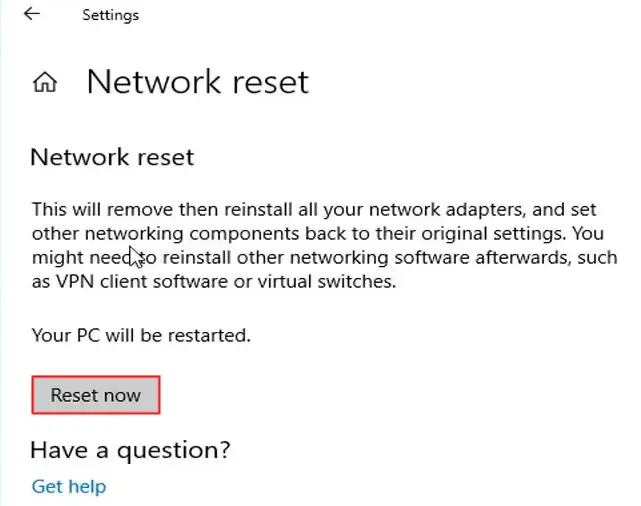
- Wait for the PC to restart and check if the problem persists.
Remember – you will have to reconnect to the network, so have the password close, and your VPN and firewall settings might be disabled after the reset.
Rollback the Network Driver Update
You could also restore the previous driver if the new update affects your Wi-Fi connectivity. To do this:
- Press the Windows + X keys and select Device manager.
- Expand the Network adapter option by clicking the > arrow.
- Right-click on the wireless adapter and select Properties.
- Click on the Driver tab, select Roll back driver, and follow the onscreen prompts.
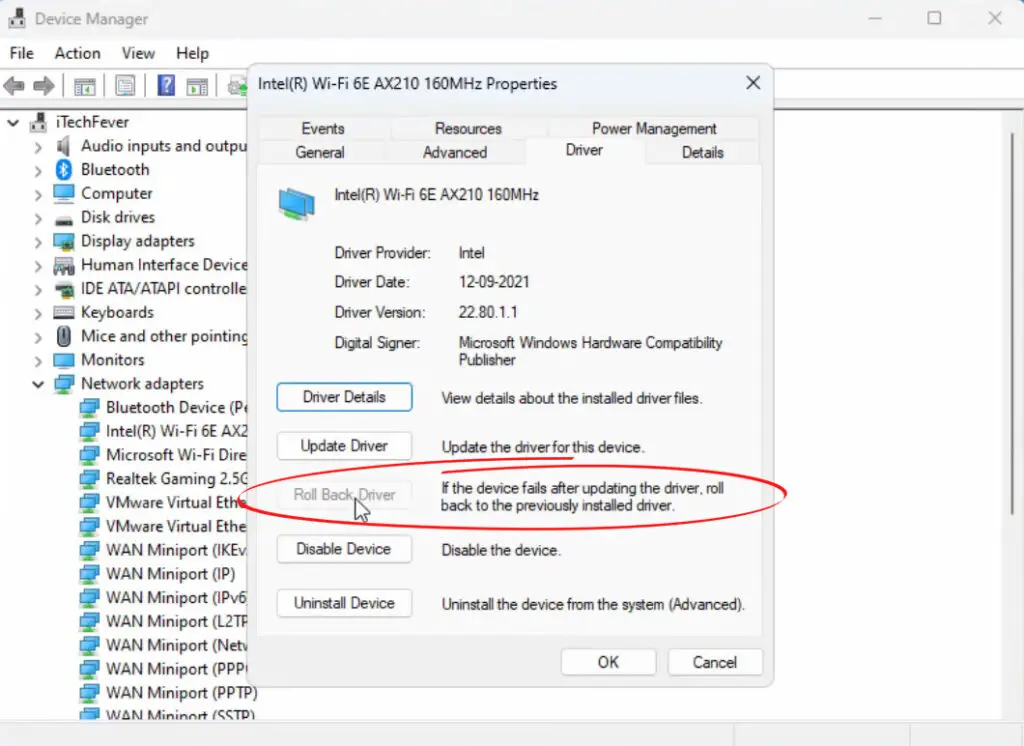
If the rollback driver option is greyed out, the previous driver is no longer available; therefore, try other troubleshooting tips. If you successfully roll back the diver, restart your device, then connect to Wi-Fi.
Uninstall the System Updates
Updates are meant to fix system bugs on your device but can result in new bugs. Therefore, you can uninstall the latest updates and hopefully resolve any connectivity issues affecting your device. The steps below show how you can do this.
- Click on the Start menu and select Settings > Update & Security.
- Select Windows update, then View update history.
- Next, click on Uninstall updates, then select the most recent update or the update you suspect is causing problems.
- Click on Uninstall > Yes > Restart now.
- Wait as the device restarts and check if Wi-Fi is back to normal.
Uninstalling Windows 10 Update
Conclusion
You should never be afraid to update your computer’s system because some features might stop working. Such scenarios are normal, and fortunately, Windows provides a rollback option that allows you to revert to older version drivers or the system version.
If the device still refuses to connect to Wi-Fi or keeps losing its Wi-Fi connection, consider using a wired connection and check for updates after a few days. However, if the connection problems persist, consult a professional for assistance tailored to your device.

Hey, I’m Jeremy Clifford. I hold a bachelor’s degree in information systems, and I’m a certified network specialist. I worked for several internet providers in LA, San Francisco, Sacramento, and Seattle over the past 21 years.
I worked as a customer service operator, field technician, network engineer, and network specialist. During my career in networking, I’ve come across numerous modems, gateways, routers, and other networking hardware. I’ve installed network equipment, fixed it, designed and administrated networks, etc.
Networking is my passion, and I’m eager to share everything I know with you. On this website, you can read my modem and router reviews, as well as various how-to guides designed to help you solve your network problems. I want to liberate you from the fear that most users feel when they have to deal with modem and router settings.
My favorite free-time activities are gaming, movie-watching, and cooking. I also enjoy fishing, although I’m not good at it. What I’m good at is annoying David when we are fishing together. Apparently, you’re not supposed to talk or laugh while fishing – it scares the fishes.

