This message just popped up, and you have no idea what to do. Is it some kind of virus? Is your PC or your router broken? How to fix an IP address conflict? First of all – it’s not a virus, and you don’t have to worry about your PC or router. An IP conflict can be easily resolved in just a few simple steps. Read this article and learn how.
CONTENTS
How Does an IP Address Assigning Process Work?
Every device connected to a network must have an IP address for communication purposes. That address is a unique identifier for that device. Without it, the device can’t send or receive data. It can’t even access the network.
That IP address can be static or dynamic. Static is assigned to a device permanently by the user. The dynamic address is assigned automatically by the DHCP server. DHCP stands for Dynamic Host Configuration Protocol. The DHCP server is built into every wi-fi router and is in charge of the automatic IP address assignment. Besides an IP address, a DHCP server assigns a subnet mask, default gateway, and a DNS server. Every device connected to your wi-fi network gets these identifiers from your router (from a DHCP server).
Recommended reading:
- Can A Bad Router Cause Slow Internet?
- How to Find Router IP Address on Android?
- How to Find Modem IP Address Behind Router?
A DHCP server can’t assign just any address to a device. Every DHCP server has a DHCP pool, which is the scope of addresses that a DHCP server can hand out. You can see how the DHCP pool is defined in your router’s settings. You can also adjust the size of the pool – you can expand or shrink that scope.
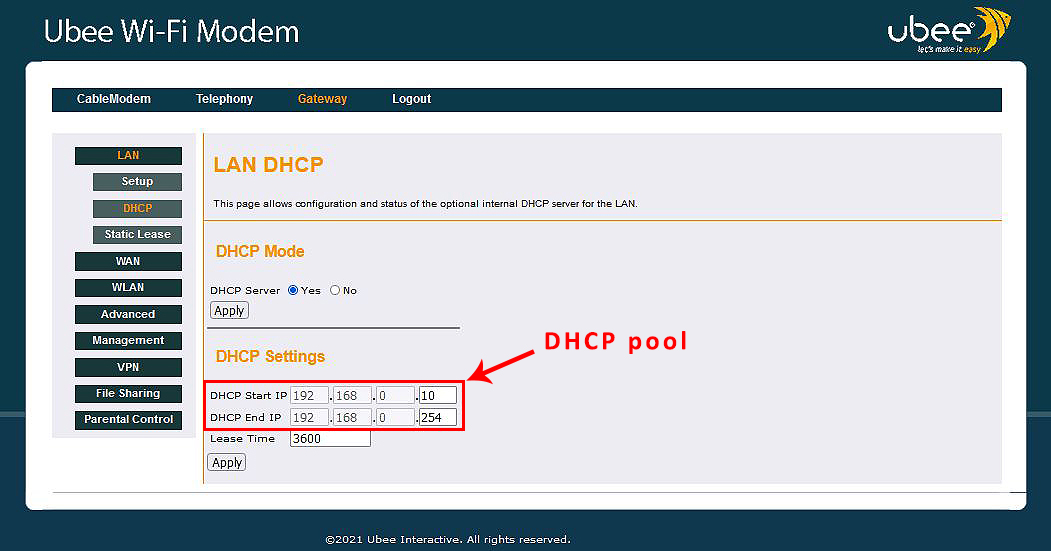
All the IP addresses inside the pool, by default, belong to the same subnet as the router’s default IP. For example, the default IP of the gateway from the example above is 192.168.0.1, and all the addresses in the DHCP pool are from the same subnet – 192.168.0.x (they all start with 192.168.0).
The computer doesn’t own a dynamically assigned IP address. The address is actually leased. You can find the duration of the lease (Lease Time option in our example). The reason why the addresses are leased is to make sure that our DHCP server doesn’t run out of addresses.
So, when your PC (or any other device) tries to connect to your wi-fi, it asks your router for an address, and your router (or rather the DHCP server inside your router) hands out the first available address. When the lease time expires, the server checks if the device is connected and renews the lease if the device is still connected. If it’s not connected, the address is brought back to the pool and becomes available again.
How Do You Assign a Static IP?
Certain devices, like printers or network servers, need a permanently assigned IP address. Those devices can’t have a dynamic IP address – their address must be static. Static IP addresses are assigned by the users (manually) and not automatically by the DHCP server. You can assign a static IP to any (or every) device connected to your wi-fi.
There are two ways to assign a static IP address to your device. You can do that through your device’s network settings (your PC’s TCP/IP properties), or you can make a DHCP reservation.
Method 1: Assign static IP to your PC using your PC’s TCP/IPv4 settings
To get to TCP/IP settings, you will have to open the Network and Sharing Center, click on your wi-fi network, open Properties, scroll down until you find Internet Protocol Version 4 (TCP/IPv4), and double-click on it.
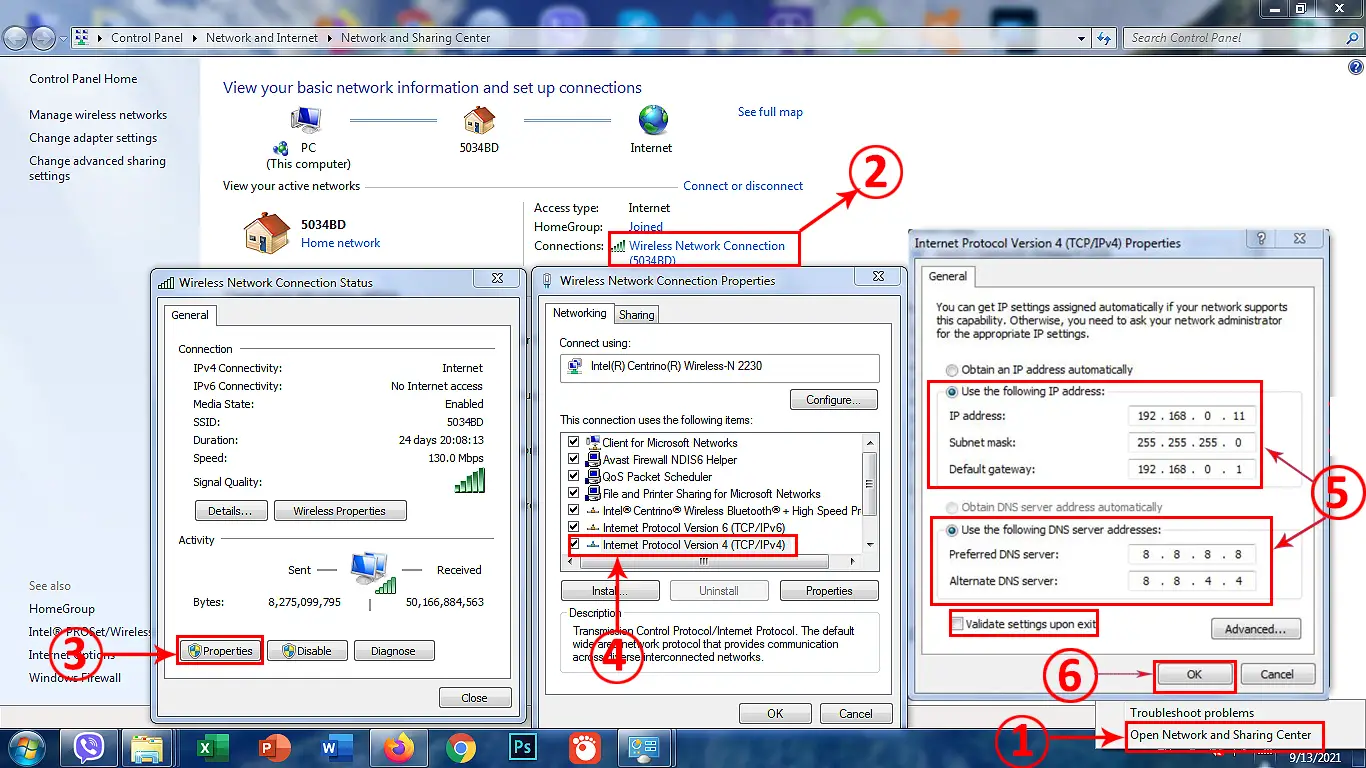
Step-by-step tutorial – How to assign a static IP to a PC running on Windows 7
In the TCP/IPv4 settings, you will have to select ‘Use the following IP address’ and enter all the required info (the address you want to assign, subnet mask, and a default gateway).
Then, select ’Use the following DNS server addresses’ and enter the preferred and alternate DNS server address.
Check the box ’Validate settings upon exit’, and click on OK.
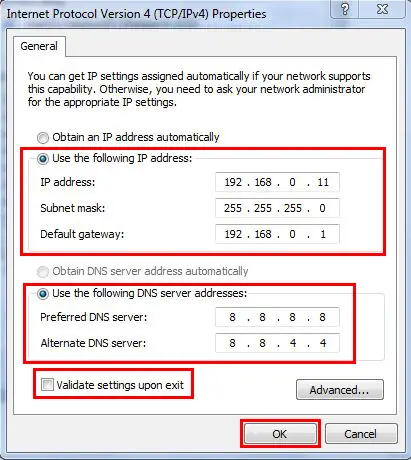
TPC/IPv4 properties
When your restart your device, the device will get a static IP address.
Method 2: Make a DHCP reservation
When you are on a smaller network where only one or few devices require static IP addresses, then both ways of assigning static IP are equally convenient. But when you have a large network with many devices that need static IPs, making a DHCP reservation for every device is a more elegant solution. If you opt for a DHCP reservation, you won’t have to change TCP/IPv4 settings on every device – you can make all the changes from one place.
To make a reservation, you will have to access your router’s control panel (aka configuration manager or GUI) and find DHCP settings (usually within LAN settings). Under DHCP settings, there should be an option called ‘make a DHCP reservation’, ‘static lease’, or something like that.
To assign a static IP to your printer/PC or some other device, you will have to enter your device’s MAC address and an IP address that you want to use. In some cases, you will also have to enter the device’s name.
Depending on the router model, you may have to enter all the required info manually or select your device from a dropdown menu, and then just enter the address you want to use.
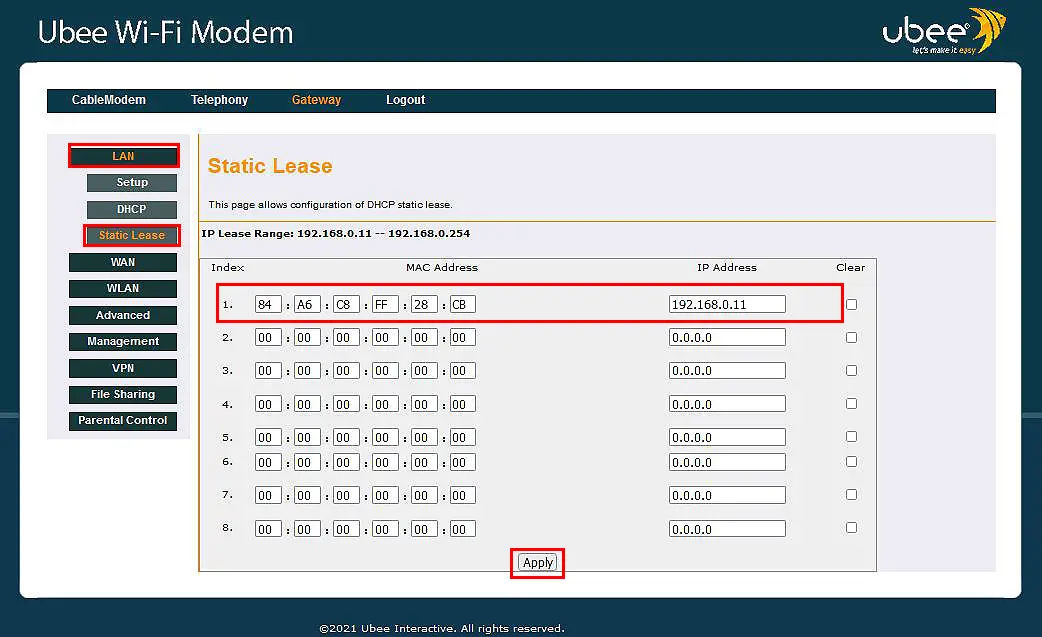
How to make a DHCP reservation (Ubee UVW3200)
Making a DHCP reservation is a more elegant solution, especially when multiple devices need static IP addresses, but there are also some downsides we should warn you about. First, when you connect your device to some other network, the device won’t have static IP (because the changes you’ve made apply only to your wi-fi network). Second, when you reset your router (we are referring to hard/factory reset), all the changes you’ve made will be lost.
Note: When assigning a static IP through your PC’s TCP/IP settings, you should use an address outside the DHCP pool but from the same subnet as the default IP. In our case, that should be an address within the scope 192.168.0.2-192.168.0.9. When assigning static IP through a DHCP reservation, you should use one of the addresses inside the DHCP pool. That is a generally accepted practice.
What Causes an IP Address Conflict?
An IP conflict occurs when there are two devices on the same network using the same IP address. Both devices with the same IP address will be disconnected from the network and won’t be able to communicate with other devices until you resolve an IP conflict.
But what causes an IP address conflict? Is it a router malfunction or a human error? The truth is – an IP conflict is rarely caused by router malfunction. It’s far more often caused by the user’s/administrator’s mistake. The mistake is, by default, closely related to setting static IP.
If you, for example, assign a static IP to your PC (whether through TCP/IP settings or DHCP reservation) without checking if the address is already used by some other device, you will cause an IP conflict. Also, if you assign one static IP to your PC through TCP/IPv4 properties, and then assign the exact same address to some other device using DHCP reservation, you will create an IP address conflict.
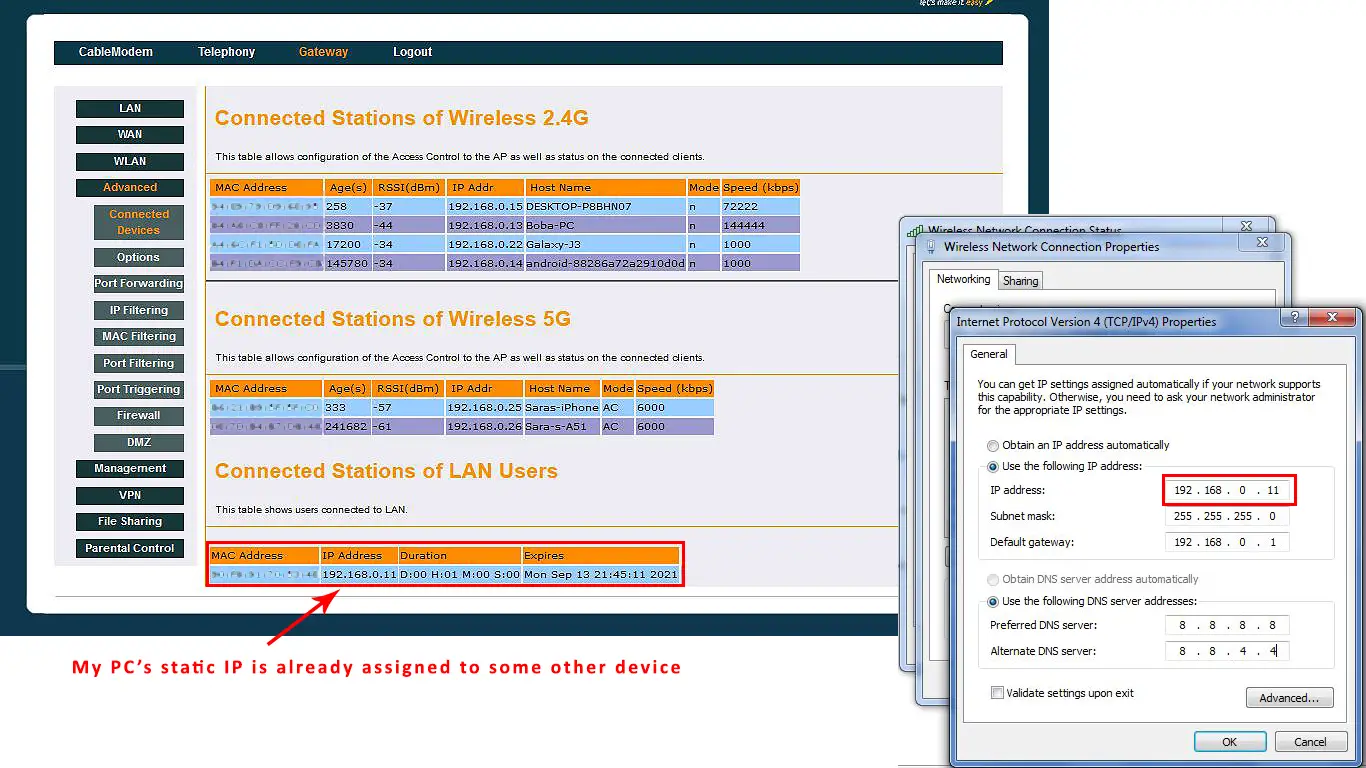
In this example, one device on my network (my streaming box) already uses the address that I assigned to my PC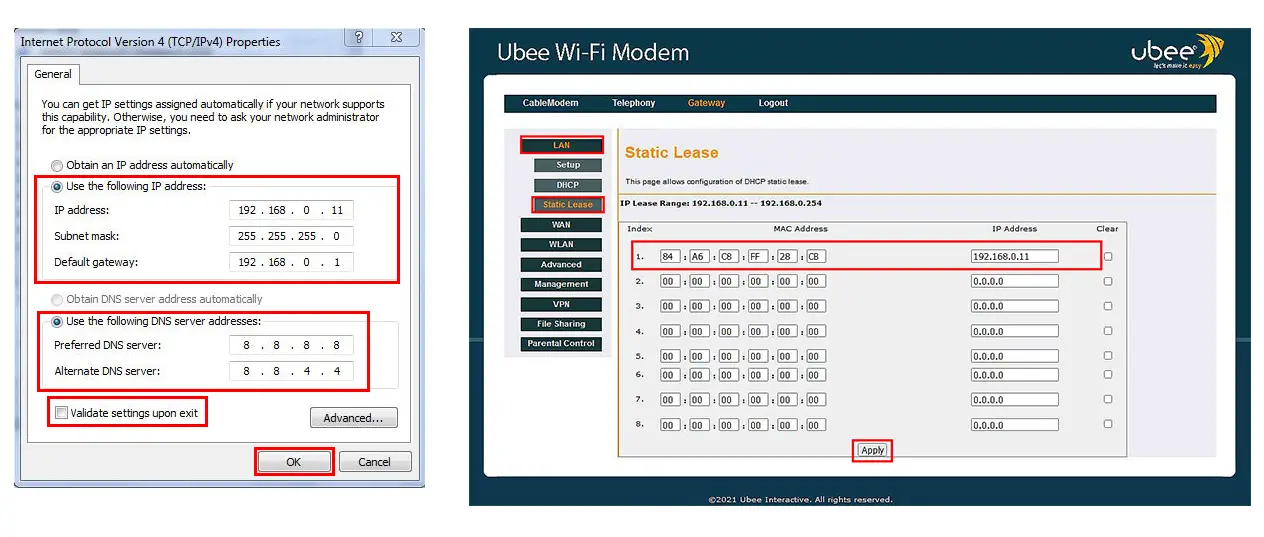 In this example, I assigned the same address to two devices (to my PC using TCP/IPv4 properties and to my printer using DHCP reservation)
In both examples, an IP conflict was caused by my mistake. It occurred because I didn’t follow that good practice I talked about. So, once again – when setting a static IP through TCP/IP properties, use an address outside the DHCP pool; when setting a static IP through DHCP reservation, use an address inside the DHCP pool (but choose an address that is not already in use).
How to Resolve an IP Address Conflict?
IP conflict is an annoying but easily solvable issue. You can do numerous things to resolve an IP conflict – reset your router, disable your network adapter, undo the changes you made in TCP/IPv4 settings, or use Command Prompt on your Windows PC.
Solution 1 – Reset your router
Resetting your router to factory settings will fix an IP conflict only if a static IP address was set through a DHCP reservation (on one or both devices). If you used devices’ settings to set a static IP on both devices, resetting your router will not solve the problem. So, if you assigned a static IP to your printer using the printer’s settings, and then assigned the same static IP to your PC or server using TCP/IP properties (not DHCP reservation), resetting the router will not fix an IP address conflict.
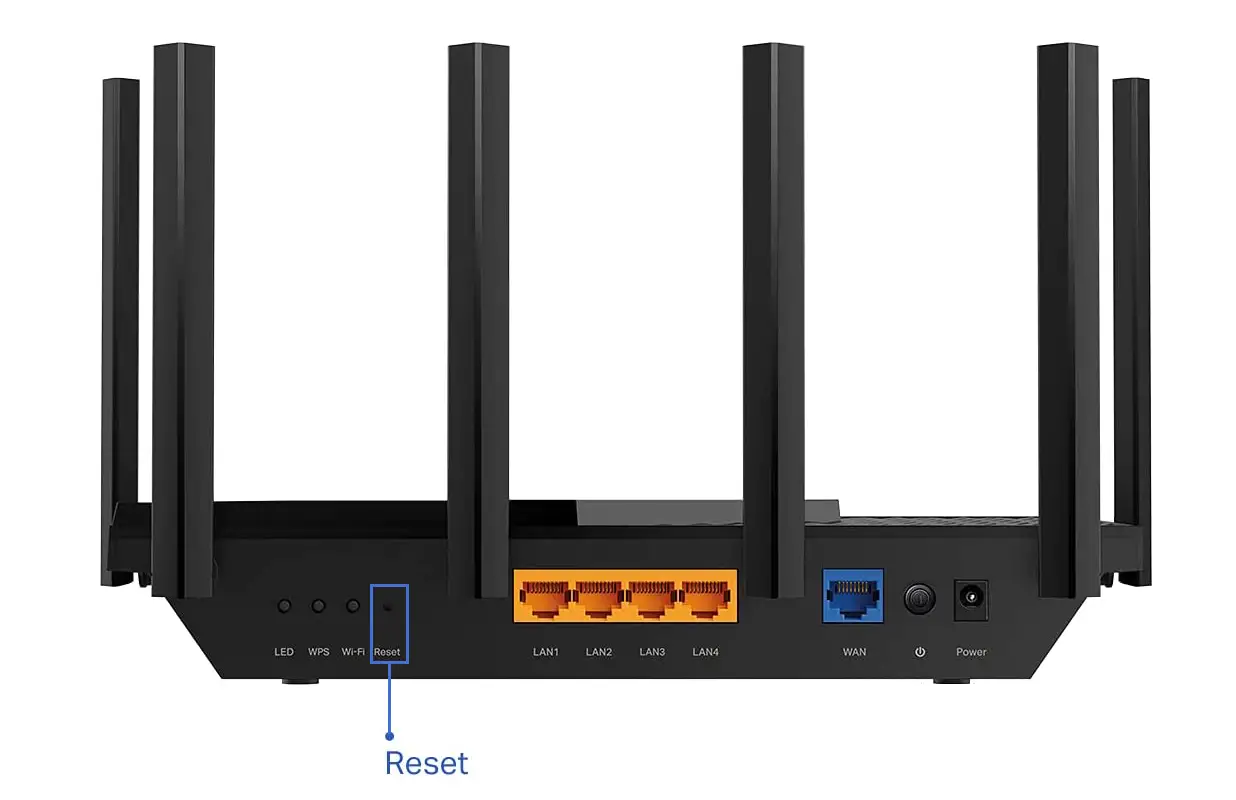
To hard-reset your router, press the reset button for approx. 10sec until all the lights start blinking
Note: Resetting your router to factory settings will erase all the changes you’ve made in your router’s settings. In case you have multiple devices on your network using static IP addresses, especially if all the addresses were set through DHCP reservation, it’s probably smarter to enter your router’s settings, find the list of devices using static IPs, and remove one or both devices using the same static IP. When you remove just one device and restart your router, the IP address conflict will be resolved.
Solution 2 – Change your TCP/IPv4 settings (disable static IP and obtain IP automatically)
If you have set static IP on your PC, you will have to go back to TCP/IPv4 properties (Network and Sharing Center > left-click on network > Properties > TCP/IPv4).
To cancel all the previously changed settings, select Obtain IP Address Automatically and Obtain DNS Server Address Automatically. Click on OK.
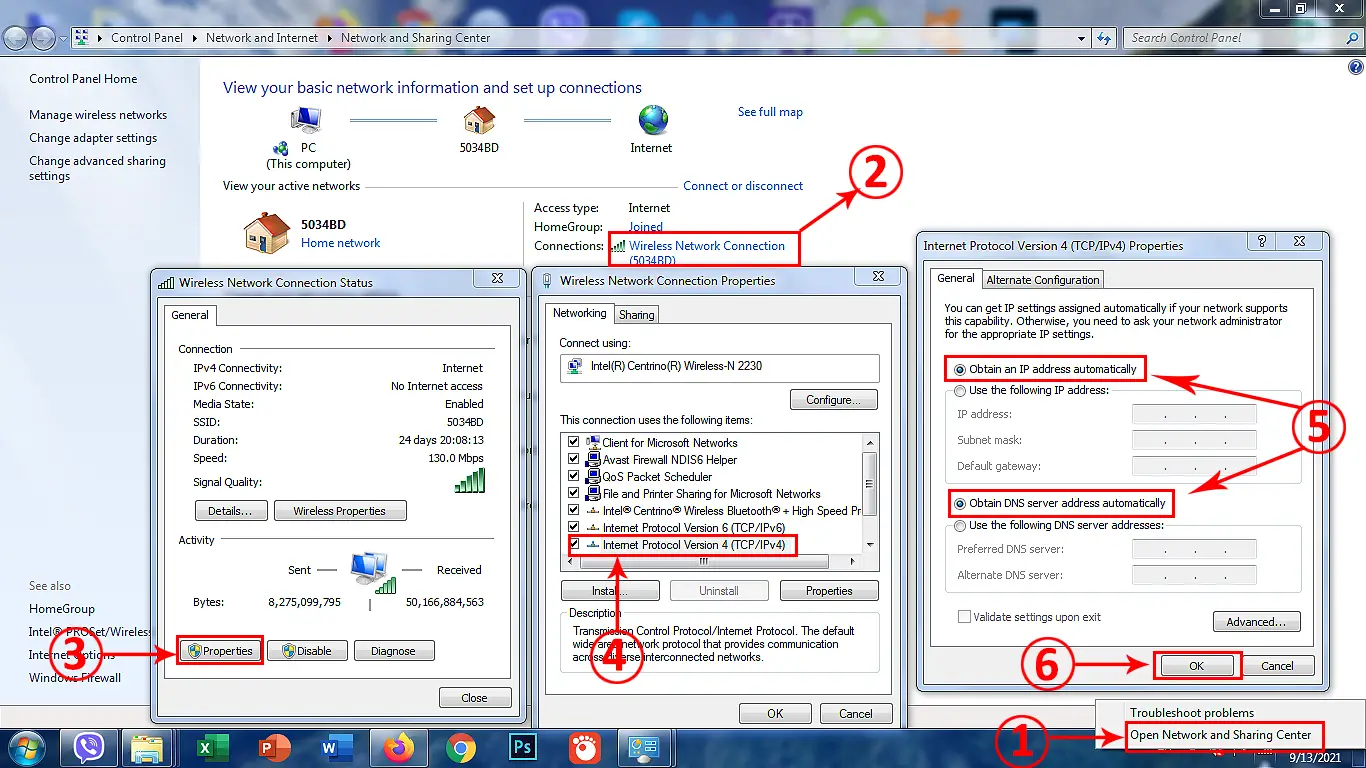
This simple change alone should fix that IP address conflict of yours, but if it doesn’t help, you can try the third option.
Solution 3 – Use Command Prompt
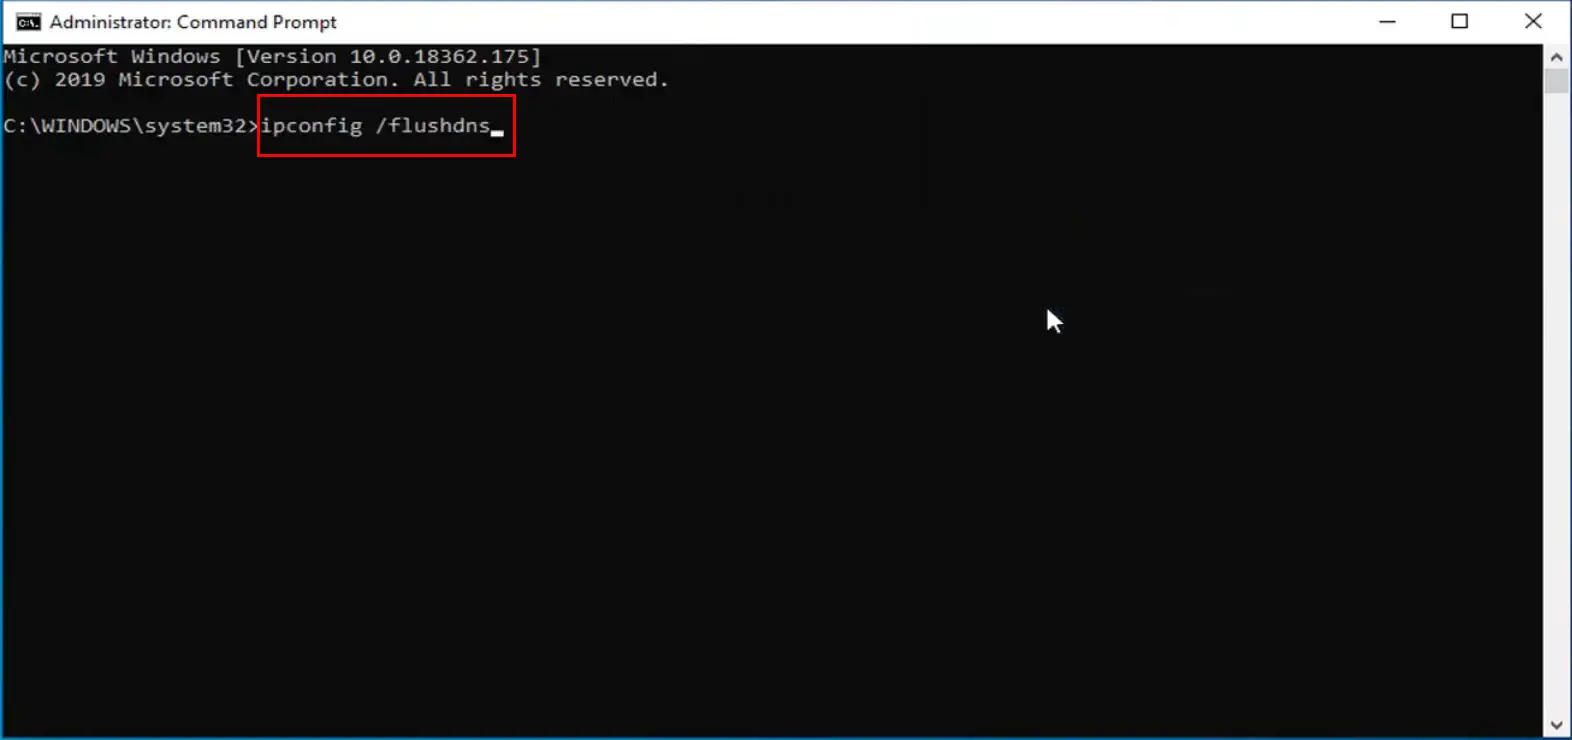
Solution 2 is often used in combination with Solution 3. Once you change your TCP/IP properties to default settings, open the Command Prompt, and use the following commands:
Command 1 – ipconfig /flushdns (Enter) – this command will refresh your DNS server configuration
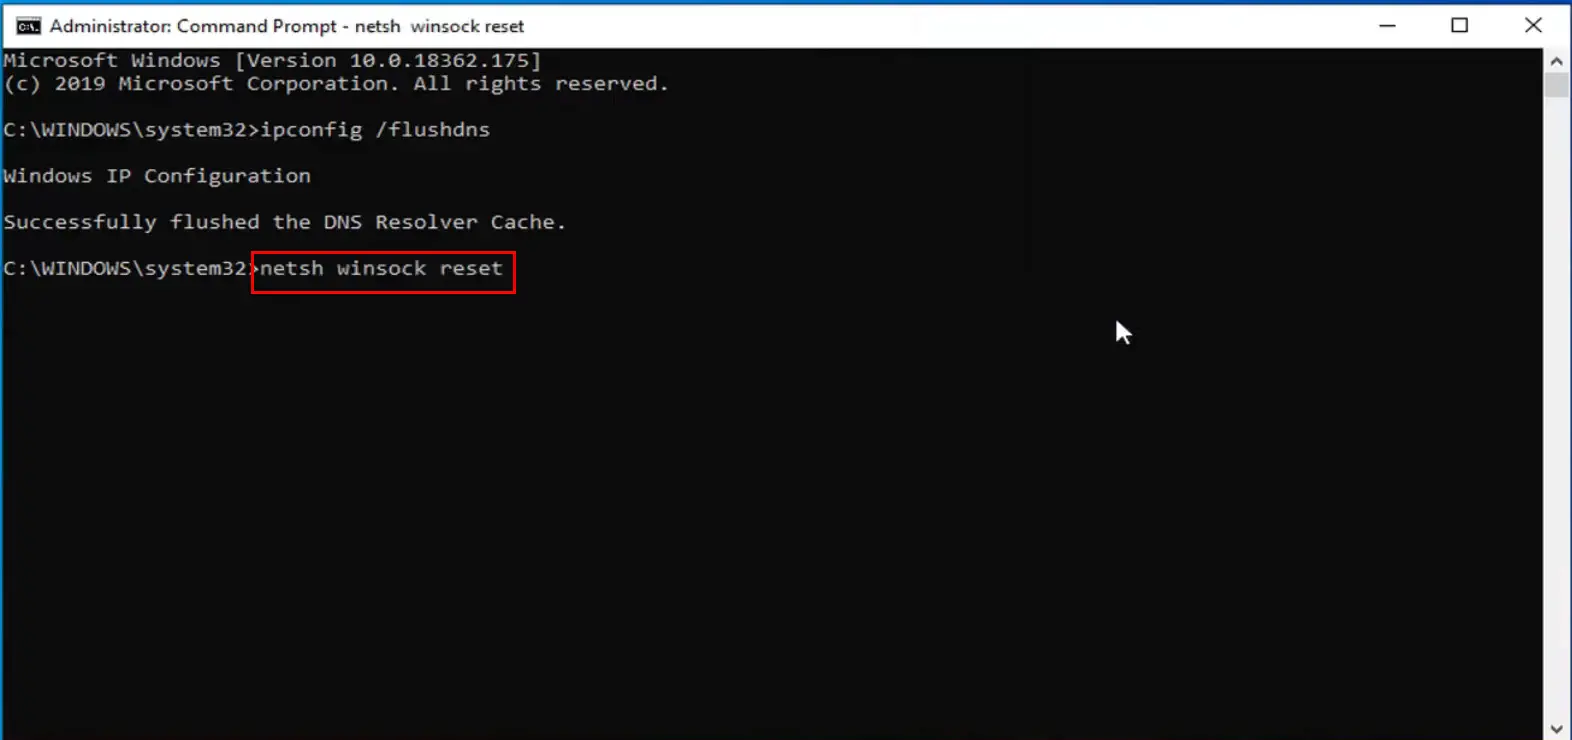
Command 2 – netsh winsock reset (Enter) – this command will reset the Winsock catalog and recover your PC from any socket errors. It basically fixes any corrupt network configuration changes and brings all the important network settings to default values.
Optional – netsh int IP reset (Enter) – this command resets your TCP/IP settings. Since you’ve already changed TCP/IP properties to default values, you don’t have to use it.
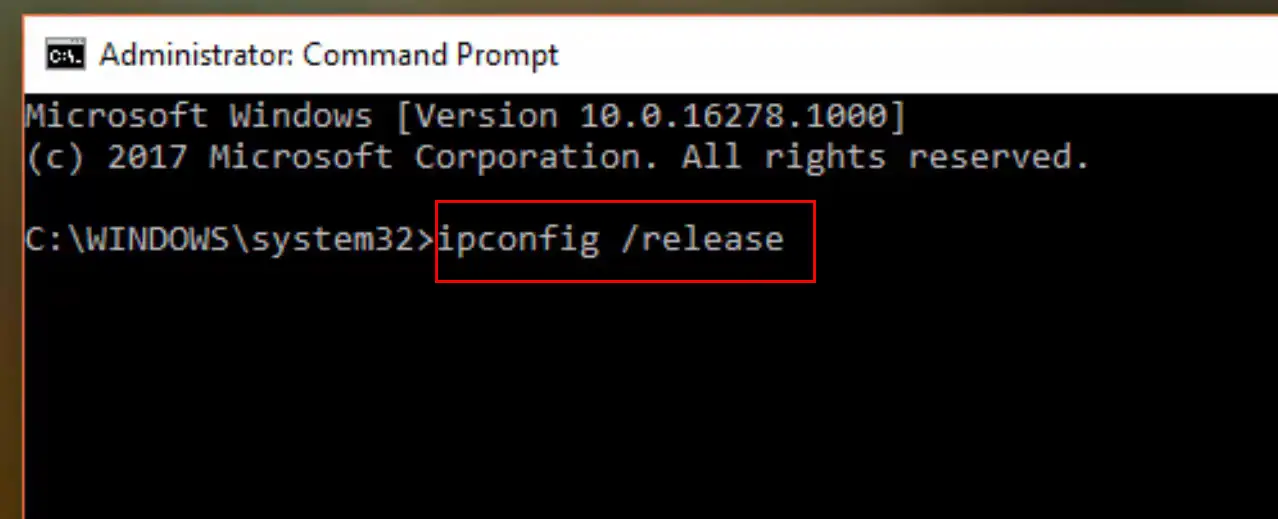
Command 3 – ipconfig /release (Enter) – this command releases the IP address currently assigned to your PC.
Command 4 – ipconfig /renew (Enter) – this command gives a new IP address to your PC from the DHCP pool.
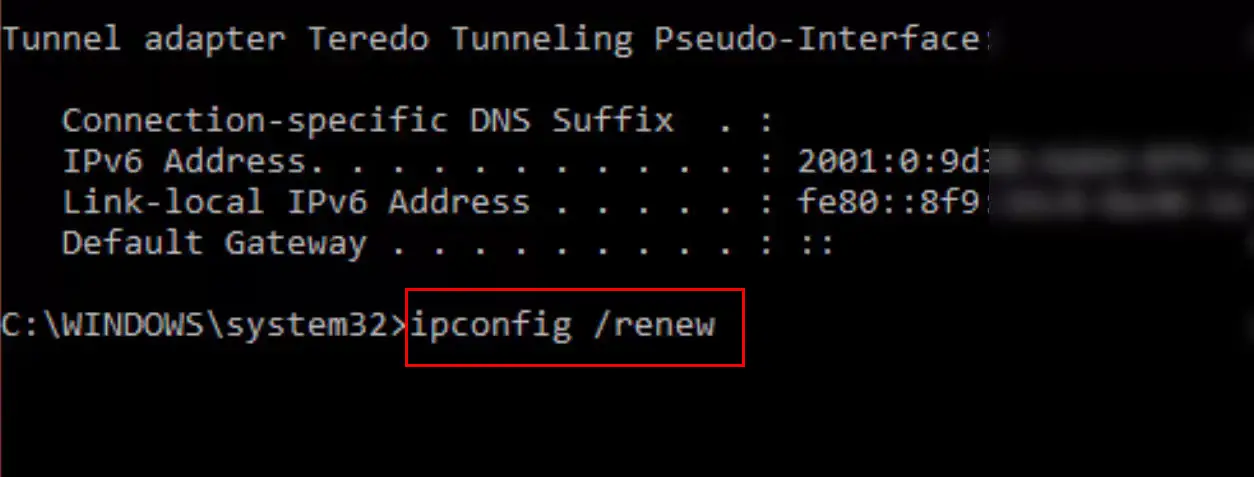
Once you apply all the above-listed commands, exit Command Prompt and restart your PC. Hopefully, this will resolve your IP address conflict.

Hey, I’m Jeremy Clifford. I hold a bachelor’s degree in information systems, and I’m a certified network specialist. I worked for several internet providers in LA, San Francisco, Sacramento, and Seattle over the past 21 years.
I worked as a customer service operator, field technician, network engineer, and network specialist. During my career in networking, I’ve come across numerous modems, gateways, routers, and other networking hardware. I’ve installed network equipment, fixed it, designed and administrated networks, etc.
Networking is my passion, and I’m eager to share everything I know with you. On this website, you can read my modem and router reviews, as well as various how-to guides designed to help you solve your network problems. I want to liberate you from the fear that most users feel when they have to deal with modem and router settings.
My favorite free-time activities are gaming, movie-watching, and cooking. I also enjoy fishing, although I’m not good at it. What I’m good at is annoying David when we are fishing together. Apparently, you’re not supposed to talk or laugh while fishing – it scares the fishes.

Thank you for a really helpful site. Re.Network info. I have been fighting a rootkit ransomeware virus for the last three months.The attacker gloated that hacking my VM email account was easy, in the Ransome note he sent. I’m in my seventies and know a bit about a computer,but nothing about the dark art of networking. My question is, can a virus reside in a router even after reset?. The reason why I ask is because this virus is not only malicious but can survive an Android smart TV reset, android phone,tablet you name it.(I don’t think it allows the equipment to be reset, But makes You think its been done. Man this virus is something else. Thanks