
Like it or not, everyone has to stay online to get things done nowadays. Parents have to work online, and the kids attend online classes. It’s not an exaggeration to say that we spend the majority of our awake time in front of the screens. And, it’s unthinkable for anyone to get even a blip in the internet connection. If you’re using a Wi-Fi network, sometimes you may get a message such as ‘Wireless Capability Is Turned Off in Windows 10′.
In addition, a Wi-Fi network is prone to disturbances since it uses somewhat volatile radio waves. However, there’s no need to panic since we have multiple methods to fix the issue. Keep on reading, and our tips will, hopefully, help you solve the problem.

CONTENTS
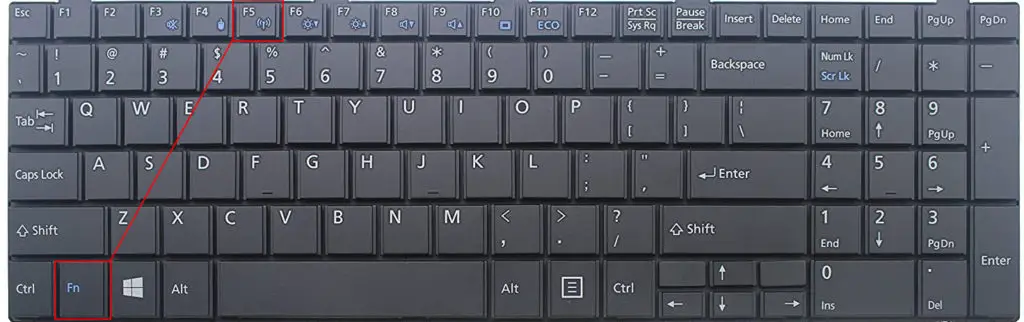
Device’s Physical Switch
Some devices such as PCs and laptops have the On/Off button for the wireless network (older laptop models). It could also be in one of the Function buttons at the top row of the keyboard. Lookup for the button and see if it’s been pressed Off accidentally. Press it again to turn the Wi-Fi network on.
Modify Adapter Settings
Your network adapter may be disabled. Follow these steps to check on the adapter settings.:
- Click Start and then the Settings icon.
- Choose Network & Internet.
- On the Status page, look for Network and Sharing Center. Click on it.
- Choose Change adapter settings from the menu on the left.
- Right-click on your Wi-Fi network and select Enable to activate your wireless capability.

Turn On Wi-Fi
Another easy fix is to check if your Wi-Fi network is turned on. Here are the steps:
- Click on the Windows icon located at the bottom-left of the screen and press the Settings icon.
- Click on Wi-Fi from the menu on the left.
- Alternatively, type ‘Wi-Fi’ on the start button, and you can see the same Wi-Fi status page.
- Ensure the Wi-Fi toggle is set to “ON”

Run the Troubleshooter
In Windows 10, there is a built-in tool for network troubleshooting. You can follow this step-by-step procedure to run the diagnostic tool:
- Right-click on the Windows icon and press Run to see the Run command. Otherwise, you can also use a shortcut – press the Windows key plus the ‘r’ key together to get to the same page.
- Type’ ncpa.cpl in the Run command and press the Enter key to see a Network Connections page.
- Click on the Wi-Fi network and press ‘Diagnose this connection.
- The tool will run Windows Network Diagnostic procedure.
- If the troubleshooting tool finds a problem, it will automatically fix it. Otherwise, you’ll see a message Troubleshooting couldn’t identify the problem, and you can close the troubleshooter.

Modify Power Management Settings
If the troubleshooting procedure cannot fix your wireless connection issue, there is another way to fix it in Windows 10. Try to reset the Power Management settings following the steps here:
- Press the Windows key and the ‘r’ key simultaneously, and you’ll see the Run command. Another way is by right-clicking the Windows icon to come to the same Run command.
- Type in ‘devmgmt.msc’ in the Run command, and press the Enter key.
- Select Network adapters.
- Double-click on your wireless network adapter.
- Select Power Management. There’s a box next to Allow the computer to turn off this device to save power. If the box is checked, click on it to uncheck.
An alternative method is to go to Power Options (Control panel > Hardware and Sound). Click on Edit Plan Settings and select Advanced Settings. Look for Wireless Adapter Settings, and set them to Maximum Performance.

Update Network Adapter Drivers
Outdated network adapter drivers could be the cause of your problem with wireless capabilities. You need to update them – that may solve your issue. The following steps will help you find out if the driver is updated:
- Press the Windows and the ‘r’ key together to see the Run command. Another way is to right-click the Windows icon, and you will get to the same Run command.
- Then, type’ devmgmt.msc’ in the Run box, and press <Enter>.
- Select Network adapters.
- Right-click on the wireless network.
- Select Update Driver and press ‘Search automatically for drivers’, letting Windows 10 locate the most recent update.
If Windows 10 has already installed the latest network drivers, it will state that ‘the latest driver is already installed. Otherwise, follow the computer’s instructions to install the new driver version.
Recommended reading: Wireless Capability Is Turned Off on Dell Laptop (Turn it Back on by Following These Steps)
As an alternative, we recommend using a third-party application named Driver Easy. Install the app on your computer system and click Scan and Update. The app will discover problematic drivers and suggest better driver versions. Restart your computer to find out if you can connect to your Wi-Fi network.
Update the BIOS
BIOS (Basic Input/Output System) firmware initializes your computer system’s start-up process. To update BIOS, stick to the following steps:
- Get access to the manufacturer’s website and look for the latest BIOS.
- Download the BIOS to your computer.
- Restart your computer and search for the BIOS.
- Follow the instructions to update the BIOS on your computer.
It’s a reasonable precaution to keep a copy of some important files before updating the BIOS since there is a chance that you could lose some of the files during the process.
How to Update BIOS in Windows 10
Network Reset
A network reset will put your network back to the original settings, and that could fix your wireless network issue. Here are the steps you need to follow :
- Go to Start and click on the Settings icon.
- Choose Network & Internet and click on Status on the left.
- You will find a link to the Network Troubleshooter.
- If you scroll down, you will find the Network reset link. Click on it.
- If you press the Reset now button, it will remove and then reinstall all your network adapters.

Since the process will reset all your networking components and software (VPN or online switches), you need to reinstall them after the network is reset.
Conclusion
This problem is pretty common nowadays, but the good news is that fixing the problem usually doesn’t require advanced knowledge. Any of the methods listed above could fix the problem when your wireless capability is turned off in Windows 10. If none of the fixes work, you can contact your Internet Service Provider as a last resort. The problem could also come from the ISP’s side, but it’s smarter to check everything on your end before calling them.

Hey, I’m Jeremy Clifford. I hold a bachelor’s degree in information systems, and I’m a certified network specialist. I worked for several internet providers in LA, San Francisco, Sacramento, and Seattle over the past 21 years.
I worked as a customer service operator, field technician, network engineer, and network specialist. During my career in networking, I’ve come across numerous modems, gateways, routers, and other networking hardware. I’ve installed network equipment, fixed it, designed and administrated networks, etc.
Networking is my passion, and I’m eager to share everything I know with you. On this website, you can read my modem and router reviews, as well as various how-to guides designed to help you solve your network problems. I want to liberate you from the fear that most users feel when they have to deal with modem and router settings.
My favorite free-time activities are gaming, movie-watching, and cooking. I also enjoy fishing, although I’m not good at it. What I’m good at is annoying David when we are fishing together. Apparently, you’re not supposed to talk or laugh while fishing – it scares the fishes.