
No one can afford a loss of an internet connection these days. Even a three-year-old would make a big fuss about it. Inevitably, you have to accept that a Wi-Fi network is not 100% foolproof. Sometimes, users get messages like Wireless Capability is Turned Off in Windows 7.
If you’re one of them, you’d be pleased to find this post. It contains a guide on how to fix this issue that you’re facing. Hopefully, one of these methods will fix your problem.

CONTENTS
Turn On Wireless Network
Apparently, if your wireless network is off, you need to turn it on. To do that is very simple; just follow these steps:
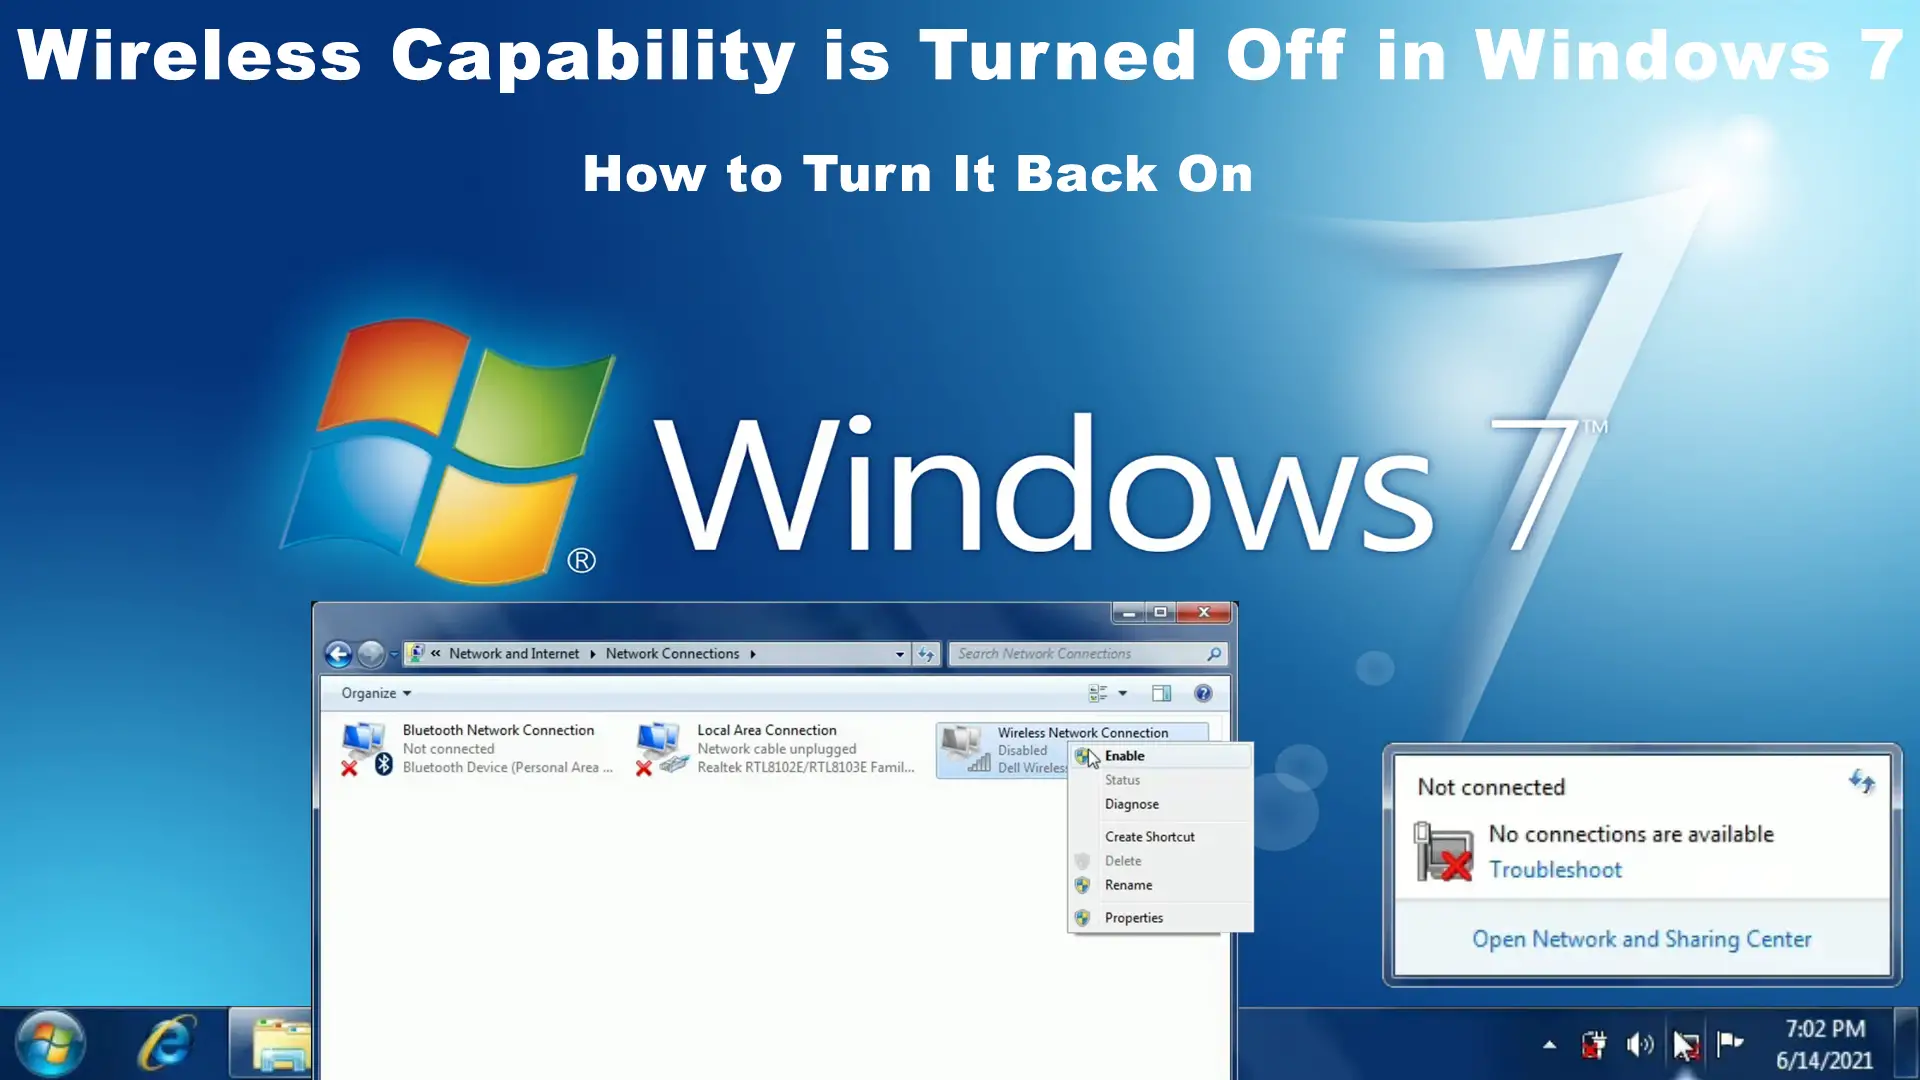
- Go to start on Windows 7 screen at the bottom-left, and type in ‘network’ in the search box.
- Click on Network and Sharing Center
- Then look for Change adapter settings and click on it.
- You will see Wireless Network Connection. Right-click on this option.
- Click Enable option, and if you have no other issues, your computer will let you have your Wi-Fi network. If the Wi-Fi is already enabled, you will need to disable it first, and then enable it.

Change Power Management Settings
Another way to fix your wireless settings in Windows 7 is to reset the Power Management settings. Here are the steps:
- Press the Windows key at the same time with the ‘r’ key to come to the Run box. You can also try another way by right-clicking on the Windows icon situated at the bottom-left of the screen, and you will see the Run option as well.
- Type’ devmgmt.msc’ in the Run box, and then press OK.
- Look for Network adapters and click on it.
- Find your wireless network and double-click it.
- Click on Power Management, and if you see ‘Allow the computer to turn off this device to save power. If there is a tick in the box, uncheck it.

The process will prevent your computer from turning off your Wi-Fi in the future.
Bring Network Adapter Driver Up to Date
Sometimes, Windows 7 the cause of the problem could be old network drivers. To find out if that’s your case, follow these steps:
- Press the Windows key at the same time with the ‘r’ key to come to the Run box. You can also try another way by right-clicking on the Windows icon situated at the bottom-left of the screen, and you will see the Run option as well.
- Type’ devmgmt.msc’ in the Run box, and then press OK.
- Look for Network adapters and click on it.
- Find your wireless network and right-click on it.
- Choose the first one – Update driver, and click on Search automatically for drivers to let the system locate for latest updates.
You will see a statement that says that the best driver is already installed on your computer if Windows 7 has already updated the network drivers. Otherwise, install the latest update as recommended by the computer.
Recommended reading: Wireless Capability Is Turned Off in Windows 10 (How to Turn it On)
Alternatively, if you’re not comfortable updating it manually, you can use a third-party app like Driver Easy. Once the application is installed, click Scan and Update. It will detect any problematic drivers and automatically find suitable upgrades to the network drivers. Then you can restart your computer and see if you can get your wireless network working.
Run the Troubleshooter
A network troubleshooter is a built-in tool that can trace errors on the computer by itself. Try to run the troubleshooter, and maybe it can resolve your wireless network issue. Follow the steps below:
- Click on the Start button in the bottom-left corner and type in Network Troubleshooter
- Select Identify and Repair Network Problems
- The troubleshooter tool will search for the problem.
- When it’s done, you’ll either get a message that there are no problems detected or that the problems have been rectified.
Update BIOS
BIOS (Basic Input/Output System) is a firmware that initializes your computer system’s boot process. During the booting operation, the pre-installed system runs during your computer’s startup process. Follow the steps below to update BIOS:
- Go to the manufacturer’s website and find the latest BIOS. Download it to your computer.
- Unzip the files and copy them to a drive.
- Restart your device and find the BIOS.
- Update the BIOS by following the instructions.
But before you start the process, ensure you have a copy of all the crucial files since they could be lost during the BIOS updating process.
Restart Your Computer
Restarting the computer may seem to be a plain and straightforward process not worthy of considering. But it could fix the problem with your Wi-Fi network. This method involves turning off your computer entirely by switching off and disconnecting all the wires. If your device is a laptop, remove the battery as well.
It will reset all your computer’s network configurations and remove bugs that could have developed in the system during the previous usage. Take a few moments before restarting your computer. This simple process could recover your Wi-Fi capability if you’re lucky.
Reset Your Network
If you reset your computer network, you will put it back to its original settings. That could resolve your wireless network problem. Stick to the following steps to start the process:
Resetting the network in Windows 7 is super easy. You need to go to the Cmd Prompt and enter two commands – netsh int ip reset and netsh winsock reset. Once you complete both commands, restart your PC.
How to Reset Internet Connection in Windows 7
Conclusion
The next time you realize that the wireless capability is turned off in Windows 7, you will know all the steps you’re supposed to take before calling a technician. Go through our fixes in the guide above, and you should be able to find a solution for your problem. If none of them are working, you can always contact your Internet Service Provider or your device manufacturer’s customer support team as a last resort.

Hey, I’m Jeremy Clifford. I hold a bachelor’s degree in information systems, and I’m a certified network specialist. I worked for several internet providers in LA, San Francisco, Sacramento, and Seattle over the past 21 years.
I worked as a customer service operator, field technician, network engineer, and network specialist. During my career in networking, I’ve come across numerous modems, gateways, routers, and other networking hardware. I’ve installed network equipment, fixed it, designed and administrated networks, etc.
Networking is my passion, and I’m eager to share everything I know with you. On this website, you can read my modem and router reviews, as well as various how-to guides designed to help you solve your network problems. I want to liberate you from the fear that most users feel when they have to deal with modem and router settings.
My favorite free-time activities are gaming, movie-watching, and cooking. I also enjoy fishing, although I’m not good at it. What I’m good at is annoying David when we are fishing together. Apparently, you’re not supposed to talk or laugh while fishing – it scares the fishes.