
We all agree that the internet is helpful in most of our daily operations, from business to our private lives. Internet connectivity problems can frustrate you and even cause losses for your business.
Notably, if you have internet connectivity issues, one of the primary actions is to check the router settings. If the settings are changed or outdated, they could cause connectivity problems. For instance, the router could display an error message stating that the ISP’s DHCP does not operate properly. Consequently, the error can slow down your internet or disable the internet connection.
Agreeably, such errors can cause immense frustrations. Fortunately, this article is here to explain the possible causes and solutions you can try to remedy the situation.

CONTENTS
What is DHCP?
DHCP stands for Dynamic Host Configuration Protocol. It is essential to automatically allocate necessary configuration information to facilitate your internet connection. Such information includes IP address, default gateway, and subnet mask.
In simpler terms, DHCP is an internet and networking protocol that your Internet Service Provider uses to assign a unique IP address to your router. It also allocates IP addresses to the devices accessing the router. Therefore, it automates the whole process of configuration of devices on an internet protocol network.
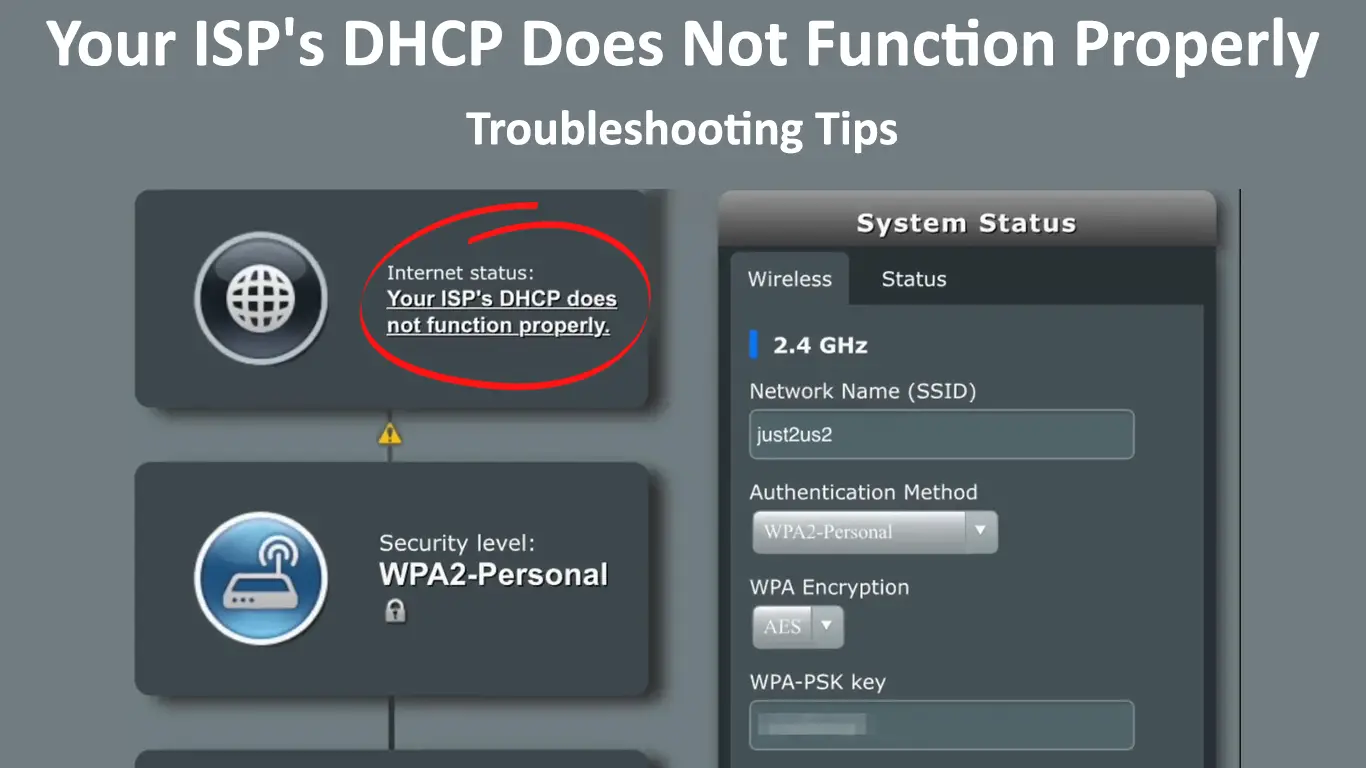
Note: Your ISP’s DHCP server and your router’s DHCP server are two different things. Your ISP’s DHCP server is something you don’t have control of – it assigns public addresses to every modem/router connected to the internet. Your router’s DHCP server is what assigns private addresses to all devices connected to your Wi-Fi.
IP addresses can be dynamic or static. The dynamic IP address is automatically assigned to a device by the DHCP. Alternatively, the static IP address is fixed – it doesn’t change and is assigned manually (by making a reservation in the DHCP pool). The network administrator assigns a static address manually. However, it is time-consuming and ineffective, which makes the automatic IP address assignment (through the DHCP server) the preferred option.
Your ISP’s DHCP Does Not Function Properly
“Your ISP’s DHCP does not function properly” is a common error message among internet users. When your router configuration page displays this error message, it means that the router has problems determining the IP address allocated to it by your internet provider.
Additionally, DHCP error indicates that the network server responsible for allocating IP addresses to different devices cannot assign an IP address to your device. Hence there is no internet connection.
This usually happens to users who decided to buy third-party equipment. Based on the information we’ve gathered on various forums, it rarely (or rather never) happens when you rent your equipment from the ISP. For some reason, ASUS router users were particularly affected by this issue.
What Causes This Error?
Troubleshooting a DHCP error can be challenging if you do not identify the root cause of the problem. Fortunately, here are the leading causes of this error message:
- IP Address Conflict
The error is likely to occur if the DHCP server allocates the same IP address to different devices. That means traffic on the conflicting address will not be sent, automatically hindering the router’s functionality.
- Configuration and Settings
DHCP is very sensitive to configuration and settings. Any tinkering with the router’s configuration settings may result in no connection and displays the error message above. Router configuration issues can result in this error since the router acts as a local DHCP server.
Therefore, the leading causes of router failure are configuration issues on the DHCP server and computing device.
How to Fix the “Your ISP’s DHCP Does Not Function Properly.”
As much as this sounds like a big problem, there is a way around it. You can always fix the problem. Try one of the troubleshooting tips explained below.
Troubleshoot the Network
It is the first and easiest step that you should consider. The computer is integrated with different troubleshooters. These troubleshooters may provide you with possible suggestions that might help you solve the problem.
How to access the network troubleshooting tool
- On your computer taskbar, right-click on your network connection icon.
- Select the Troubleshoot Problems option.
- It will direct you to a new window, and the system will automatically start scanning for the problem.
- Suppose the troubleshooter detects the problem. Click on Apply this fix option and give it time to solve the issue.
This technique doesn’t always work, so you may get a message that Windows was unable to find the problem. But do not worry, as we have more solutions for you.
Check the Connecting Cables
Sometimes the physical connection might be the problem, the cabling to your router.
Check if the cables are in the right state. Specifically, ensure there is no breakage or tear of the wires.
Additionally, check that the respective ports are in good condition. Consider changing the wires or repairing the ports if you notice any signs of damage.
Change DHCP Router Query Frequency
It is essential to ensure that the query frequency is set correctly; otherwise, it might result in connectivity problems. It is easy to make mistakes when setting up the router.
Query frequency is how the router sends DHCP requests to the modem. By default, it is set to Normal. Therefore consider changing this section of query frequency from normal to aggressive or continuous.
Here’s how to change the query frequency:
- Access your router’s administration page using your username and password using your web browser.
- Next, navigate to WAN settings > internet connection > DHCP query frequency in the menu.
- Change it from ordinary to aggressive or continuous state.
- Click save to activate the changes.

These changes will take five minutes to be updated. A confirmation message for the DHCP request is sent to your router to confirm the changes. Hopefully, this solves your problem and restores your connectivity.
However, note that these steps may vary depending on your router. Therefore consult the user guide or visit the manufacturer’s website for the appropriate steps for your route.
Connectivity Outage
Alternatively, the problem could be that your Internet provider is facing a regional internet outage. Therefore, that could mean that the ISP server is not online. Understandably, there will be no internet.
Most ISPs, like Verizon and Spectrum, provide timely notices about internet outages on their websites. Consider checking there for credible outage information. On the other hand, you can contact your ISP to know if your area is experiencing an outage. Consequently, the best option in such instances is to wait for the ISP to restore connectivity.
Restart Your Router
Each time the router starts up, the DHCP reassigns a new IP address. Therefore consider restarting your router to confirm if your ISP will assign a different IP address.
You can switch off the router by using a power switch if it has one. Alternatively, unplug it from the wall outlet, wait five minutes, and plug it back in.
Factory Reset the Router
If the problem persists after restarting the router, consider resetting the router to restore the default settings. A factory reset is a sure way of undoing any changes on the router that could be the problem.
To reset your router, press the reset button on the back of the router.

While holding down the reset button, ensure you see the power indicator flash to confirm the reset is happening.
After a successful reset, use the user manual to configure it. After successfully configuring the router, the connection should be up and running.
If this is not the case, move to the next suggestion.
Update the Router’s Firmware
Your router’s firmware must be updated to the latest version since software bugs could be what is affecting your connection.
You can download the latest firmware version from your manufacturer’s website. Download and extract the file. However, be keen to ensure you do not download a virus from a malicious site camouflaging as the manufacturer’s site.
- Access your router dashboard
- Navigate to the update section
- Select upload file.
- Choose and upload the extracted file.
- Restart your router to activate the changes.
How to Update ASUS Router Firmware
Talk to Your Internet Service Provider for Assistance
In some instances, the above troubleshooting techniques might not solve the problem. Therefore, do not hesitate to contact your service provider for further assistance.
Consequently, the technical support team might provide alternative troubleshooting tips for you. Additionally, the support team can send a technician to your place if they cannot solve the issue remotely.
Sometimes, they might use a magical provisional signal to solve the problem. The temporary signal is a code used to restore your router settings.
Through this method, the ISP support team can perform an automatic reset from their side that will reset your DHCP and the IP address.
Conclusion
The above troubleshooting steps should help you fix the ISP’s DHCP that does not function properly. However, if the problem is not solved, your best bet is to contact your internet service provider’s customer care support line for further assistance.

Hey, I’m Jeremy Clifford. I hold a bachelor’s degree in information systems, and I’m a certified network specialist. I worked for several internet providers in LA, San Francisco, Sacramento, and Seattle over the past 21 years.
I worked as a customer service operator, field technician, network engineer, and network specialist. During my career in networking, I’ve come across numerous modems, gateways, routers, and other networking hardware. I’ve installed network equipment, fixed it, designed and administrated networks, etc.
Networking is my passion, and I’m eager to share everything I know with you. On this website, you can read my modem and router reviews, as well as various how-to guides designed to help you solve your network problems. I want to liberate you from the fear that most users feel when they have to deal with modem and router settings.
My favorite free-time activities are gaming, movie-watching, and cooking. I also enjoy fishing, although I’m not good at it. What I’m good at is annoying David when we are fishing together. Apparently, you’re not supposed to talk or laugh while fishing – it scares the fishes.