If you want to change your Zhone router settings in order to make your network more secure or to enable or disable some of its features you are in the right place. This article provides instructions on how to access the Zhone router admin page and change the wireless settings.
However, before we start with the Zhone router login steps, we need to prepare something first.
CONTENTS
Before You Start
Since we want the Zhone router login to be successful, we should make sure to have the following:
1. A device to connect to the network and the router admin dashboard
2. Access to the network over WiFi or a network cable.
3. The Zhone router admin login details
With these three things ready, the login process should be completed in a minute or two.
What Are The Default Zhone Router Login Details?
Zhone router default IP address: 192.168.1.1
Default username: admin
Default password: admin
These are the default Zhone router login details. In case you have custom ones, login using them instead. The defaults can be used if you decide to reset the router to factory defaults.
How To Login To Zhone Router?
Here are the steps you need to follow to access the Zhone router admin dashboard.
STEP 1 – Have You Connected Your Device To The Network?
This is the first thing you need to do. We have mentioned it in the Before You Start section and it is really important. If you don’t connect the device you won’t be able to proceed.
You can connect over WiFi or connect the device to the router using a network cable. You can choose the connection method depending on your device but we recommend using the wired connection because it is more stable. After you connect the device, move to Step 2.
STEP 2 – Open The Web Browser On Your Device
You certainly have at least one web browser installed on your device. It is used to access the router’s admin dashboard and manage the router settings easily. So, open the browser use every day and get the router’s IP address ready.
STEP 3 – Type The Zhone IP Address Into The Browser’s URL Bar
The Zhone router IP is 192.168.1.1. Type the IP into the URL bar and Press Enter or Go on the keyboard.

Just make sure to type it correctly and in case the router login page doesn’t appear check the router IP using your device. Windows users can do it using the Command Prompt while other users can follow the steps described here to find their router IP.
STEP 4 – Enter The Zhone Router Admin Username And Password
The default Zhone router admin username and password are both admin. Type them into the required fields and press the Login button. If they are correct, you will see the router admin dashboard. However, if you have changed the default login details and now you can’t remember them you will have to reset the router to factory defaults. After that you will be able to login with the default username and password. Normally, these default login details can be found on a sticker placed on the bottom side of the router.
STEP 5 – You Can Manage The Zhone Router Settings Now
After you login to the Zhone router admin dashboard, you can easily modify its options according to your needs. You can change the default settings, block devices from the network, apply additional tweaks to increase the router security, set up Port Forwarding or create a Guest network. There are many options that can be changed and enabled, but in case you are new to this it is always better to backup the router settings and then make the changes.
NOTE: The screenshots given below may be different from the ones you see in your router settings.
How To Change The Zhone Admin Password?
If you change the admin password, you will be the only one who has access to the router admin settings. This is important because the default admin password can be easily found and abused by anyone who has access to your network. Here is how to change it:
1. Login to your Zhone router first.
2. Click on Management in the menu on the left.
3. Complete the required fields. Enter the old admin password first, and then type the admin password twice. It is important to type this password and not copy paste it because if you have made a typo the first time and you copy it like that, you won’t be able to login with the password you actually wanted to save. In that case the only option would be to reset the router to factory settings.
4. Click the Save/Apply button
In case the system logs you out, simply login back with the new admin password.
How To Change The Zhone SSID And Password?
The Zhone router WiFi settings should be changed as well. The WiFi password protects our network from unauthorized access and you definitely have to make sure to encrypt your wireless network. And since we tend to share the WiFi password too often these days, it is recommended to change it every second month. If you want to change the WiFi network settings, here is where to find these settings.
1. Login to the router by following the steps presented above.
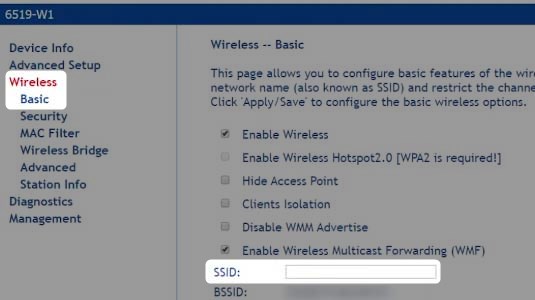
2. In the menu on the left click on Wireless and then select Basic.

3. Scroll down a little and in the SSID field enter the desired network name.
4. Save the new network name by clicking the Apply/Save button. If you haven’t connected your device using a wired connection, you will probably be disconnected. In that case, connect the device to the new WiFi name and login to the router again.
5. Now click on Wireless again and select Security.
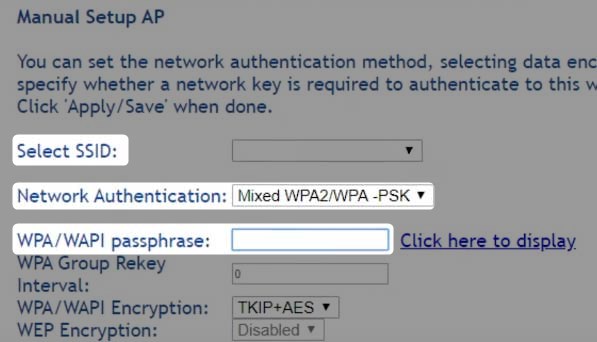
6. Scroll down to the Manual Setup AP section and select the new network name from the Select SSID drop-down list.

7. In the Network Authentication field select Mixed WPA2/WPA-PSK.
8. In the WPA/WAPI Passphrase field type the new wireless password.
9. Now click on Apply/Save to confirm and save the changes.
Recommended reading:
- What Is SSID Isolation? (SSID Isolation Explained)
- How to Configure a Router to Use WPA3?
- Should The WPS Light Be On On My Router?
Final Words
The Zhone router admin dashboard can be accessed pretty easily if you have prepared everything in advance. Changing the setting is also easy but in case you don’t quite understand how to do something or what settings and values you have to change or enable/disable, we recommend saving the current router settings first, and then either ask someone to help you or follow other guides and tutorials that can be found on our website.

Hey, I’m David. I’ve been working as a wireless network engineer and a network administrator for 15 years. During my studies, I also worked as an ISP field technician – that’s when I met Jeremy.
I hold a bachelor’s degree in network engineering and a master’s degree in computer science and engineering. I’m also a Cisco-certified service provider.
In my professional career, I worked for router/modem manufacturers and internet providers. I like to think that I’m good at explaining network-related issues in simple terms. That’s exactly what I’m doing on this website – I’m making simple and easy-to-follow guides on how to install, set up, and troubleshoot your networking hardware. I also review new network equipment – modems, gateways, switches, routers, extenders, mesh systems, cables, etc.
My goal is to help regular users with their everyday network issues, educate them, and make them less scared of their equipment. In my articles, you can find tips on what to look for when buying new networking hardware, and how to adjust your network settings to get the most out of your wi-fi.
Since my work is closely related to computers, servers, and other network equipment, I like to spend most of my spare time outdoors. When I want to blow off some steam, I like to ride my bike. I also love hiking and swimming. When I need to calm down and clear my mind, my go-to activity is fishing.
