What would you do if your Lenovo Wi-Fi is not working in Windows 10? Before we dwell on the subject, it’s not happening to a specific brand like Lenovo only. Most of the issues originate from Windows Operating System, software, or hardware.
If the Wi-Fi network could not be found anywhere in your Lenovo device, contacting the Lenovo Local Service would probably be the best move. But various issues could come up from the operating system, and you can fix most of those issues on your own. You can try following our step-by-step procedure and some of the methods we are about to explain may fix the problem for you.

CONTENTS
Ensure the Wi-Fi is On
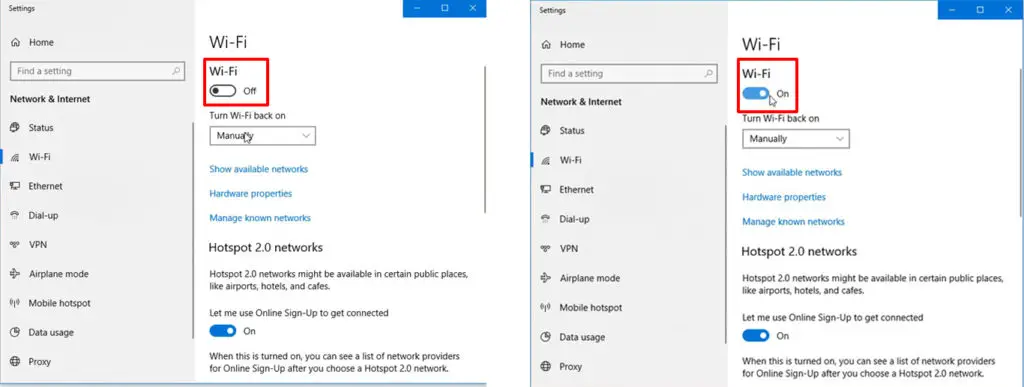
The apparent reason for the lack of Wi-Fi on your Lenovo device is that the Wi-Fi network is not switched on. It’s pretty easy to find that out in the Settings. Walkthrough the following steps to switch on the Wi-Fi:
- Go to start on the bottom-left of the screen and click on Settings. Alternatively, do the shortcut method by pressing the Windows key and the ‘i’ key together, and you’ll see the Settings page immediately.
- Select Wi-Fi and click the ‘On’ button to run your Wi-Fi network.
If the Wi-Fi network is alive, you can resume all your online activities.

Airplane Mode is Active
When you’re traveling in an airplane, you can activate an Airplane mode so that your device would not interfere with the plane’s electronic devices without switching off. Since many people work on the go these days, most devices like laptops and tablets have a special Airplane mode button or icon to make a simple one-tap action to activate the mode. Therefore, it’s not uncommon to accidentally press the button on the keyboard or the icon on the computer screen.
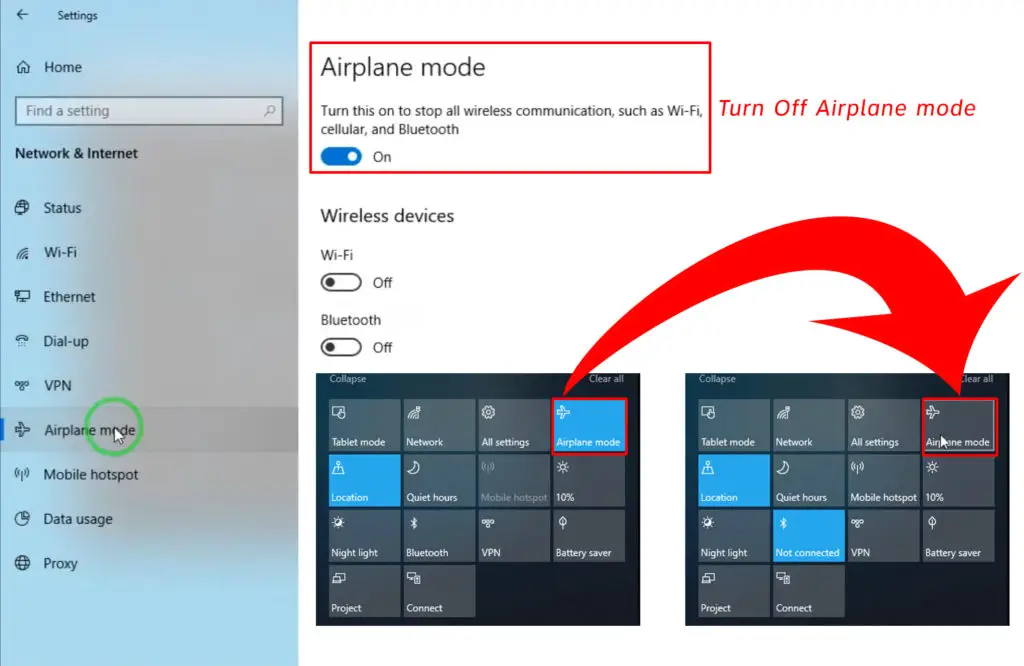
If you accidentally press the Airplane mode button on the keyboard, you need to press it again. Look for the key at the top row of the keyboard, around the area where the function keys are. Press it once more to disable Airplane mode, and you will get your computer (and your Wi-Fi) functioning at full capacity again.
As an alternative, you can go to the shortcut by clicking the Internet network icon in the lower-right corner of the computer screen. You can view the menu, and if the Airplane mode is active, the icon is highlighted in blue. To disable it, click on it once more to disable the Airplane mode.

Update Network Adapters Driver
Occasionally, the network adapter driver on your Lenovo laptop needs an update. You can go to Lenovo’s Device Manager to find out if it’s updated or not. If it’s not, you can try updating it (manually or automatically). Here are the steps:
- Press the Windows key and the ‘x’ key simultaneously and click Device Manager on the menu. Alternatively, you can right-click on the Windows icon on the bottom-left of the computer screen to view the same menu.
- Double-click on the Network adapters on the Device Manager page, and you will see a list of adapters.
- Choose the Wi-Fi network adapter and click on ‘Update Driver’.
- A new page launches, and you need to choose ‘Search automatically for drivers’.
- The system will automatically update to the new version if an update is available.
- Ensure you reboot your Lenovo device when the update is completed and see if it fixes the Wi-Fi problem.
Reset Power Management Settings
You can also try resetting the settings on the Power Management page to see if that can fix your Lenovo W-Fi settings. A few steps are similar to the previous fix. Here they are:
- Press the Windows key and the ‘x’ key simultaneously and click Device Manager on the menu. Alternatively, you can right-click on the Windows icon on the bottom-left of the computer screen to view the same menu.
- Double-click on the Network adapters on the Device Manager page, and you will see a list of adapters.
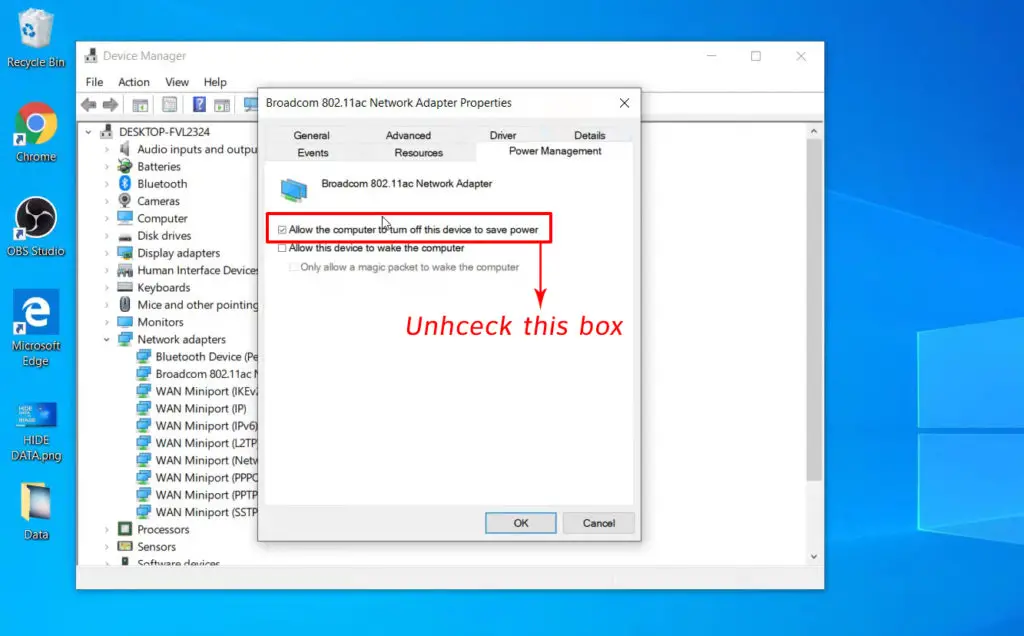
- Choose the Wi-Fi network adapter and click on ‘Properties’.
- On the Properties page, click on Power Management, and you can see the option that says ‘Allow the computer to turn off the device to save power’. See if the box is checked. If it is, uncheck it and press ‘Ok’ to confirm the change.
This process should return the full power setup on your Lenovo, and you can view Wi-Fi settings on Windows.

Restart Wi-Fi Network with a ‘Forget’ Function
Restarting is one of the best solutions when you talk about the internet and the devices used. The internet connection deals with unstable processes, especially when you’re using wireless Wi-Fi. It could result in leaving some bugs in the software, and restarting the program or devices seems to be the right step to remove the bugs.
Here’s what you need to do to restart your Wi-Fi network:
- Go to the network icon at the bottom-left of your computer screen and click on it.
- You will have a list of strong Wi-Fi networks adjacent to your Lenovo laptop. Click on your desired Wi-Fi, and there should be an option called ‘Forget’. Click on ‘Forget’ so that your computer will not automatically connect to this network.
- Now search for that network again, and Windows 10 will ask for a password to reconnect.
The process may eliminate some bugs, and you should get a clean and fresh Wi-Fi network.
Run the Troubleshooter
Window 10 has a troubleshooter tool that you can use to fix various issues and problems on your Lenovo computer. You don’t have to be an IT expert to run it. A simple DIY troubleshooting could fix your Lenovo’s problem with Wi-Fi settings. These are the steps:
- Go to the Settings page. There are two ways to do it. Firstly, click on <Start> and click on the settings icon. Secondly, press the Windows key and the ‘i’ key together, and you’re on the Settings page already.
- Choose Update & Security.
- From the menu on the left, select Troubleshoot, and follow with the Additional troubleshooters.
- Select Incoming Connections and press the button ‘Run the troubleshooter’ when it appears on the screen.
The troubleshooter will run, find, and remove faults automatically. It could fix some Wi-Fi issues on your Lenovo.
Conclusion
Before calling up for help, there are various things you can check and try to fix the issue in case your Lenovo Wi-Fi is not working in Windows 10. With a little bit of DIY skills, you should be able to follow the simple steps that we have laid down for you. One of these methods will probably fix the problem with your Lenovo device.

Hey, I’m Jeremy Clifford. I hold a bachelor’s degree in information systems, and I’m a certified network specialist. I worked for several internet providers in LA, San Francisco, Sacramento, and Seattle over the past 21 years.
I worked as a customer service operator, field technician, network engineer, and network specialist. During my career in networking, I’ve come across numerous modems, gateways, routers, and other networking hardware. I’ve installed network equipment, fixed it, designed and administrated networks, etc.
Networking is my passion, and I’m eager to share everything I know with you. On this website, you can read my modem and router reviews, as well as various how-to guides designed to help you solve your network problems. I want to liberate you from the fear that most users feel when they have to deal with modem and router settings.
My favorite free-time activities are gaming, movie-watching, and cooking. I also enjoy fishing, although I’m not good at it. What I’m good at is annoying David when we are fishing together. Apparently, you’re not supposed to talk or laugh while fishing – it scares the fishes.
