Staying connected with our friends and family is much easier today thanks to wireless networks. However, there is also a certain risk when we are using these networks. If the network isn’t encrypted, anyone who is within the wireless signal range can access the network and also our personal information and data.
In this article, we are going to show you how to encrypt your wireless network using WPA2 encryption. This will help us stay connected with our friends and family, but we won’t have to worry about the safety of our personal files and information.
CONTENTS
What Is Wireless Encryption?
Wireless encryption practically scrambles the information sent through our network. This means that it practically transforms readable data into an unreadable format so the data is practically useless to anyone who doesn’t have the encryption key.
Encrypting your wireless network is an extremely important step if you want to protect your home or office network from unauthorized access. The good thing though, is that encrypting your wireless network is a relatively simple and straightforward process. You can encrypt your network by changing a few settings in the router’s admin dashboard.
It is recommended to use the WPA2 encryption or even better the latest WPA3. Both types of encryption will protect your network and information but let’s say that WPA2 is more compatible with the devices we use today. Some devices still don’t support WPA3 and that may cause some issues.
Why Should You Encrypt Your Wireless Network?
To keep it simple, you should encrypt your wireless network in order to protect your personal files and information. If you leave the wireless network open, or unencrypted, anyone within the wireless signal range can connect to your network. And this is something we have to avoid.
Although most people will just use your bandwidth, ruining your wireless network performance and speed, they can also perform some illegal activities that can really cause you some legal trouble. On top of everything, they can access and steal your personal files and data, find out your bank account login details, and much more.
How To Encrypt Your Wireless Network ?
As we have already mentioned you can encrypt your wireless network from the router’s admin dashboard. So, here are the steps you need to take in order to do this properly.
Take your device (laptop or desktop computer, tablet or iPhone or Android phone) and connect it to the network. Depending on the device you can either connect over WiFi or simply plug in the network cable. In case your network is not encrypted you simply need to click on the network name, a WiFi password is not needed in that case.
After you connect the device, check the router and find the label that is usually located on the router. This label has all the admin login details printed on it. There you should find the default router IP address, and the default admin username and password.
In case you can’t find the label, check the user manual or find the router IP address by yourself. As for the admin username and password, you can either search our website and find how to login to your router or try different combinations of the following usernames and passwords:
Common default usernames: admin, Admin, user, root, administrator
Common admin passwords: password, user, admin, 1234 or just leave the field blank. Some router manufacturers set the serial number of the router or its MAC address as the admin password, so keep this in mind as well.
Now launch the web browser on your device and enter the router’s IP address in the browser’s URL bar. If the IP address is correct, you will be asked to enter the admin username and password when you hit the Enter or Go button.
Enter the admin login details and again, if they are correct, you will see the router’s admin dashboard. Here you can find various configuration settings that can help you secure and maintain your network, control the time your kids spend online, set up port forwarding if you are into gaming, and so on.
At this point, we want to find the Wireless Security section. You shouldn’t have any problems finding it, but depending on the router brand you should look for Wireless Setup, Security, Wireless Security, and similar.
Now find the Authentication Method or Security Mode section. In most cases, you will see a drop-down list here or you will have the option to check the radio button next to the desired encryption type.
From the drop-down list, you should choose WPA2-PSK [AES], WPA2 Personal, or WPA/WPA2-Personal (PSK).
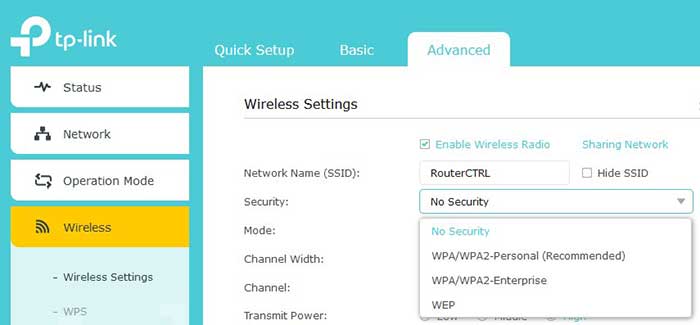
After that select AES where applicable. AES stands for Advanced Encryption Standard and represents the Wi-Fi authorized strong encryption standard.
And in the end, there is the Passphrase, Pre-shared Key (PSK), or WPA Pre-Shared Key field. Here you should type the wireless password. It is important to set up a strong and hard-to-guess WiFi password, but at the same time make it memorable. You definitely don’t want to look for a piece of paper whenever you want to share your WiFi password with your guests.
Now click on the Save or Apply button and your network will be protected.
And that’s it. We hope we didn’t make it too complicated and that you have managed to encrypt your wireless network. From now on, only the people who have your WiFi password will be able to connect to your network.
Recommended reading:
- How to Stop Hackers from Invading Your Network? (Protect Your Network Against Hackers)
- Can Someone on the Same Wi-Fi See Your History?
- How to Share a Wi-Fi Password From iPhone to iPhone? (Step-by-Step Guide)
Tips For Keeping Your Wireless Network Secure
Although the wireless network encryption is a pretty good layer of security, it still doesn’t make your wireless network completely secure. This is why you need to check these additional steps you can take to make your wireless network more secure. So, let’s go step by step.
Change The Default Router Admin Password
The router admin password grants us access to the router settings. Some routers will let you change both the admin username and the password, but in most cases, you can change only the admin password.
As you could see, the default admin passwords we have mentioned above are pretty simple and easy to guess. This is why we need to change it. If someone who is connected to our network wants to access the router settings for some reason, it wouldn’t be too complicated to find the router IP and default login details. Once he or she gains access to the router admin dashboard anything can happen. To prevent this, we need to change the admin password.
After you log in to your wireless router settings, you can find the admin password in the System & Features, System, or Management Tool section. If the menu expands, look for Password, Admin Password, Change password.
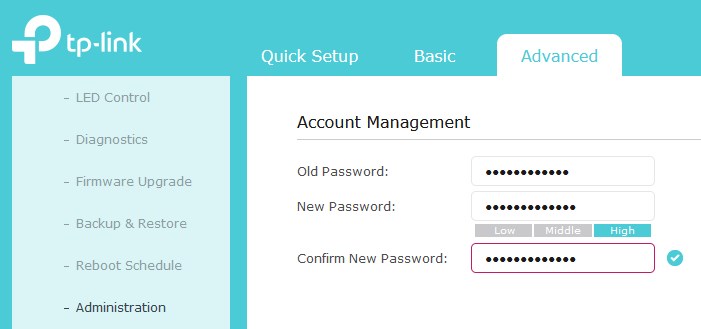
After you reach this page, in most cases, you will have to enter the old admin password first. After that, you will have to enter the new password, and also type it once again just in case you have made a typing error the first time. Please don’t copy/paste the admin password, because it is possible that you have mistyped it the first time.
If that happens you won’t be able to login with the password you think you have typed and you will have to reset the router to factory settings and then login with the default password.
Change The Wifi Password From Time To Time
This is just a recommendation. These days we share our wireless password too much. Practically anyone who comes to visit us asks for the WiFi password first. This puts your wireless network at risk and because of that, we recommend changing the wireless password every two months.
Also, whenever you change the wireless password always make sure the new one is equally strong and unique as the previous one. Although the recommended wireless password length is 8 characters, always add a few more. There is no need to go above 12 characters.
Disable Remote Management

The Remote Administration, Remote management, or Remote Access is a feature that lets you access the wireless router settings from any device from anywhere. Generally, routers that have this option enabled are pretty much vulnerable.
In order to disable this feature, you have to login to your wireless router first. The remote management feature can be usually found in the Administration section. It is recommended to keep it disabled unless you are actively using it.
Disable WPS
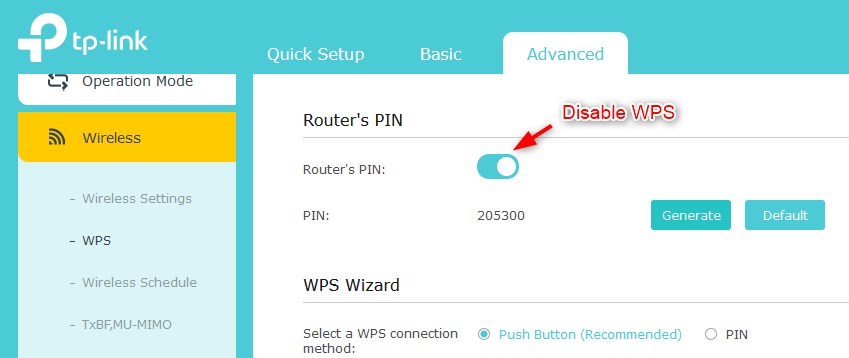
WPS or Wi-Fi Protected Setup is supported by almost all wireless routers today. This feature is used to connect a device to the network without the need to enter the WiFi password. Although it is a pretty handy way to connect specific devices like printers to your network, it is also a security risk for your network.
Because of that, it is recommended to disable this feature. In simple terms, if your router is physically accessible then anyone can press the WPS button and connect its WPS-enabled device to your network without your permission. You really want to prevent this from happening.
Set Up A Guest Network
Setting up a separate network for your guests and visitors is called a Guest WiFi network. It is not that difficult to set up one, you can follow our guide on how to set up a Guest WiFi, but it definitely increases the security of your primary network.
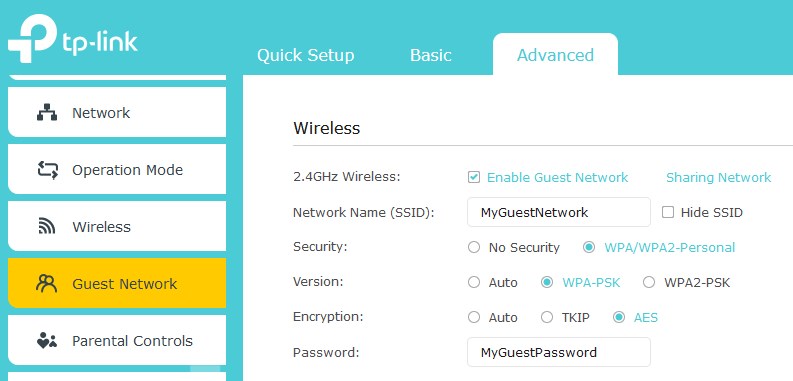
The Guest WiFi network is a separate network from your primary network. When you share your WiFi password with someone, if their device is infected it can infect all the devices within the network. Also, if someone has access to your primary network, he or she can access your personal files and information stored on other devices. The Guest WiFi network prevents this from happening.
Automatically Log Out As Administrator
When you access your router admin dashboard and you are done modifying the settings, it is recommended to logout. In case you forget to do it, there is an Auto Logout option that you need to enable.
By default, some routers set this time interval to 30 minutes of inactivity. We recommend lowering it to 3-5 minutes. So, if you leave the computer the system will log you out after this time.
Update The Router Firmware Regularly
New wireless router firmware versions are released every now and then. Some ISPs push these automatic firmware upgrades and the user doesn’t have to deal with that. But there are cases where this doesn’t happen and the router firmware gets old. This means it isn’t protected from the latest online threats and vulnerabilities.
So, upgrading the router firmware is important and something you should do whenever there is a new firmware version available. The process is pretty simple, and you won’t have problems finding the Firmware Upgrade option. However, it is important to know that once the firmware upgrade process begins you mustn’t disrupt it in any way.
This means you mustn’t turn off the router, open other tabs in the browser, or continue surfing the internet. This may corrupt the router firmware and make the firmware upgrade stuck at any point. As a result, your router may become unusable as well as the network in general.
Get A New Router
And finally, some old routers won’t offer you WPA2 encryption even after you upgrade the firmware to the latest version. In that case, we strongly recommend you replace your current wireless router. The new router will definitely support WPA2 encryption, and maybe even WPA3.
Conclusion
This article has explained how to encrypt your wireless network in order to keep your data safe. While encryption is not a 100% guarantee of security, it is a good way to protect yourself from unwanted access.
In addition to encryption, there are other steps you can take to secure your wireless network. We recommend going through the recommendations presented in this article and applying the ones you like or almost all of them.

Hey, I’m David. I’ve been working as a wireless network engineer and a network administrator for 15 years. During my studies, I also worked as an ISP field technician – that’s when I met Jeremy.
I hold a bachelor’s degree in network engineering and a master’s degree in computer science and engineering. I’m also a Cisco-certified service provider.
In my professional career, I worked for router/modem manufacturers and internet providers. I like to think that I’m good at explaining network-related issues in simple terms. That’s exactly what I’m doing on this website – I’m making simple and easy-to-follow guides on how to install, set up, and troubleshoot your networking hardware. I also review new network equipment – modems, gateways, switches, routers, extenders, mesh systems, cables, etc.
My goal is to help regular users with their everyday network issues, educate them, and make them less scared of their equipment. In my articles, you can find tips on what to look for when buying new networking hardware, and how to adjust your network settings to get the most out of your wi-fi.
Since my work is closely related to computers, servers, and other network equipment, I like to spend most of my spare time outdoors. When I want to blow off some steam, I like to ride my bike. I also love hiking and swimming. When I need to calm down and clear my mind, my go-to activity is fishing.
